Boom Collision Audio#
Overview#

The NVIDIA Omniverse™ Boom (omni.audio.boom) Extension adds audio material support to Kit Apps. With it, you can author audio materials on top of physics materials. These audio materials are used to play sounds based on simulation events, such as an impact, a roll, or a slide, or custom, script-based events with user-defined event names.
Interface#
The Boom window is divided into panels described in the following subsections.
Debug Settings#
With Debug Settings, you control the debug rendering features of the system.

Control |
Description |
|---|---|
Debug Display |
Toggles debug rendering on/off. Colored spheres are drawn based on the type and magnitude of the event.
|
Show Suppressed Events |
Controls if events that were filtered out by containing events are rendered in black. This is off, by default, to prevent cluttering, but it can be useful to see how many events are attempting to play. |
Audio Material Definitions#
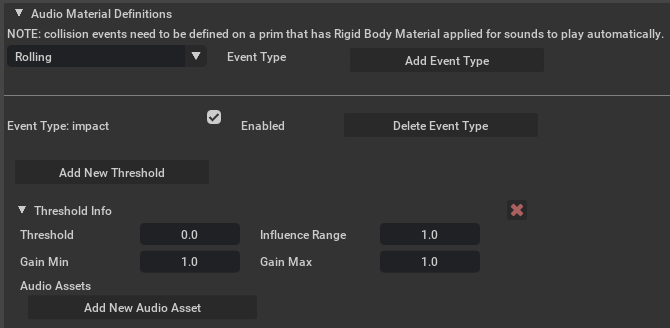
With Audio Material Definitions, you define the audio material and its associated events.

Control |
Effect |
|---|---|
Add Event Type |
Defines a new event type for the audio material.
|
Enabled |
Controls if events of the given type will be generated during simulation. |
Delete Event Type |
Deletes the defined event type from the selected material. |
Add New Threshold |
Creates a new threshold group for the associated event type. |
Threshold |
The lower bound of the threshold group. If there is a larger group defined, that is used as the upper bound. Units are based on the associated event.
Use the “X” to remove the entire threshold from the event type. WARNING: This is action cannot be undone. |
Influence Range |
How large (in meters) the initial influence range for the event is. Events of the same type that are fully-contained won’t play. It decays over time. |
Gain Min |
The gain value to use at the low end of the threshold range.
|
Gain Max |
The gain value to use at the high end of the threshold range. Linear interpolation is used between min and max.
|
Audio Assets |
0 or more asset refs to audio clips. One will be picked to play at random when an event of that threshold range is triggered.
|
Add New Audio Asset |
Opens a file dialog to select asset(s) to add to the threshold group. Use multi-select to add more than one asset. |
Demo Scenes#
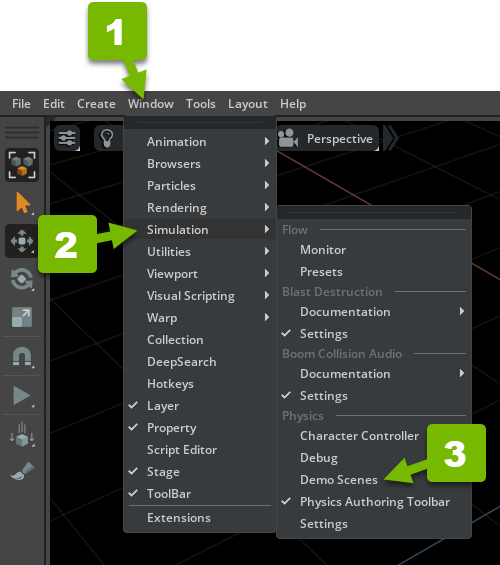
Example demo scenes can be accessed through the physics demo scenes menu option (Window > Simulation > Demo Scenes). This will enable a Physics Demo Scenes window, which has a Boom Samples section.

Tutorials#
Basic Setup Tutorial#
Step-by-step Walkthrough#
In this tutorial, you learn how to set up a simple scene with collision-based audio.
First, enable the Boom extension (if it isn’t enabled already):
Navigate to Window > Extensions.
Enable the Boom extension.
You can check Autoload if you’ll be working with Boom frequently and don’t want to enable it every time you load the application.
Make sure it says “UP TO DATE” at the top of the extension details. If it doesn’t, update to the latest release of the extension.
Make sure there is something for the object to interact with:
Navigate to Create > Physics > Physics Scene.
And Create > Physics > Ground Plane.
Next, create a prim to interact with:
Navigate to Create > Mesh or Create > Shape, and pick a primitive type to create (Cube, Sphere, etc).
Alternatively, you can load a mesh from another USD source.
Position the mesh above the plane.
Set up the mesh’s physics properties.
Right-click the mesh, and navigate to Add > Physics > Rigid Body with Colliders Preset to make it dynamic and collidable.
Right-click the mesh again, and navigate to Add > Physics > Contact Reporter if you want the system to auto-generate the simulation-based events.
Make sure the Contact Report Threshold is low enough to generate contact events for the body. The default of 100 should be fine unless the mesh is very small.
Only one object in a collision event needs to have the Contact Reporter set for sounds to play for both sides, but both having it won’t cause any problems.
The simulation events depend on the physics material. That can be applied in one of two ways:
Assign a render material that has a physics material with it under Materials on selected models in the Property panel.
Right click on a render material and select Add > Physics > Rigid Body Material to create add physics properties to it.
Set the physics material directly under Physics > Physics materials on selected models in the Property panel, this one takes priority if both are set.
Now set up the audio material:
The audio material needs to live on the same prim as the physics material.
Select the prim that the physics material is defined on, and add the desired event type(s) to it via the Boom panel to define the audio material
Or, create the audio material in another scene and reference it (this method is useful if you want to create a library of audio materials in a single file):
Create a Scope prim in another file, and add the event type(s) you want to it.
Use Add > Reference on the physics material in the original file to point at it.
Use the Prim Path field of the reference to target a single prim in the reference file.
Define as many threshold groups as you want.
We recommend that you have the minimum attenuation for the lowest threshold group start at 0 so bodies settling don’t spam sounds.
If you only have one set of sounds that you want to play, creating two threshold groups and adding the same sounds to both is useful in allowing the sounds to ramp in over the first range and play at full volume above the second threshold.
If multiple audio assets are added to a threshold group, one will be picked at random to play when triggered by contact.
Repeat for all event types that you want to have play audio clips.
It is not required to fill out all event types for an audio material to be valid
Creating complex sounds from interactions of multiple materials:
Unique material pair sounds are created by combining audio materials from both sides of a contact event.
Audio assets should be authored with as little audio contribution from external materials as possible.
Try the “Simple Example” demo to hear how sounds are combined based on materials involved in the contact.
You can change the material on the box to hear how the sounds change when interacting with the two ground tiles.
Note
Run the simulation (by pressing Play), the rigid body falls to the ground and generates sounds from contact events. Use Shift + Left Mouse Button to toss the body to generate impact events or drag the body to generate sliding and rolling events.