Warp#
Overview#

NVIDIA Warp is a Python framework for writing high-performance simulation and graphics code in Omniverse. Warp provides an easy way for Python coders to write kernel-based programs and benefit from GPU acceleration in Omniverse and OmniGraph.
NVIDIA’s Omniverse developers are using Warp to help create new GPU-accelerated 3D simulation workflows and dynamic content today. Some of the key benefits include simulation performance on-par with native code and improved developer productivity thanks to fast iteration times.
In Warp, kernels are defined in Python syntax and JIT compiled to C++/CUDA at runtime. Users can hot-reload kernels directly from within Python and leverage rich high-level data structures and algorithms to build real-time simulations.
Installation#
To get started with Warp in Omniverse, users should enable one of the Warp extensions from the extension registry (note that the versions may differ from the image):

The omni.warp.core extension installs Warp into the Omniverse Application’s Python environment, which allows users to import the module in their scripts and nodes.
Once enabled, users should be able to open the Script Editor window and execute the following code successfully:
import warp as wp

print(wp.__version__)
The omni.warp extension provides a collection of OmniGraph nodes and sample scenes demonstrating uses of Warp in OmniGraph.
Enabling the omni.warp extension automatically enables the omni.warp.core extension.
After enabling omni.warp, the samples can be found in the Examples Browser.
If you do not see an Examples tab in the UI, you can show it by toggling the Window > Browsers > Examples menu entry:
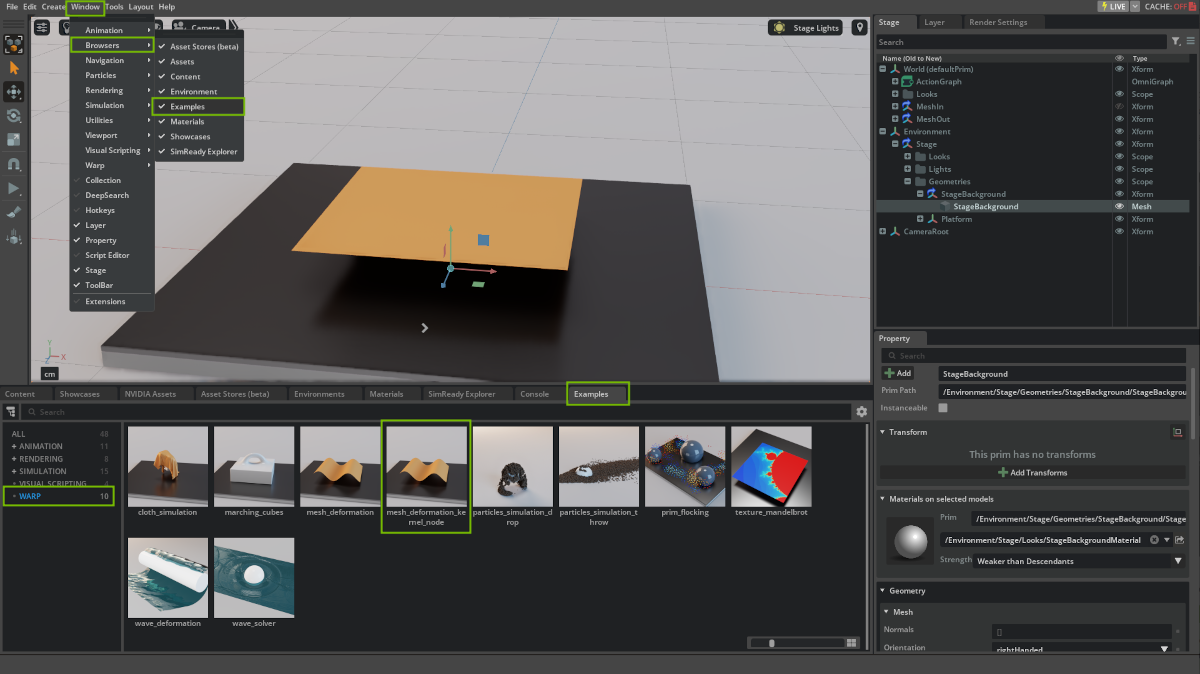
Double-click on an example to load the scene. Press the Play button (or hit SPACEBAR) to run the scene.
Note
A confirmation dialog will pop up when first opening a scene containing Warp Kernel Nodes as there are no limitations on what code may be executed by these nodes. Please do not run graphs containing Warp Kernel Nodes unless you trust the content author.
Defining Warp Kernels#
Kernels in Warp are defined using a @wp.kernel decorator around user Python functions.
For example, a simple function to deform a mesh according to a sine wave could be defined as follows:
@wp.kernel
def compute(
    points_in: wp.array(dtype=wp.vec3),
    points_out: wp.array(dtype=wp.vec3),
    time: float,
):
    # Get thread id.
    tid = wp.tid()

    # Read input point position.
    pos = points_in[tid]

    # Sine-wave deformation.
    displacement = wp.vec3(0.0, wp.sin(time + pos[0] * 0.1) * 10.0, 0.0)

    # Write output point position.
    points_out[tid] = pos + displacement
Using Warp in OmniGraph#
One of the main uses for Warp in Omniverse is as a convenient and productive way to define GPU OmniGraph nodes in Python.
There are several ways to execute Warp code in OmniGraph:
Create a custom OmniGraph node in Python that imports the Warp module.
Add a Script Node. to the Action Graph and import the Warp module in the script.
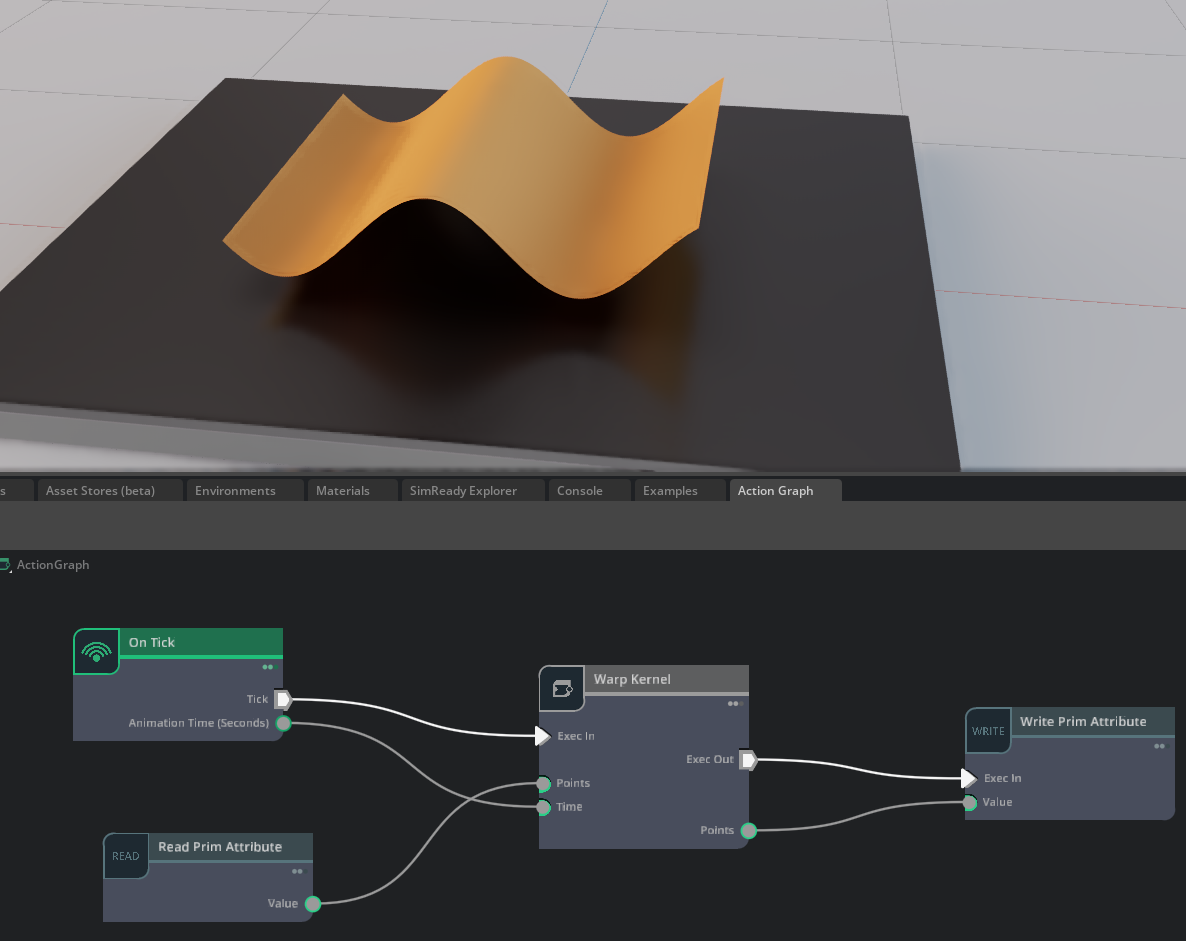
Add Warp Kernel Nodes to the Action Graph (requires enabling the
omni.warpextension). Each Warp Kernel Node executes a single, user-defined Warp kernel, and multiple Warp kernels can be run in parallel or in serial depending on the OmniGraph layout.
Below, we show the source for a Warp Kernel Node that deforms a set of mesh points using the previous mesh-deformation kernel and outputs the result:
import warp as wp

@wp.kernel
def compute(inputs: Inputs, outputs: Outputs):
    tid = wp.tid()

    pos = inputs.points[tid]
    displacement = wp.vec3(0.0, wp.sin(inputs.time + pos[0] * 0.1) * 10.0, 0.0)
    outputs.points[tid] = pos + displacement
On first launch, the compute function will be JIT compiled to a native CUDA kernel and executed on the GPU.
We can deform a USD mesh primitive by wiring it up to the corresponding Points input of our Warp Kernel Node:
This scene and the rest of the Warp samples are stored in USD format and can be found along with their assets
by opening a file browser using the menu entry Window > Warp > Sample Scenes.
Furthermore, the source code for all the Warp nodes used in the samples can be found in the omni.warp extension
directory inside omni.warp/omni/warp/nodes/_impl. A shortcut to this location can also be found in the
Window > Warp menu.
FAQ#
How to Load a Different Version of Warp?#
Each Kit application ships with a specific version of the Warp extensions, and by default, only that version is available. However, you can enable newer or older versions of Warp by adding the public extension registries from other major Kit releases.
For example, to use the Warp extensions from Kit 107.X while running Kit 106.X:
Launch Kit and open the Extensions window from the Windows > Extensions menu.
Click the hamburger icon at the top of the Extensions window and select Settings.
In the Extension Registries section, click the plus icon to add a new registry.
For the URL, enter https://ovextensionsprod.blob.core.windows.net/exts/kit/prod/107/shared for Kit 107. Replace 107 with the target Kit major version.
Click the hamburger icon at the top of the Extensions window again and select Resync Registry.
Find the omni.warp.core extension in the list, click the hamburger icon near the extension’s name to see all available versions, and note the specific version number you want to load.
Relaunch Kit from the command line, using the –enable flag to specify the version for each extension. For example: kit –enable –enable omni.warp.core-X.Y.Z. If omni.warp is also desired, a compatible version must also be enabled using –enable omni.warp-X.Y.Z.
See the [omni.kit.registry.nucleus’s documentation](https://docs.omniverse.nvidia.com/kit/docs/omni.kit.registry.nucleus/latest/Overview.html#basic-principle) for alternative methods to set the registry.
If using IsaacLab, the –enable flags need to be passed using the dedicated kit_flags: isaaclab.sh -p script_to_run.py –kit_args “–enable omni.warp.core-X.Y.Z”.
Further Reading#
Please see the following external references for more background and the full documentation of the Warp SDK: