Audio#
Audio in NVIDIA Omniverse™ Kit based apps allows for more interactivity in your USD stage. Omniverse USD Composer’s audio system provides both spatial and non-spatial audio support. Sounds can be triggered at a specific time on the animation timeline, or triggered as needed through python scripts. There are two USD prims that are used to define a stage’s audio - a ‘sound’ and a ‘listener’ prim. Sound prims behave as emitters for sounds and can be either ‘spatial’ or ‘non-spatial’. A listener prim is necessary for spatial audio to give a point in space where the audio is intended to be heard from. A listener does not affect non-spatial sounds.
Audio Output#
When using audio in Omniverse USD Composer, there are a few ways to control whether, where, and how loud the audio output works:
Control the device the audio output is routed to in the Audio Devices preferences panel. This allows the user to choose which device audio output will go to. Changing the output device will immediately move the audio playback to the new device for all playback. By default, the system’s default media output device will be used. Note that if the system’s default device changes, the app will not automatically change devices until a it is launched again (though this behavior may change in the future).
Control the overall volume levels in the app with the Volume Levels preferences panel. This allows the master volume, spatial audio volume, and non-spatial audio volume levels to be configured independently.
Enable or disable audio playback on the fly in the current stage. This can be done by opening up the playback filters menu attached to the “Play” button next to the main viewport. The menu is displayed by long-clicking on the “Play” button. To toggle audio on and off, even while a stage simulation is playing, simply choose the “Audio” setting in the filter menu.
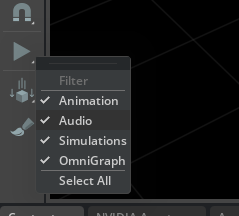
Disable audio completely by launching the app using the
--no-audiocommand line argument. If this is used, all audio functionality will be disabled and cannot be enabled again until the app is launched again without that argument.
Speaker Layouts and Spatial Audio#
A speaker layout is a way of describing the number and positioning of speakers in real world physical space so that a scene can be accurately represented in spatial audio simulations. There are several standard speaker layouts used in home theater and desktop computer setups. Some of these standard layouts are described below.
The Omniverse USD Composer low-level audio system supports playback on audio devices with up to 64 channels (ie: individual speakers). However, the audio preferences currently only expose speaker layouts for the standard layouts up to 16 channels since no standard layouts are currently defined for more channels. Speaker layouts up to 8 channels (ue: 7.1 surround) has been tested on real hardware. The layouts with more channels are still experimental and have only been tested on recorded output and verified manually.
Omniverse USD Composer currently supports the speaker layouts described below. All of these layouts describe speakers that are located on a unit sphere centered at the [human] listener’s head. The hemispheres of the sphere are separated by the plane formed by the listener’s eyes and ears. Layouts are typically named by speaker groupings that include a set of one or more “main” speakers, an optional subwoofer channel (often denoted with ‘.1’ in names), and one or more optional extra planes of speakers. Each part of the name typically uses the number of speakers in the group separated by ‘.’. The optional extra speaker planes are typically parallel to the main speaker plane. The following standard layouts are supported:
Mono: only a single output channel. All output will be downmixed to a single audio channel. Spatial audio simulations will use volume attenuation effects, but will lose all directionality effects.
Stereo: front left and right output channels. The speakers in this layout are typically located at 90 (right) and 270 (left) degrees around the listener.
2.1 (stereo plus sub): the two main speakers are located in the same positions as with the stereo layout, but with the addition of a subwoofer channel located at the listener’s position.
Quad (front and back stereo speakers): this layout consists of four speakers located at 45 (front right), 135 (back right), 225 (back left), and 315 (front left) degrees around the listener.
4.1 (quad plus sub): the four main speakers are located in the same positions as with the quad layout, but with the addition of a subwoofer channel located at the listener’s position.
5.1 surround: this layout consists of five main speakers located at 315 (front left), 45 (front right), 0 (front center), 225 (back left), and 135 (back right) degrees, plus a subwoofer channel located at the listener’s position.
7.1 surround: this layout consists of seven main speakers located at 315 (front left), 45 (front right), 0 (front center), 270 (side left), and 90 (side right), 225 (back left), and 135 (back right) degrees, plus a subwoofer channel located at the listener’s position.
9.1 surround: this layout consists of nine main speakers located at 315 (front left), 45 (front right), 0 (front center), 270 (side left), 90 (side right), 225 (back left), 135 (back right), 300 (front left of center) and 60 (front right of center) degrees, plus a subwoofer channel located at the listener’s position.
7.1.4 surround (7.1 plus quad ceiling speakers): same as the 7.1 surround layout with the addition of a quad layout on the “ceiling” plane above the listener. Note that this speaker layout is still experimental.
9.1.4 surround (9.1 plus quad ceiling speakers): same as the 9.1 surround layout with the addition of a quad layout on the “ceiling” plane above the listener. Note that this speaker layout is still experimental.
9.1.6 surround (9.1 plus 6 ceiling speakers): same as the 9.1 surround layout with the addition of six speakers on the “ceiling” plane above the listener. The additional six channels are located at 315 (front top left), 45 (front top right), 270 (side top left), 90 (side top right), 225 (back top left), and 135 (back top right) degrees at an inclination of 45 degrees. Note that this speaker layout is still experimental.
Matching the speaker layout as closely as possible to the [real] physical speakers’ locations in space allows the spatial audio simulation to be more accurate. The simulated audio world will place virtual speakers around the listener object (ie: camera or listener prim depending on settings) and any output sent to those virtual speakers will be mapped to the corresponding real world speakers. Note that the simulation’s speaker layout does not need to match the real world speaker layout, but the best experience will be had when they do match. If there are more real world speakers than the selected layout uses, some speakers may just be silent or the output may be upmixed to the device’s speaker count (depends on how the device behaves). If there are fewer real world speakers, the final output will simply be downmixed to the device’s speaker count. As much directionality as possible will be preserved during any downmix. By default, Omniverse USD Composer will try to auto detect the audio device’s channel count and match that.
Audio Assets and Spatial Audio#
The audio system for Omniverse USD Composer supports audio assets up to 64 channels. For many file formats such as MP3, FLAC, Vorbis, etc, this many channels is not typically representable and is not a concern. However, other formats such as Opus and WAV support up to 255 channels. In these cases only assets with up to 64 channels may be loadable.
When using spatial audio, using mono assets is usually the best practice the single channel can be most readily spatialized for the output. Using stereo or higher assets for spatial audio sound prims may result in some unexpected downmixing of the asset and some data may be lost in the final output.
When using non-spatial audio, the asset will be played back as if it were being played through a media player app. The asset’s original channels will be mapped to the appropriate output speakers without modification. If the asset has more channels than the output speaker layout (ie: a 5.1 asset being played on a stereo device), the final output will be downmixed to the device’s speaker count. If the asset has fewer channels than the output (ie: a stereo asset being played on a 5.1 device), the result will only output to the corresponding speakers that match the layout (ie: front left and right speakers in this example).
Spatial and non-spatial sound prims may be used simultaneously in a USD stage. All non-spatial sounds will be treated as background tracks and will not be affected by the position and orientation of the listener. A sound prim can be switched from spatial to non-spatial mode using its “aural mode” property.
Sound Prims#
A sound prim represents an object in the world that produces sound. The sound prim can either be a spatial or non-spatial audio emitter. Spatial emitters have a position and orientation in 3D space and are used to simulate the distance from the listener. The sound emitter prims can be attached to other objects in the world so that they move around the world with them.
Creating Sound Prims#
There are several ways to create a new sound prim.
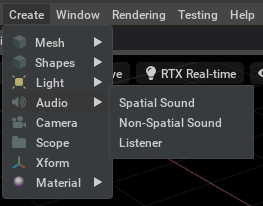
The ‘Create’ menu in the ‘Audio’ sub-menu,
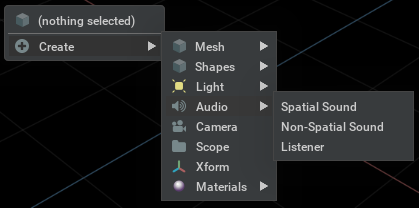
Right clicking in the viewport area, selecting ‘Create’, and using the ‘Audio’ sub-menu, or
by dragging a sound asset from the content browser window to the viewport.
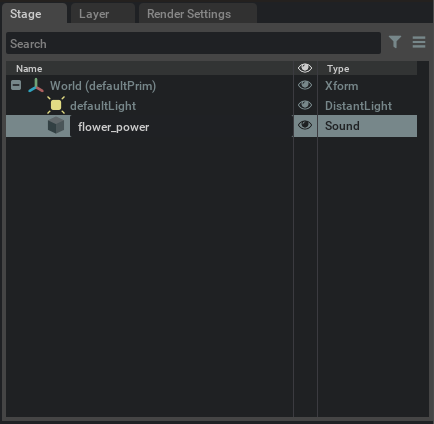
By default, a new sound prim in the stage will be given the same name as its asset. This can be changed at any time from the “Stage” window. A new sound prim that was created using either of the “Create” menus will be given the default name of “Sound” since its asset is unknown at creation time.
Each sound prim has the following properties that can affect its playback:
Sound Prim Properties |
Usage
|
|---|---|
Attenuation Range |
Defines the range over which the emitter’s sound falls off to silence. The first value is the range up to which there is no attenuation. The second value is the range at which the sound will fall off to silence. These values are measured in stage units. This defaults to the range <0, 100>.
|
Attenuation Type |
Defines how the sound should fall off to silence. This defines the mathematical model for the fall off calculation. This may be ‘inverse’ for an inverse square fall off, ‘linear’ for a linear fall off, and ‘linearSquare’ for a linear squared fall off. The default is ‘inverse’.
|
Aural Mode |
Defines how the sound emitter will behave in the world. This may be either ‘spatial’ or ‘non-spatial’. Spatial sounds will render such that they appear to be coming from a specific location or distance from the listener. A non-spatial sound will render as it was originally authored. Spatial sounds are usually used for in-world sound effects and non-spatial sounds are often used for background music or dialogue. The default is ‘spatial’.
|
Cone Angles |
Defines the angles for a cone where the sound can be heard from. This defines an ‘inner’ and ‘outer’ angle for the cone. The cone always sweeps out relative to the emitter’s front vector. When the line between the listener and this emitter is within the inner cone angle, the sound is not attenuated. When the line is outside of the outer cone angle, the emitter cannot be heard. When the line is between the two cone angles, the volume will be adjusted toward silence as it gets closer to the outer angle. When both these angles are 180 degrees, the emitter is omni-directional and the cones are disabled. The default is <180, 180>.
|
Cone Low-pass Filter |
Defines low-pass filter parameters to use for the inner and outer cone angles. These parameters are unit-less and indicate the relative amount of filtering that should be performed at each of the cone angles. Listener to emitter lines that land between the two cone angles will also have their low-pass filter values interpolated accordingly. A filter parameter of 0.0 indicates that no filtering should occur. A value of 1.0 indicates that maximum filtering should occur. This defaults to <0, 0>.
|
Cone Volumes |
Defines the volume levels to use at the inner and outer cone angles. These are normalized volume levels between 0.0 (silence) and 1.0 (full volume). Listener to emitter lines that land between the two cone angles will also have their volume value interpolated accordingly. This defaults to <1.0, 0.0>.
|
Enable Distance Delay |
Defines whether distance delay calculations will be performed for this sound. When enabled, this will delay the start of playing the sound according to the current speed of sound and the total distance between the listener and this emitter. This can be ‘on’, ‘off’, or ‘default’. When set to ‘default’, the global audio settings will control whether these calculations are performed or not. This defaults to ‘default’.
|
Enable Doppler |
Defines whether doppler shift calculations will be performed for this sound. When enabled, this will actively calculate and apply a doppler shift factor to the playing sound based on its current velocity relative to the listener. This can be ‘on’, ‘off’, or ‘default’. When set to ‘default’, the global audio settings will control whether these calculations are performed or not. This defaults to ‘default’.
|
Enable Interaural Delay |
Defines whether inter-aural time delay calculations will be performed for this sound. When enabled, this will actively calculate and apply a small time delay to the left and right side speakers depending on the location of this emitter relative to the listener. This can be ‘on’, ‘off’, or ‘default’. When set to ‘default’, the global audio settings will control whether these calculations are performed or not. This defaults to ‘default’.
|
End Time |
Defines the time index at which this sound should stop playing. This time index is relative to the animation timeline. If this is less than or equal to the “Start Time” value, this sound will play until its asset naturally ends. This defaults to 0.
|
File Path |
Defines the path to the asset to use for this sound. This may be an Omniverse path or a local path. The asset will be loaded as soon as possible and cached internally. This defaults to an empty string.
|
Gain |
Defines the volume level to play this sound at. This is a normalized linear volume level in the range <0.0, 1.0>. A value of 0.0 indicates silence. A value of 1.0 indicates full volume. This may also be larger than 1.0 to make the sound louder than it was originally authored at. This may also be negative to invert the sound. This defaults to 1.0.
|
Loop Count |
Defines the number of times to repeat this sound after it finishes naturally. The sound will always play at least once. This indicates the number of times it will repeat after that initial play through. This may be negative to indicate that the sound should loop infinitely. This defaults to 0.
|
Media Offset End |
Defines the end of the region of the sound to play. This is measured in video frames. This may be less than or equal to the ‘Media Offset Start’ value to indicate that the sound should play until its natural end. This defaults to 0.
|
Media Offset Start |
Defines the start of the region of the sound to play. This is measured in video frames. This may be 0 to indicate the start of the sound. This defaults to 0.
|
Priority |
Defines the relative priority level to use for this sound when deciding which sounds are the most important to play in the stage. This is ignored as long as their are fewer sounds playing than there are available sound processing voices. Once there are more playing sounds than voices, this value along with each sound’s effective volume are used to decide which sounds are most important to stay active in the stage. This is an arbitrary scale with 0 being the default priority and larger numbers meaning higher priority levels. Negative values indicate lower than default priority.
|
Start Time |
Defines the time index at which this sound should start playing. This time index is relative to the animation timeline using its same scale. This may be negative to indicate that this sound is only to be dynamically triggered through python scripts. This defaults to 0.
|
Time Scale |
Defines the rate to play back this sound at. This is a scaling factor where 1.0 indicates that the sound should be played back at its originally authored rate. A value greater than 1.0 will increase the playback speed and increase the pitch. A value less than 1.0 will decrease the playback speed and decrease the pitch. This defaults to 1.0.
|
Each of these prim properties can be adjusted through python scripts at runtime as needed. When modified through the python script, the changes will take effect immediately and affect all future instances of it. Some sounds may want to only be triggered based on interactive events. In these cases, they can still be added as part of the USD stage, but simply set their start time property to -1. These sounds will never be triggered as part of the animation timeline, but can instead be triggered as needed through the python script.
If a sound prim is made invisible, the output from that one prim will be muted in the stage. Making the prim visible again will unmute its audio. This is similar to the behavior seen with light prims - toggling the light prim’s visibility property turns the light on and off (ie: “mutes” the light).
The prim’s visibility property can be changed at any time, even during playback, and can be done at a per-prim level. The sound prim’s visibility state can be changed by:
Toggling its stage by clicking on the “eye” icon beside the prim in the “Stage” window.
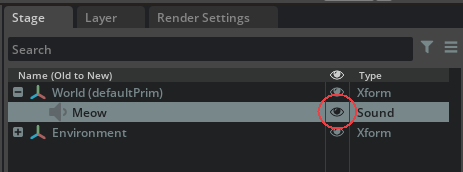
Setting the sound prim’s visibility property in python script code.
Listener Prims#
A listener represents the point in space in the virtual world from which spatial sounds are heard. Its position and orientation affect which sounds can be heard and at which volume levels they are heard. The listener’s velocity relative to each sound emitter is also used when calculating doppler shift factors.
The listener object can be an explicit object in the USD stage, or it can be implicit from the current camera. Each camera can have a listener attached to it. If a third person view is preferred instead, some situations may be better suited to having the listener attached to the third person character object. This will have the effect of hearing the world from that character’s perspective. As with sound emitters, a listener prim can be attached to another prim in the world so that it moves with the other prim.
A listener prim does not strictly need to be created in a USD stage if it is going to be implicitly attached to the active camera. However, if a listener prim is needed, one can be created by:
Using the ‘Create’ menu in the ‘Audio’ sub-menu.

Right clicking in the viewport area, selecting ‘Create’, and using the ‘Audio’ sub-menu.

By default, a new listener will be given the name “Listener”. This can be changed in the “Stage” window in the same manner as with renaming the sound prims.
Each listener prim has the following properties that can affect its playback:
Listener Prim Properties |
Usage
|
|---|---|
Cone Angles |
Defines the angles for a cone where the sound can be heard from. This defines an ‘inner’ and ‘outer’ angle for the cone. The cone always sweeps out relative to the emitter’s front vector. When the line between the listener and this emitter is within the inner cone angle, the sound is not attenuated. When the line is outside of the outer cone angle, the emitter cannot be heard. When the line is between the two cone angles, the volume will be adjusted toward silence as it gets closer to the outer angle. When both these angles are 180 degrees, the emitter is omni-directional and the cones are disabled. The default is <180, 180>.
|
Cone Low-pass Filter |
Defines low-pass filter parameters to use for the inner and outer cone angles. These parameters are unitless and indicate the relative amount of filtering that should be performed at each of the cone angles. Listener to emitter lines that land between the two cone angles will also have their low-pass filter values interpolated accordingly. A filter parameter of 0.0 indicates that no filtering should occur. A value of 1.0 indicates that maximum filtering should occur. This defaults to <0, 0>.
|
Cone Volumes |
Defines the volume levels to use at the inner and outer cone angles. These are normalized volume levels between 0.0 (silence) and 1.0 (full volume). Listener to emitter lines that land between the two cone angles will also have their volume value interpolated accordingly. This defaults to <1.0, 0.0>.
|
Orientation From View |
Defines whether the orientation of the listener is taken directly from the prim’s orientation or from the orientation of the camera. If this option is enabled, the orientation will be taken to match the active camera. If disabled, the orientation will come directly from the listener prim. This is useful for some third person situations - if the listener prim itself does a lot of rotating, the audio output could be very confusing and disorientating if it comes from the listener’s perspective. In this case, it might be more friendly to have the listener’s orientation come from the camera instead. This defaults to enabled.
|
The active listener for the stage is chosen through the Audio Settings menu described below. By default, the active camera will be the listener. If this is disabled, the active listener can be explicitly chosen. As with sounds prims, all properties of listener prims can be modified from the python scripts as well. This includes dynamically selecting the active listener prim.
Audio Player#
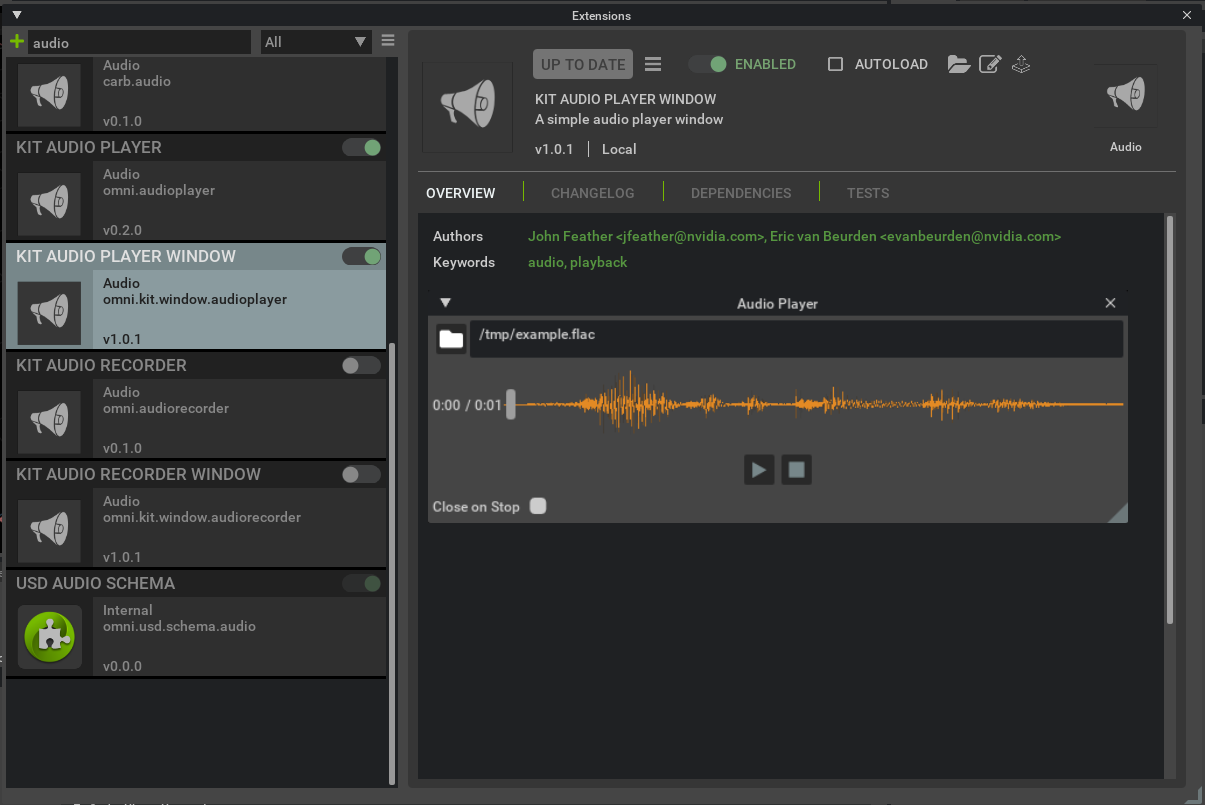
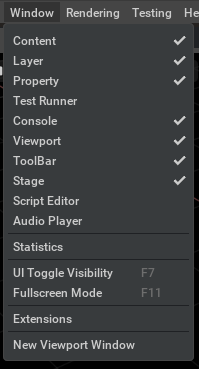
Unlike graphics assets such as textures, meshes, etc, audio assets cannot be visually previewed. To handle this, Create provides a simple audio player window that can be used to preview assets before adding them to the USD stage. The audio player window is provided as an extension in NVIDIA Omniverse™ Kit based apps. This can be enabled by opening the Extension Manager window (“Window” menu -> “Extensions”), searching for “audio player”, and enabling the “Audio Player Window” extension. This will also enable the required “Audio Player” extension.
Once its extension is enabled, the audio player can be accessed in one of two ways:
by selecting “Audio Player” from the “Window” menu, or
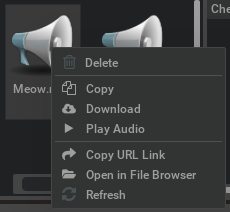
by choosing “Play Audio” from the right-click context menu of an audio asset in the Content Browser window.
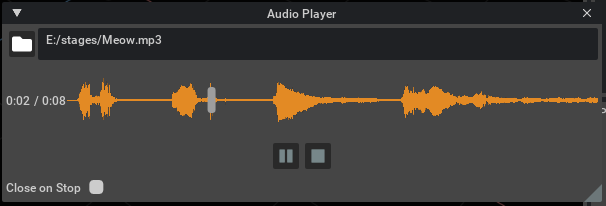
The audio player has a few simple controls on it:
Option |
Result |
|---|---|
Asset Name / Picker |
A new asset may be chosen by either typing in its path, or clicking on the file folder button to bring up an asset picker window. When a new asset path is given, the previous asset (if any) will stop playing and be unloaded. Assets from both local storage and Omniverse may be chosen. If an asset fails to load, a failure message will be displayed in red in the window.
|
Timeline |
Shows the progress of playing the sound asset. This includes the length and current position displayed in minutes and seconds. Clicking on the timeline or dragging the slider will reposition the play cursor to a different spot in the asset, but only when in ‘stopped’ mode.
|
Play/Pause |
The play/pause button will toggle between the two actions (Play / Pause) each time it is pressed (while an asset is loaded). When paused, playback will stop but playback position is kept. When un-paused, playback will resume from the same position it was last paused at.
|
Stop |
Stopping the playback will reset the current position back to the start of the asset.
|
Stage Audio Settings#
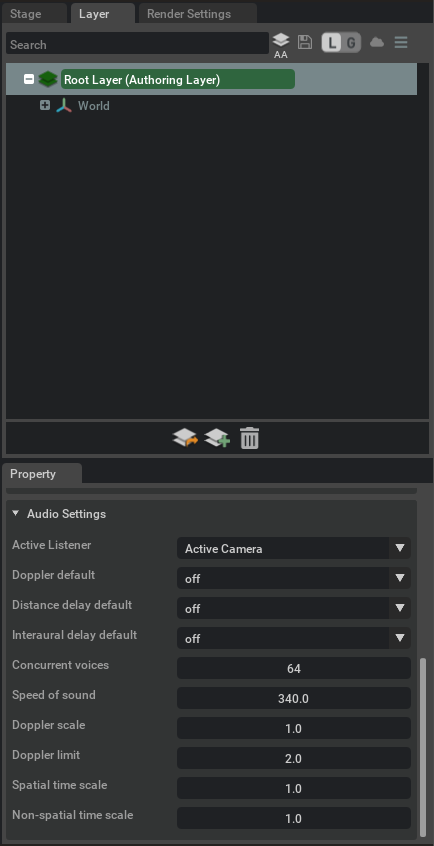
The audio settings window contains several audio settings values that are specific to the current USD stage. These are global settings for the stage that affect the audio behavior. These properties can be found in the “Layer” window by selecting the “Root Layer (Authoring Layer)” object. The audio settings will be at the bottom of the “Property” window below.
Audio Setting |
Usage
|
|---|---|
Active Listener |
A drop-down box that allows the active listener prim to be selected for the stage. The list of options will always include “Active Camera”, plus any other listener prims that exist in the stage. If “Active Camera” is selected, the listener’s position and orientation will always be taken from the position and orientation of the active camera in the stage. If a specific listener prim is selected, that prim will be used to derive the listener’s position in space. Its orientation will either come from the prim’s orientation or the active camera’s orientation depending on the value of that prim’s “Orientation From View” property. This value may be modified dynamically by a python script as well but the current value at any given time should still be reflected here. The default listener for a stage is always “Active Camera”.
|
Doppler Default |
The default global behavior for doppler effect calculations. This will affect all sound prims that choose the ‘default’ mode for their “Enable Doppler” property. This may be ‘on’ or ‘off’ to affect only the sound prims that use the ‘default’ mode. This may also be set to ‘forceOn’ or ‘forceOff’ to turn doppler calculations on or off for all spatial sound prims regardless of their “Enable Doppler” property. This defaults to ‘off’.
|
Distance Delay Default |
The default global behavior for distance delay calculations. This will affect all sound prims that choose the ‘default’ mode for their “Enable Distance Delay” property. This may be ‘on’ or ‘off’ to affect only the sound prims that use the ‘default’ mode. This may also be set to ‘forceOn’ or ‘forceOff’ to turn distance delay calculations on or off for all spatial sound prims regardless of their “Enable Distance Delay” property. This defaults to ‘off’.
|
Interaural Delay Default |
The default global behavior for interaural time delay calculations. This will affect all sound prims that choose the ‘default’ mode for their “Enable Interaural Delay” property. This may be ‘on’ or ‘off’ to affect only the sound prims that use the ‘default’ mode. This may also be set to ‘forceOn’ or ‘forceOff’ to turn interaural delay calculations on or off for all spatial sound prims regardless of their “Enable Interaural Delay” property. This defaults to ‘on’.
|
Concurrent Voices |
Defines the maximum number of sounds that can be played simultaneously. This can affect the overall processing requirements of the stage. This must be at least 1 and less than 4096. If more sounds than this are active in the scene at any given time, only the ones that are the loudest or marked as the highest priority will be audible in the stage. This can be set to an optimal value that balances processing needs and correctness for the stage through a process of trial and error. This defaults to 64.
|
Speed of Sound |
Defines the speed of sound setting for the stage. This affects doppler and distance delay calculations for the stage. This is always expressed in meters per second. This defaults to 340m/s.
|
Doppler Scale |
Defines a scaling value to exaggerate or reduce the effect of doppler shift calculations. A value of 1.0 means that the calculated doppler shift values should be unscaled. A value greater than 1.0 means that the effects of the doppler scale calculations should be exaggerated. A value less than 1.0 means that the effect of the doppler scale calculations should be reduced. Negative values are not allowed. This defaults to 1.0.
|
Doppler Limit |
Defines a limit for doppler shift factors. This helps to reduce unintentional audio corruption due to velocities larger than the speed of sound being used in the stage. This limit is a unit-less scaling factor that is non-linearly proportional to the speed of sound setting. For example, a value of 16.0 is approximately equivalent to a relative velocity of 95% the speed of sound. A value of 2.0 is approximately equivalent to 50% the speed of sound. This defaults to 2.0.
|
Spatial Time Scale |
Defines the global time scale value for all spatial sound prims. This is equivalent to changing the “Time Scale” property on all spatial sound prims, except that it only needs to be managed from one spot and it doesn’t change the individual time scale values of each sound prim. This can be used for time global dilation effects and the like. Defaults to 1.0.
|
Non-Spatial Time Scale |
Defines the global time scale value for all non-spatial sound prims. This is equivalent to changing the “Time Scale” property on all non-spatial sound prims, except that it only needs to be managed from one spot and it doesn’t change the individual time scale values of each sound prim. This can be used for time global dilation effects and the like. Defaults to 1.0.
|
