Scene Based Synthetic Dataset Generation#
This tutorial illustrates the process of generating synthetic datasets using the omni.replicator extension. The resulting data is stored offline (on disk), making it readily available for training deep neural networks. The examples can be executed within the Isaac Sim Python standalone environment. The example uses Isaac Sim and Replicator to create synthetic datasets offline (on disk) for the training of machine learning models.
In this tutorial you:
Utilize and set up external customizable config files (YAML/JSON) to adjust simulation and scenario parameters
Load custom environments
Spawn assets using the Isaac Sim API
Run randomized physics simulations
Register various Replicator randomization graphs
Create cameras and render products with the Replicator API
Use Replicator writers to save data to disk
Prerequisites#
Familiarity with the omni.replicator extension, including its annotators and writers.
Basic understanding of Isaac Sim’s Stage and World concepts, further explained in the Hello World tutorial.
Running simulations as Standalone Applications.
Familiarity with Replicator randomizers and OmniGraph for a better understanding of the randomization pipeline.
Scenario#
By default, the scenario is executed in a warehouse environment. Within this setting, a forklift is randomly placed in a designated area. Based on the forklift’s position, a pallet is placed in front of it at a randomized distance. Using Replicator’s scatter_2d randomization function with the collision check argument check_for_collisions set to True, the pallet is scattered with boxes, ensuring the boxes do not self-collide. The scatter graph node randomly scatters the boxes in each capture frame. Additionally, a traffic cone is randomly positioned at one of the bottom corners of the forklift’s oriented bounding box (OBB). Before the synthetic data generation (SDG) pipeline starts, a short physics simulation is executed, during which several boxes are dropped onto a pallet situated behind the forklift.
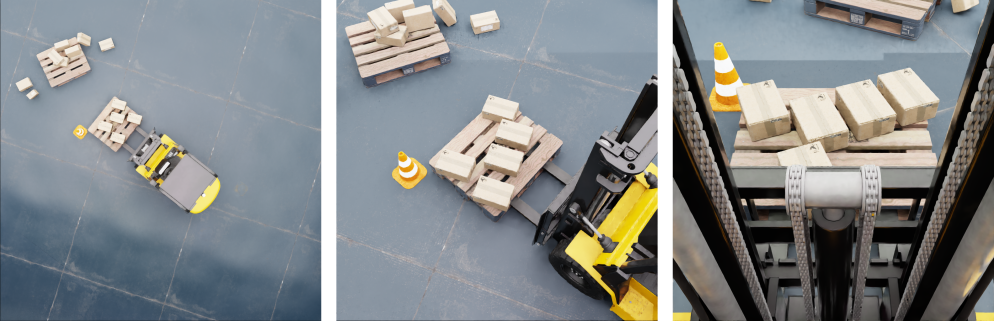
Three camera views are used for the synthetic data generation (SDG). The first (top_view_cam) offers a top-down view of the scenario (left), the second (pallet_cam) captures a randomized view of the boxes scattered on the pallet (center), and the third is overlooking the pallet from the driver’s place in the forklift using various heights (right).
The data is collected using Replicator writers, with the BasicWriter as the default choice. The writer’s config parameters are loaded form the writer_config entry and used to initialize the writer with annotators including rgb, semantic_segmentation, and bounding_box_3d. The data is stored in the output_dir folder, which by default is <working_dir>/_out_scene_based_sdg.
Getting Started#
The main script of the tutorial is located at <install_path>/standalone_examples/replicator/scene_based_sdg/scene_based_sdg.py and it is set to run as a standalone application. The default configurations are stored in the script itself in the form of a Python dictionary, there is no need to provide a config file.
To overwrite the default configuration parameters, you can provided custom config files as a command-line argument for the script by using --config <path/to/file.json/yaml>. Example config files are stored in scene_based_sdg/config/*. In the provided examples, the configuration files serve as templates to illustrate and showcase the configurability of the script.
Helper functions are located in the scene_based_sdg_utils.py file.
To generate a synthetic dataset, run the following command:
./python.sh standalone_examples/replicator/scene_based_sdg/scene_based_sdg.py
Config Scenarios#
The following provides details about the various config scenarios:
Without an explicit config file, the script uses the default parameters stored in the script itself. The default parameters are the following:
Built-in (default) Config
config = {
    "launch_config": {
        "renderer": "RayTracedLighting",
        "headless": False,
    },
    "resolution": [512, 512],
    "rt_subframes": 16,
    "num_frames": 20,
    "env_url": "/Isaac/Environments/Simple_Warehouse/full_warehouse.usd",
    "writer": "BasicWriter",
    "writer_config": {
        "output_dir": "_out_scene_based_sdg",
        "rgb": True,
        "bounding_box_2d_tight": True,
        "semantic_segmentation": True,
        "distance_to_image_plane": True,
        "bounding_box_3d": True,
        "occlusion": True,
    },
    "clear_previous_semantics": True,
    "forklift": {
        "url": "/Isaac/Props/Forklift/forklift.usd",
        "class": "Forklift",
    },
    "cone": {
        "url": "/Isaac/Environments/Simple_Warehouse/Props/S_TrafficCone.usd",
        "class": "TrafficCone",
    },
    "pallet": {
        "url": "/Isaac/Environments/Simple_Warehouse/Props/SM_PaletteA_01.usd",
        "class": "Pallet",
    },
    "cardbox": {
        "url": "/Isaac/Environments/Simple_Warehouse/Props/SM_CardBoxD_04.usd",
        "class": "Cardbox",
    },
    "close_app_after_run": True,
}
The following command runs the script with the default parameters:
./python.sh standalone_examples/replicator/scene_based_sdg/scene_based_sdg.py
Using the config_basic_writer.yaml config file explicitly chooses BasicWriter with the given writer_config configurations. It also changes the environment to /Isaac/Environments/Grid/default_environment.usd.
Custom YAML Config
launch_config:
    renderer: RayTracedLighting
    headless: false
resolution: [512, 512]
env_url: "/Isaac/Environments/Grid/default_environment.usd"
rt_subframes: 32
writer: BasicWriter
writer_config:
    output_dir: _out_basicwriter
    rgb: true
The following command runs the script with the custom parameters:
./python.sh standalone_examples/replicator/scene_based_sdg/scene_based_sdg.py \
    --config standalone_examples/replicator/scene_based_sdg/config/config_basic_writer.yaml
The config_default_writer.json uses the default writer (which is still the BasicWriter) and changes the writer_config values to rgb and instance_segmentation annotators.
Custom JSON Config
{
    "launch_config": {
        "renderer": "RayTracedLighting",
        "headless": false
    },
    "resolution": [512, 512],
    "writer_config": {
        "output_dir": "_out_defaultwriter",
        "rgb": true,
        "instance_segmentation": true
    }
}
The following command runs the script with the custom parameters:
./python.sh standalone_examples/replicator/scene_based_sdg/scene_based_sdg.py \
    --config standalone_examples/replicator/scene_based_sdg/config/config_default_writer.json
The config_kitti_writer.yaml config file uses KittiWriter with the given writer_config configurations.
Custom YAML Config using KittiWriter
launch_config:
    renderer: RayTracedLighting
    headless: true
resolution: [512, 512]
num_frames: 5
clear_previous_semantics: false
writer: KittiWriter
writer_config:
    output_dir: _out_kitti
    colorize_instance_segmentation: true
    mapping_dict:
        forklift: [11, 110, 223, 255]
        pallet: [211, 210, 223, 255]
The following command runs the script with the custom parameters:
./python.sh standalone_examples/replicator/scene_based_sdg/scene_based_sdg.py \
    --config standalone_examples/replicator/scene_based_sdg/config/config_kitti_writer.yaml
The config_coco_writer.yaml config file uses CocoWriter with the given writer_config configurations.
Custom YAML Config using CocoWriter
launch_config:
    renderer: RayTracedLighting
    headless: true
resolution: [512, 512]
num_frames: 5
clear_previous_semantics: true
writer: CocoWriter
writer_config:
    output_dir: _out_coco
    coco_categories:
        forklift:
            name: forklift
            id: 333
            supercategory: warehouse
            color: [211, 111, 211]
            isthing: 1
        pallet:
            name: pallet
            id: 313
            supercategory: warehouse
            color: [141, 111, 131]
            isthing: 1
The following command runs the script with the custom parameters:
./python.sh standalone_examples/replicator/scene_based_sdg/scene_based_sdg.py \
    --config standalone_examples/replicator/scene_based_sdg/config/config_coco_writer.yaml
Running as a SimulationApp#
The code for this tutorial is different from the default omni.replicator examples, which are usually executed using the script editor in the GUI. The provided script runs an instance of Isaac Sim as a Standalone Application. For this, the SimulationApp object needs to be created before importing any other dependencies (such as omni.replicator.core).
Isaac Sim as a Standalone Application
from isaacsim import SimulationApp

[..]

# Create the simulation app with the given launch_config
simulation_app = SimulationApp(launch_config=config["launch_config"])

# Late import of runtime modules (the SimulationApp needs to be created before loading the modules)
import omni.replicator.core as rep
import omni.usd

# Custom util functions for the example
import scene_based_sdg_utils
from omni.isaac.core.utils import prims
from omni.isaac.core.utils.rotations import euler_angles_to_quat
from omni.isaac.core.utils.stage import get_current_stage, open_stage
from omni.isaac.nucleus import get_assets_root_path
from pxr import Gf
Note
Omniverse related imports need to be included after the SimulationApp is created.
Loading the Environment#
The environment is a USD stage. As a first step, the stage is loaded using the helper function open_stage.
Use get_assets_root_path to get the path to the nucleus server and then provide the URL of the environment to the open_stage function.
The open_stage function returns a boolean value indicating whether the stage was successfully loaded or not. If the stage was not loaded successfully, the application is terminated.
Load the Environment
# Get server path
assets_root_path = get_assets_root_path()
if assets_root_path is None:
    carb.log_error("Could not get nucleus server path, closing application..")
    simulation_app.close()

# Open the given environment in a new stage
print(f"[scene_based_sdg] Loading Stage {config['env_url']}")
if not open_stage(assets_root_path + config["env_url"]):
    carb.log_error(f"Could not open stage{config['env_url']}, closing application..")
    simulation_app.close()
Creating the Cameras and the Writer#
The example provides two ways (Replicator and Isaac Sim API) of creating cameras rep.create.camera and prims.create_prim. prims.create_prim``is used as render products to generate the data. The created render products are attached to the built-in ``BasicWriter to collect the data from the selected annotators (rgb, semantic_segmentation, bounding_box_3d) and to write it to the given output path. Use rep.get.prim_at_path``to access ``driver_cam_prim wrapped in an OmniGraph node so that it can be randomized by each step of the randomization graph generated by Replicator.
The cameras used in the examples are created using Replicator (rep.create.camera), which is further used by render products to generate data.
Cameras
driver_cam = rep.create.camera(
    focus_distance=400.0, focal_length=24.0, clipping_range=(0.1, 10000000.0), name="DriverCam"
)

# Camera looking at the pallet
pallet_cam = rep.create.camera(name="PalletCam")

# Camera looking at the forklift from a top view with large min clipping to see the scene through the ceiling
top_view_cam = rep.create.camera(clipping_range=(6.0, 1000000.0), name="TopCam")
From the cameras, render products are created and disabled until the SDG pipeline starts to improve performance by avoiding unnecessary rendering. The output directory is set to the given path in the config file. If the path is relative, it is set relative to the current working directory. The script checks to see if the writer type is in the registry and initializes it with the given config parameters.
Writer and Render Products
# Create render products for the custom cameras and attach them to the writer
resolution = config.get("resolution", (512, 512))
forklift_rp = rep.create.render_product(top_view_cam, resolution, name="TopView")
driver_rp = rep.create.render_product(driver_cam, resolution, name="DriverView")
pallet_rp = rep.create.render_product(pallet_cam, resolution, name="PalletView")
# Disable the render products until SDG to improve perf by avoiding unnecessary rendering
rps = [forklift_rp, driver_rp, pallet_rp]
for rp in rps:
    rp.hydra_texture.set_updates_enabled(False)

# If output directory is relative, set it relative to the current working directory
if not os.path.isabs(config["writer_config"]["output_dir"]):
    config["writer_config"]["output_dir"] = os.path.join(os.getcwd(), config["writer_config"]["output_dir"])
print(f"[scene_based_sdg] Output directory={config['writer_config']['output_dir']}")


# Make sure the writer type is in the registry
writer_type = config.get("writer", "BasicWriter")
if writer_type not in rep.WriterRegistry.get_writers():
    carb.log_error(f"Writer type {writer_type} not found in the registry, closing application..")
    simulation_app.close()

# Get the writer from the registry and initialize it with the given config parameters
writer = rep.WriterRegistry.get(writer_type)
writer_kwargs = config["writer_config"]
print(f"[scene_based_sdg] Initializing {writer_type} with: {writer_kwargs}")
writer.initialize(**writer_kwargs)

# Attach writer to the render products
writer.attach(rps)
Domain Randomization#
The following snippet provides examples of various randomization possibilities using Isaac Sim and Replicator API. It starts by spawning a forklift using the Isaac Sim API to a randomly generated pose. It then uses the forklift pose to place a pallet in front of it withing the bounds of a random distance.
Isaac Sim API Randomization
# Spawn a new forklift at a random pose
forklift_prim = prims.create_prim(
    prim_path="/World/Forklift",
    position=(random.uniform(-20, -2), random.uniform(-1, 3), 0),
    orientation=euler_angles_to_quat([0, 0, random.uniform(0, math.pi)]),
    usd_path=assets_root_path + config["forklift"]["url"],
    semantic_label=config["forklift"]["class"],
)

# Spawn the pallet in front of the forklift with a random offset on the Y (pallet's forward) axis
forklift_tf = omni.usd.get_world_transform_matrix(forklift_prim)
pallet_offset_tf = Gf.Matrix4d().SetTranslate(Gf.Vec3d(0, random.uniform(-1.2, -1.8), 0))
pallet_pos_gf = (pallet_offset_tf * forklift_tf).ExtractTranslation()
forklift_quat_gf = forklift_tf.ExtractRotationQuat()
forklift_quat_xyzw = (forklift_quat_gf.GetReal(), *forklift_quat_gf.GetImaginary())

pallet_prim = prims.create_prim(
    prim_path="/World/Pallet",
    position=pallet_pos_gf,
    orientation=forklift_quat_xyzw,
    usd_path=assets_root_path + config["pallet"]["url"],
    semantic_label=config["pallet"]["class"],
)
Furthermore, using the Replicator API various randomizers are registered. It starts with a rep.randomizer.scatter_2d example, where boxes are randomly scattered on the surface of the pallet in front of the forklift. The randomizer is also randomizing the materials of the boxes using rep.randomizer.materials. The generated randomization graph is then registered using rep.randomizer.register.
Replicator Randomization Graph I
# Register the boxes and materials randomizer graph
def register_scatter_boxes(pallet_prim, assets_root_path, config):
    # Calculate the bounds of the prim to create a scatter plane of its size
    bb_cache = create_bbox_cache()
    bbox3d_gf = bb_cache.ComputeLocalBound(pallet_prim)
    prim_tf_gf = omni.usd.get_world_transform_matrix(pallet_prim)

    # Calculate the bounds of the prim
    bbox3d_gf.Transform(prim_tf_gf)
    range_size = bbox3d_gf.GetRange().GetSize()

    # Get the quaterion of the prim in xyzw format from usd
    prim_quat_gf = prim_tf_gf.ExtractRotation().GetQuaternion()
    prim_quat_xyzw = (prim_quat_gf.GetReal(), *prim_quat_gf.GetImaginary())

    # Create a plane on the pallet to scatter the boxes on
    plane_scale = (range_size[0] * 0.8, range_size[1] * 0.8, 1)
    plane_pos_gf = prim_tf_gf.ExtractTranslation() + Gf.Vec3d(0, 0, range_size[2])
    plane_rot_euler_deg = quat_to_euler_angles(np.array(prim_quat_xyzw), degrees=True)
    scatter_plane = rep.create.plane(
        scale=plane_scale, position=plane_pos_gf, rotation=plane_rot_euler_deg, visible=False
    )

    cardbox_mats = [
        f"{assets_root_path}/Isaac/Environments/Simple_Warehouse/Materials/MI_PaperNotes_01.mdl",
        f"{assets_root_path}/Isaac/Environments/Simple_Warehouse/Materials/MI_CardBoxB_05.mdl",
    ]

    def scatter_boxes():
        cardboxes = rep.create.from_usd(
            assets_root_path + config["cardbox"]["url"], semantics=[("class", config["cardbox"]["class"])], count=5
        )
        with cardboxes:
            rep.randomizer.scatter_2d(scatter_plane, check_for_collisions=True)
            rep.randomizer.materials(cardbox_mats)
        return cardboxes.node

    rep.randomizer.register(scatter_boxes)
The next randomization example calculates the corners of the bounding box of the forklift together with the pallet and uses the corners as a predefined list of locations to randomly place a traffic cone.
Replicator Randomization Graph II
# Register the place cones randomizer graph
def register_cone_placement(forklift_prim, assets_root_path, config):
    # Get the bottom corners of the oriented bounding box (OBB) of the forklift
    bb_cache = create_bbox_cache()
    centroid, axes, half_extent = compute_obb(bb_cache, forklift_prim.GetPrimPath())
    larger_xy_extent = (half_extent[0] * 1.3, half_extent[1] * 1.3, half_extent[2])
    obb_corners = get_obb_corners(centroid, axes, larger_xy_extent)
    bottom_corners = [
        obb_corners[0].tolist(),
        obb_corners[2].tolist(),
        obb_corners[4].tolist(),
        obb_corners[6].tolist(),
    ]

    # Orient the cone using the OBB (Oriented Bounding Box)
    obb_quat = Gf.Matrix3d(axes).ExtractRotation().GetQuaternion()
    obb_quat_xyzw = (obb_quat.GetReal(), *obb_quat.GetImaginary())
    obb_euler = quat_to_euler_angles(np.array(obb_quat_xyzw), degrees=True)

    def place_cones():
        cones = rep.create.from_usd(
            assets_root_path + config["cone"]["url"], semantics=[("class", config["cone"]["class"])]
        )
        with cones:
            rep.modify.pose(position=rep.distribution.sequence(bottom_corners), rotation_z=obb_euler[2])
        return cones.node

    rep.randomizer.register(place_cones)
The following example randomizes light parameters and their placement above the forklift and the pallet area.
Replicator Randomization Graph III
# Register light randomization graph
def register_lights_placement(forklift_prim, pallet_prim):
    bb_cache = create_bbox_cache()
    combined_range_arr = compute_combined_aabb(bb_cache, [forklift_prim.GetPrimPath(), pallet_prim.GetPrimPath()])
    pos_min = (combined_range_arr[0], combined_range_arr[1], 6)
    pos_max = (combined_range_arr[3], combined_range_arr[4], 7)

    def randomize_lights():
        lights = rep.create.light(
            light_type="Sphere",
            color=rep.distribution.uniform((0.2, 0.1, 0.1), (0.9, 0.8, 0.8)),
            intensity=rep.distribution.uniform(500, 2000),
            position=rep.distribution.uniform(pos_min, pos_max),
            scale=rep.distribution.uniform(5, 10),
            count=3,
        )
        return lights.node

    rep.randomizer.register(randomize_lights)
Similarly to the above examples, Replicator has support for many other randomizations. For more information, see Replicator’s randomizer examples tutorials.
The registered randomizations are setup to be trigger each frame, at every nth frame (interval), or manually at specific events.
Replicator Randomization Triggers
# Setup the randomizations to be triggered every frame
with rep.trigger.on_frame():
    rep.randomizer.scatter_boxes()
    rep.randomizer.randomize_lights()

    # Randomize the camera position in the given area above the pallet and look at the pallet prim
    pallet_cam_min = (pallet_pos_gf[0] - 2, pallet_pos_gf[1] - 2, 2)
    pallet_cam_max = (pallet_pos_gf[0] + 2, pallet_pos_gf[1] + 2, 4)
    with pallet_cam:
        rep.modify.pose(
            position=rep.distribution.uniform(pallet_cam_min, pallet_cam_max),
            look_at=str(pallet_prim.GetPrimPath()),
        )

    # Randomize the camera position in the given height above the forklift driver's seat and look at the pallet prim
    driver_cam_min = (driver_cam_pos_gf[0], driver_cam_pos_gf[1], driver_cam_pos_gf[2] - 0.25)
    driver_cam_max = (driver_cam_pos_gf[0], driver_cam_pos_gf[1], driver_cam_pos_gf[2] + 0.25)
    with driver_cam:
        rep.modify.pose(
            position=rep.distribution.uniform(driver_cam_min, driver_cam_max),
            look_at=str(pallet_prim.GetPrimPath()),
        )

# Setup the randomizations to be triggered at every nth frame (interval)
with rep.trigger.on_frame(interval=4):
    top_view_cam_min = (foklift_pos_gf[0], foklift_pos_gf[1], 9)
    top_view_cam_max = (foklift_pos_gf[0], foklift_pos_gf[1], 11)
    with top_view_cam:
        rep.modify.pose(
            position=rep.distribution.uniform(top_view_cam_min, top_view_cam_max),
            rotation=rep.distribution.uniform((0, -90, -30), (0, -90, 30)),
        )

# Setup the randomizations to be manually triggered at specific times
with rep.trigger.on_custom_event("randomize_cones"):
    rep.randomizer.place_cones()
After registering the randomization graphs and before running the data collection a short physics simulation is run. After spawning the forklift and the empty pallet, the example runs a short physics simulation by dropping several stacked boxes on a pallet behind the forklift.
Isaac Sim Simulation
def simulate_falling_objects(forklift_prim, assets_root_path, config, max_sim_steps=250, num_boxes=8):
    # Create the isaac sim world to run any physics simulations
    world = World(physics_dt=1.0 / 90.0, stage_units_in_meters=1.0)

    # Set a random relative offset to the pallet using the forklift transform as a base frame
    forklift_tf = omni.usd.get_world_transform_matrix(forklift_prim)
    pallet_offset_tf = Gf.Matrix4d().SetTranslate(Gf.Vec3d(random.uniform(-1, 1), random.uniform(-4, -3.6), 0))
    pallet_pos = (pallet_offset_tf * forklift_tf).ExtractTranslation()

    # Spawn a pallet prim at a random offset from the forklift
    [..]

    # Keep track of the last box to stop the simulation early once it stops moving
    last_box = None
    # Spawn boxes falling on the pallet
    for i in range(num_boxes):
        # Spawn the carbox prim by creating a new Xform prim and adding the USD reference to it
        box_prim = prims.create_prim(
            prim_path=f"/World/SimulatedCardbox_{i}",
            position=pallet_pos + Gf.Vec3d(random.uniform(-0.2, 0.2), random.uniform(-0.2, 0.2), spawn_height),
            orientation=euler_angles_to_quat([0, 0, random.uniform(0, math.pi)]),
            usd_path=assets_root_path + config["cardbox"]["url"],
            semantic_label=config["cardbox"]["class"],
        )

        # Get the next spawn height for the box
        spawn_height += bb_cache.ComputeLocalBound(box_prim).GetRange().GetSize()[2] * 1.1

        # Wrap the prim as simulation ready with a simplified collider
        add_colliders(box_prim, approx_type="boundingCube")
        box_rigid_prim = RigidPrim(prim_path=str(box_prim.GetPrimPath()))
        box_rigid_prim.enable_rigid_body_physics()

        # Cache the rigid prim
        last_box = box_rigid_prim

    # Reset the world to handle the physics of the newly created rigid prims
    world.reset()

    # Simulate the world for the given number of steps or until the highest box stops moving
    for i in range(max_sim_steps):
        world.step(render=False)
        if last_box and np.linalg.norm(last_box.get_linear_velocity()) < 0.001:
            print(f"[scene_based_sdg] Simulation finished at step {i}..")
            break
Running the Script#
Finally the randomizations and frame writing is triggered to run for the given number of frames, followed by a wait until all data is written to disk, and closing the application.
Script Execution
# Register randomizers graphs
scene_based_sdg_utils.register_scatter_boxes(pallet_prim, assets_root_path, config)
scene_based_sdg_utils.register_cone_placement(forklift_prim, assets_root_path, config)
scene_based_sdg_utils.register_lights_placement(forklift_prim, pallet_prim)

[..]

# Run a simulation before generating data
scene_based_sdg_utils.simulate_falling_objects(forklift_prim, assets_root_path, config)

[..]

# Start the SDG
num_frames = config.get("num_frames", 0)
print(f"[scene_based_sdg] Running SDG for {num_frames} frames")
for i in range(num_frames):
    # Trigger the custom event to randomize the cones at specific frames
    if i % 2 == 0:
        rep.utils.send_og_event(event_name="randomize_cones")
    # Trigger any on_frame registered randomizers and the writers (delta_time=0.0 to avoid advancing the timeline)
    rep.orchestrator.step(delta_time=0.0, rt_subframes=rt_subframes)

[..]

# Wait for the data to be written to disk
rep.orchestrator.wait_until_complete()

[..]

simulation_app.close()
Summary#
This tutorial covered the following topics:
Starting a
SimulationAppinstance of Isaac Sim to work with replicatorLoading a stage and custom assets at random locations using plain Isaac Sim API
Setting up cameras, render products, and writers with Replicator to generate data
Creating Replicator randomization graphs
Running a physics simulation with Isaac Sim API
Next Steps#
One possible use for the created data is with the TAO Toolkit. After the generated synthetic data is in Kitti format, you can use the TAO Toolkit to train a model. TAO provides segmentation, classification and object detection models. This example uses object detection with the Detectnet V2 model as a use case.
To get started with TAO, follow the set-up instruction video.
TAO uses Jupyter notebooks to guide you through the training process. In the folder cv_samples_v1.3.0, you can find notebooks for multiple models. You can use any of the object detection networks for this use case, but this example uses Detectnet_V2.
In the detectnet_v2 folder, you can find the Jupyter notebook and the specs folder. The TAO Detectnet V2 documentation goes into more detail about this sample. TAO works with configuration files that can be found in the specs folder. Here, you must modify the specs to refer to the generated synthetic data as the input.
To prepare the data, you must run the following command.
tao detectnet_v2 dataset-convert [-h] -d DATASET_EXPORT_SPEC -o OUTPUT_FILENAME [-f VALIDATION_FOLD]
This is in the Jupyter notebook with a sample configuration. Modify the spec file to match the folder structure of your synthetic data. The data is in TFrecord format and is ready for training. Again, you need to change the spec file for training to represent the path to the synthetic data and the classes being detected.
tao detectnet_v2 train [-h] -k <key>
                        -r <result directory>
                        -e <spec_file>
                        [-n <name_string_for_the_model>]
                        [--gpus <num GPUs>]
                        [--gpu_index <comma separate gpu indices>]
                        [--use_amp]
                        [--log_file <log_file>]
For any questions regarding the TAO Toolkit, refer to the TAO documentation.
Further Learning#
To learn how to use Omniverse Isaac Sim to create data sets in an interactive manner, see the Synthetic Data Recorder and then visualize them with the Synthetic Data Visualizer.