Import Wizard#
Isaac Sim provides a large library of tools that enables robotic simulation for a number of use cases, including digital twins, teleoperation, and reinforcement learning. The Isaac Sim Import Wizard can help you identify the relevant tools for importing your robot, provide offline instructions for each tool, and step through them in a recommended order.
Note
The Import Wizard is currently in alpha phase, still undergoing testing and development. If you encounter any bugs or have any suggestions, please go to Isaac Sim Developer Forums to share your feedback, and help us improve its functionality and user experience. We appreciate your participation and patience.
Getting Started#
To launch the Import Wizard, go to the Isaac Utils > Isaac Sim Import Wizard. The Welcome Page will open in a new window.
The instruction for using the Import Wizard is in the Instruction section of the Welcome Page. There are essential four ways to use the Wizard:
If you have no idea which tools to use, you can start with the Questionnaire by click the green “Do You Need Help Getting Started?” button. The Questionnaire will ask a series of multiple choice questions. Your answers will help it recommend a list of tools. You will have the option to save this recommended list as one of the Customize Pipelines for future use.
If you are looking for instructions and documentations for a known set of tools, you can use the checkboxes and click the “Next” button to go through your chosen list of tools.
If you want to go through all of the tools, you can select “Common Tools” from the dropdown list. It’ll take you to the instruction page of “Common Tools”, and from there, clicking “Next” will take you to the next tool on the list.
If you have a list of tools that you already narrowed down for your workflow, and you want the Wizard to always take you through those tools every single time you import an asset, then you can create a Custom Pipeline. See Customize Pipelines for more details.
Each page contains links to all the documentation pages that are associated with the tool, so you can locate the links for more information in one place. It also has a shortcut to open the folder that the tool’s extension is located in, in which you can find all the Python scripts and data that are associated with the extension. These are all under the “Additional Resources” section of each page.
User Interface#
There are four main sections to the Import Wizard:
Welcome Page#
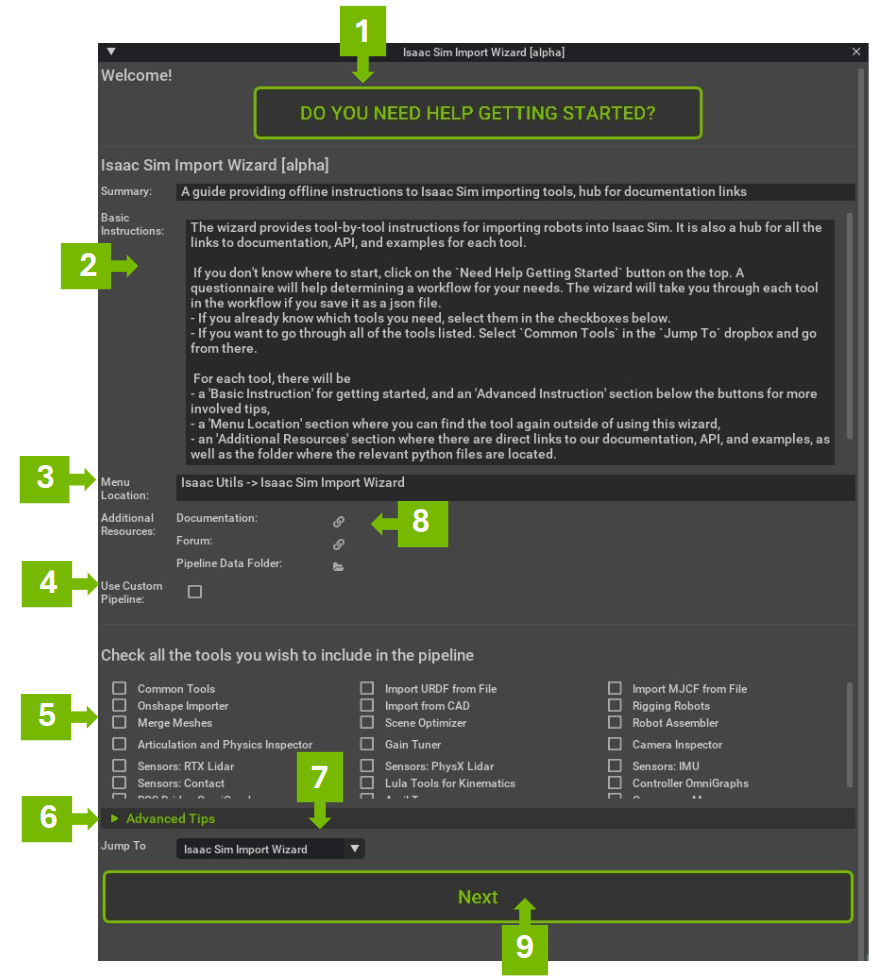
Ref # |
Option |
Result |
|---|---|---|
1 |
Open Questionnaire |
See Questionnaire
|
2 |
Instructions |
Instructions on how to use the wizard
|
3 |
Menu Location |
Where to find the Import Wizard in the menu bar
|
4 |
Use Custom Pipeline |
See Customize Pipelines for more details
|
5 |
Available Tools List |
Tools available in the Import Wizard. The chosen tools are presented in a predetermined order. This is not an exhaustive list for all Isaac Sim tools.
|
6 |
Advance Tips |
Expandable Window with more tips you might need
|
7 |
Jump To List |
Quick Access to any of the available tools
|
8 |
Available Resources Links |
Links to the Isaac Sim Documentation and Forum
|
9 |
Next |
Start the pipeline
|
Tool Instructions Page#
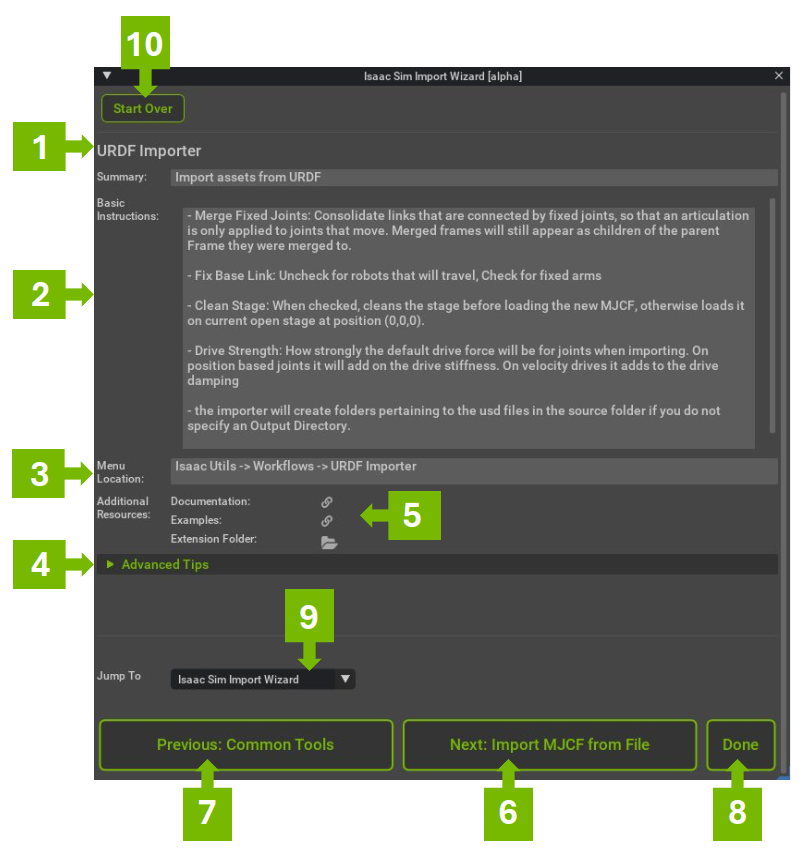
Ref # |
Option |
Result |
|---|---|---|
1 |
Name of the Tool |
Name of the tool you are currently viewing
|
2 |
Instructions |
Instructions on how to use the current tool
|
3 |
Menu Location |
Where to find the tool again in the menu bar
|
4 |
Advance Tips |
Expandable Window with more tips you might need
|
5 |
Available Resources Links |
Links to the relevant Documentation, Python API, Examples, and Extension Folder
|
6 |
Next Tool |
Go to the next tool in the pipeline
|
7 |
Previous Tool |
Go to the previous tool in the pipeline
|
8 |
Done |
Close the wizard
|
9 |
Jump To List |
Quick access to any of the other available tools
|
10 |
Start Over |
Go Back to Wizard Welcome Page
|
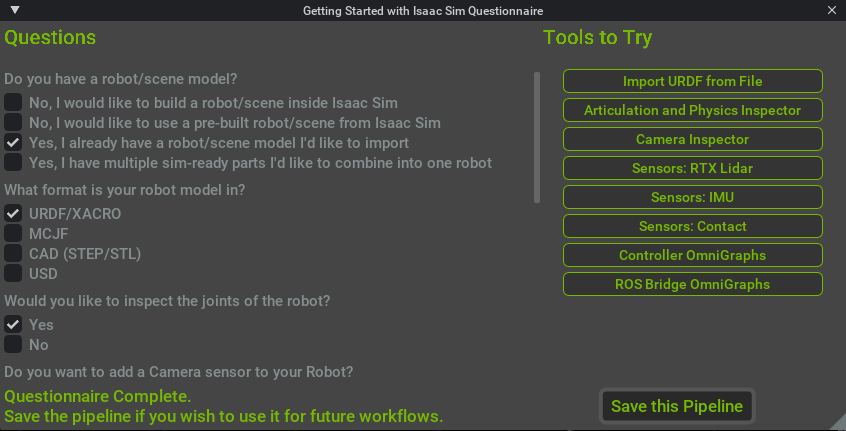
Questionnaire#
The questionnaire is a series of questions that help you determine which tools are useful for your workflow. As you answer the questions on the left, a list of recommended tools appears on the right. You can preview those tools by clicking on the buttons on the right and it opens the wizard to the page with the corresponding tool’s instructions. After you complete the Questionnaire, you can press the Save This Pipeline button to save the pipeline for future use. Read more about using customized pipelines in the Customize Pipelines section.
Customize Pipelines#
You can define your own pipeline sequence and use it when you frequently repeat the same steps. When you are on the “Welcome Page” of the Import Wizard, check the box next to “Use Custom Pipeline” to retrieve your pipeline.
A template of the pipeline file is provided in /data/custom_pipeline.json. They are formatted with the name of the pipeline as a key in a dictionary and the list of tools are in an array in the order that they should be presented by the wizard. You must use the tool names that are shown on the Welcome Page’s checkboxes. You can have multiple pipelines in the same file, as long as they are different key names. You can save your own file in the same format or append to this custom_pipeline.json file.
{
    "Import Pipeline": [
        "Import URDF from File",
        "Articulation and Physics Inspector",
        "Gain Tuner",
        "Controller OmniGraphs"
    ],
}
If you used the Questionnaire to generate a pipeline, when you press Save This Pipeline button at the end, that pipeline can be appended (or overwritten if you chose to) to the provided custom_pipeline.json or a new file that you defined.