Isaac Sim Extension Templates#
Learning Objectives#
This tutorial provides an overview of the available extension templates that can be created using the Extension Template Generator. By the end of this tutorial, the reader will:
Understand the underlying structure of the provided extension templates
Understand the purpose of each provided extension template
Be able to immediately start writing functional code with hot reloading to interact with the USD World.
Be able to create a highly customized UI-based extension in Isaac Sim
Getting Started#
This tutorial assumes that the user knows how to use the Extension Template Generator to download an extension template onto their local machine and enable the new extension in Omniverse Isaac Sim.
General Concepts#
Each template provided by the Extension Template Generator has a common underlying structure with a thin layer of implementation on top. In each template root directory, there is a folder called ./scripts where all Python code supporting the extension is stored. Inside ./scripts, there are three common Python files:
- global_variables.py
A script that stores the global variables that the user specified when creating their extension in the Extension Template Generator such as the Title and Description.
- extension.py
A class containing the standard boilerplate necessary to have the user extension show up on the Toolbar. This class is meant to fulfill most ues-cases without modification. In extension.py, useful standard callback functions are created that the user may complete in ui_builder.py.
- ui_builder.py
This file is the user’s main entrypoint into the template. Here, the user can see useful callback functions that have been set up for them, and they may also create UI elements that are hooked up to user-defined callback functions. This file is the most thoroughly documented, and the user should read through it before making serious modification.
A typical user will only need to modify ./scripts/ui_builder.py to get their extension working the way they want. Inside ./scripts/ui_builder.py, the user will find a set of standard callback functions that connect them to the simulator:
on_menu_callback(): Called when extension is opened
on_timeline_event(): Called when timeline is stopped, paused, or played
on_physics_step(): Called on every physics step. Physics steps only happen while the timeline is playing.
on_stage_event(): Called when stage is opened or closed
cleanup(): Called when resources such as physics subscriptions should be cleaned up because the extension is being closed
build_ui(): User function that creates the UI they want.
In the provided extension templates, most of the implementation is in the build_ui() function. The extension templates utilize a set of wrapper classes around omni.ui elements that allow the user to easily create and manage a variety of UI elements. These are refered to in this tutorial as UIElementWrappers. Each wrapper is meant to provide the user with the most common-sense way of interacting with a UI element. For example, the user can create a FloatField UI element; any time the user modifies the FloatField in the UI, a user callback function will be called with the new float value passed in.
Each extension template builds a UI with a set of governing callback functions in build_ui(). These callback functions contain all of the logic to make the UI run smoothly and make it easy to connect user code for a custom application.
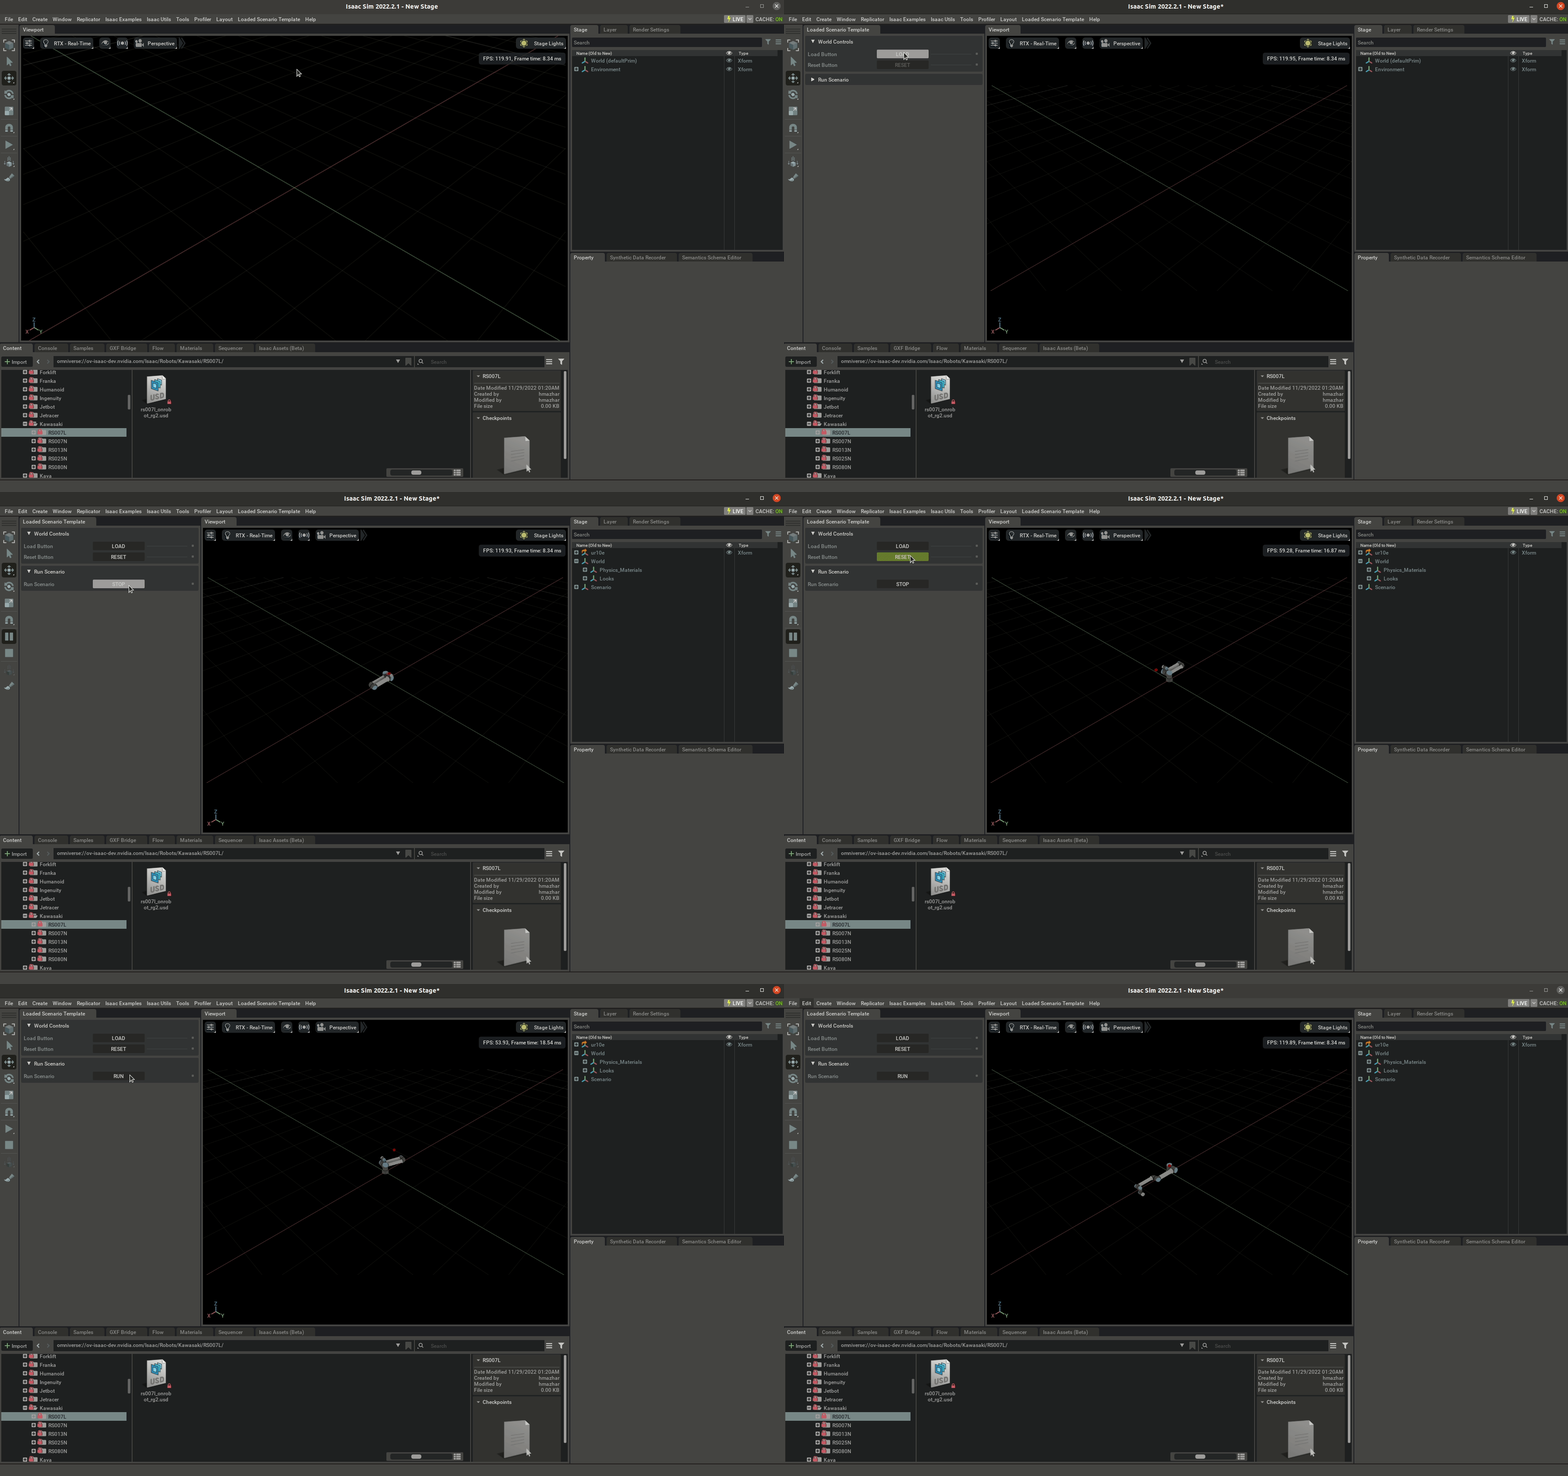
Loaded Scenario Template#
The Loaded Scenario Template starts the user off with a simple UI that contains three buttons: Load, Reset, and Run. This is meant to provide as clear a pathway as possible for the user to start writing code to directly affect the USD stage without having to understand much about the internal workings of the underlying simulator. There user only needs to know the following simple concepts.
Important Concepts#
In Omniverse Kit Applications, there is a simulation timeline that can be directly stopped, paused, and played on the left-hand side toolbar. Physics is only running while the timeline is active (not stopped). As such, the user cannot control a robot Articulation while the timeline is stopped, and initialization needs to be performed on certain assets such as an Articulation when the timeline goes from stopped to playing. The purpose of the Loaded Scenario Template is to make it easier for the user to interact with the simulator without having to handle things like initialization.
In omni.isaac.core.world there is a singleton class World that is designed to set up and properly manage the simulation with simple and clear user-interaction. In this template, the World is managed by the Load and Reset buttons, leaving the user with clear guarantees about the state of the simulator at the time that their callback functions are called. The user interaction with the World is minimized to the point that they their only interaction with the World takes the form world.scene.add(user_object) where user_object is any object from omni.isaac.core.
To ensure proper functionality, all manipulation of the timeline should be done by the Load and Reset buttons. I.e. the user is able to cause trouble by pressing the Stop and Play buttons on the left-hand toolbar outside of this UI. For this reason, the template directly handles the cases where the user messes with the timeline outside of the template UI by resetting the UI when necessary to maintain assumptions on user callback functions.
Implementation Details#
The Load button has two callback functions:
- def setup_scene_fn():
On pressing the Load Button, a new instance of World is created and then this function is called. The user should now load their assets onto the stage and add them to the World with world.scene.add().
- def setup_post_load_fn():
The user may assume that their assets have been loaded by their setup_scene_fn callback, that their objects are properly initialized, and that the timeline is paused on timestep 0.
The Reset button has two callback functions:
- pre_reset_fn():
This function is called before the World is reset, so there are no gurantees on the state of the simulator.
- post_reset_fn():
The user may assume that their objects are properly initialized, and that the timeline is paused on timestep 0.
They may also assume that objects that were added to the World have been moved to their default positions. I.e. a cube prim will move back to the position it was in when it was created in setup_scene_fn().
The RUN button is not connected to the World. It is a StateButton, which means that it will switch between two states: “RUN” and “STOP”. A StateButton can have three callback functions:
- on_a_click():
Function called when the StateButton is showing its a_text
- on_b_click():
Function called when the StateButton is showing its b_text
- physics_callback_fn():
If specified, the StateButton will call this function on every physics step while the state button is in its B state, and it will cancel the physics subscription whenever the state button is in its A state.
Note
You can see how these functions are called in the UIBuilder class in exts/omni.isaac.extension_templates/template_source_files/loaded_scenario_workflow/ui_builder.py

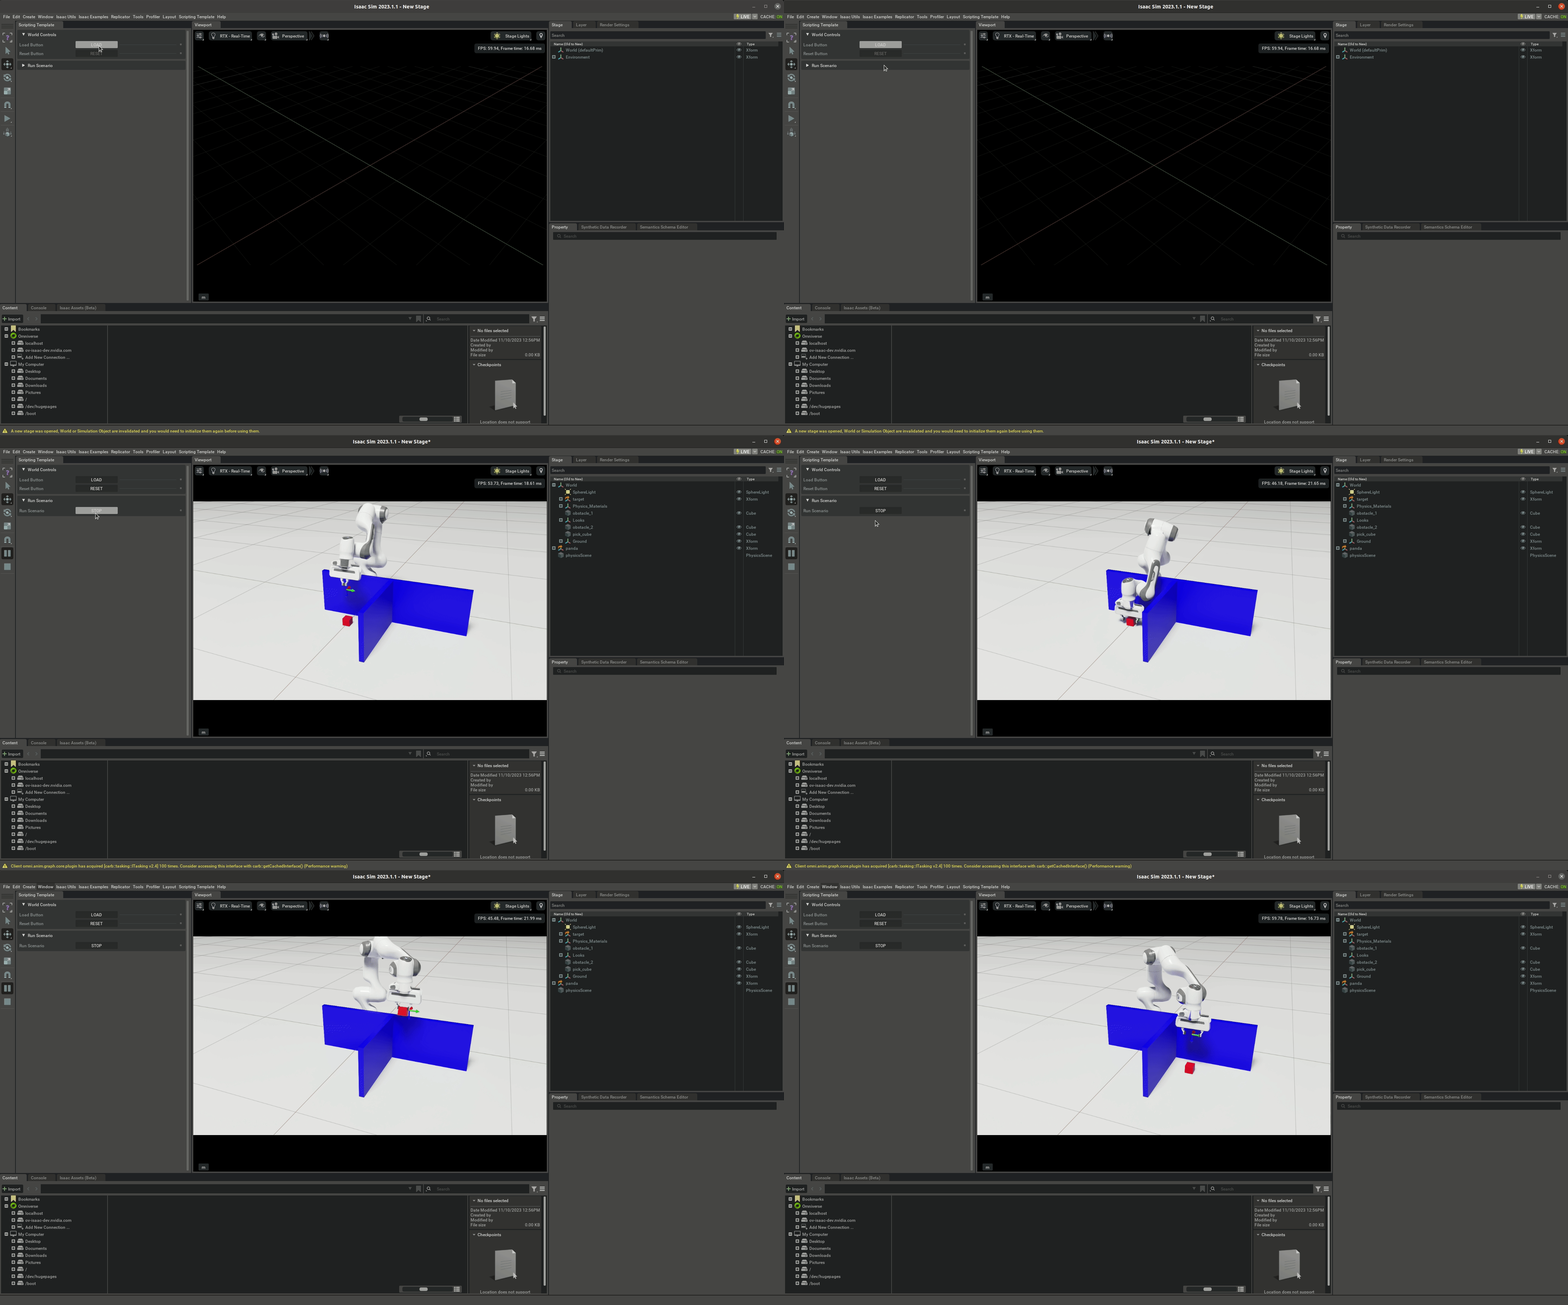
Scripting Template#
The Scripting Template is a natural extension of the Loaded Scenario Template that demonstrates the implementation of a more advanced framework for programming script-like behavior from a UI-based extension in Omniverse Isaac Sim. This template uses the same mechanics for loading and resetting the robot position, but it implements the RUN button as a script.
Using the pattern demonstrated in this template, the user can program script-like behavior by implementing long-running functions that check in on every physics step to send a new command or determine that it is time to return. The Scripting Template contains an implementation of the functions goto_position(), open_gripper_franka() and close_gripper_franka(). These functions are used in series in order to script the simple pick-and-place task shown below.
Implementation Details#
The implementation details of the UI match the Loaded Scenario Template, and so this section focuses on the implementation of script-like behavior. Long-running functions that check in on every frame can be written using Python’s yield/generator framework. A function my_script() is implemented in the file scenario.py that contains the sequence of goto_position(), open_gripper_franka(), and close_gripper_franka() function calls. The my_script() function makes use of yield and yield from statements. This allows my_script() to be wrapped in a generator with self._script_generator = self.my_script(). Then, on every physics step, next(self._script_generator) is called to step the generator and execute code until the next yield statement is encountered (in either my_script() or a nested function).
Take the function open_gripper_franka() as an example:
1def open_gripper_franka(self, articulation):
2    open_gripper_action = ArticulationAction(np.array([.04,.04]), joint_indices = np.array([7,8]))
3    articulation.apply_action(open_gripper_action)
4
5    # Check in once a frame until the gripper has been successfully opened.
6    while not np.allclose(articulation.get_joint_positions()[7:],np.array([.04,.04]), atol=.001):
7        yield()
8
9    return True
my_script() calls yield from open_gripper_franka(). The function open_gripper_franka() sends a single command to the Franka Articulation that the grippers should open, and then on every subsequent physics step, it checks if the gripper has made it to the target position. Once the gripper has reached the target position, the function stops calling yield and instead calls return True to signal a success. The control flow goes back to my_script() and the next function in the sequence gets called.

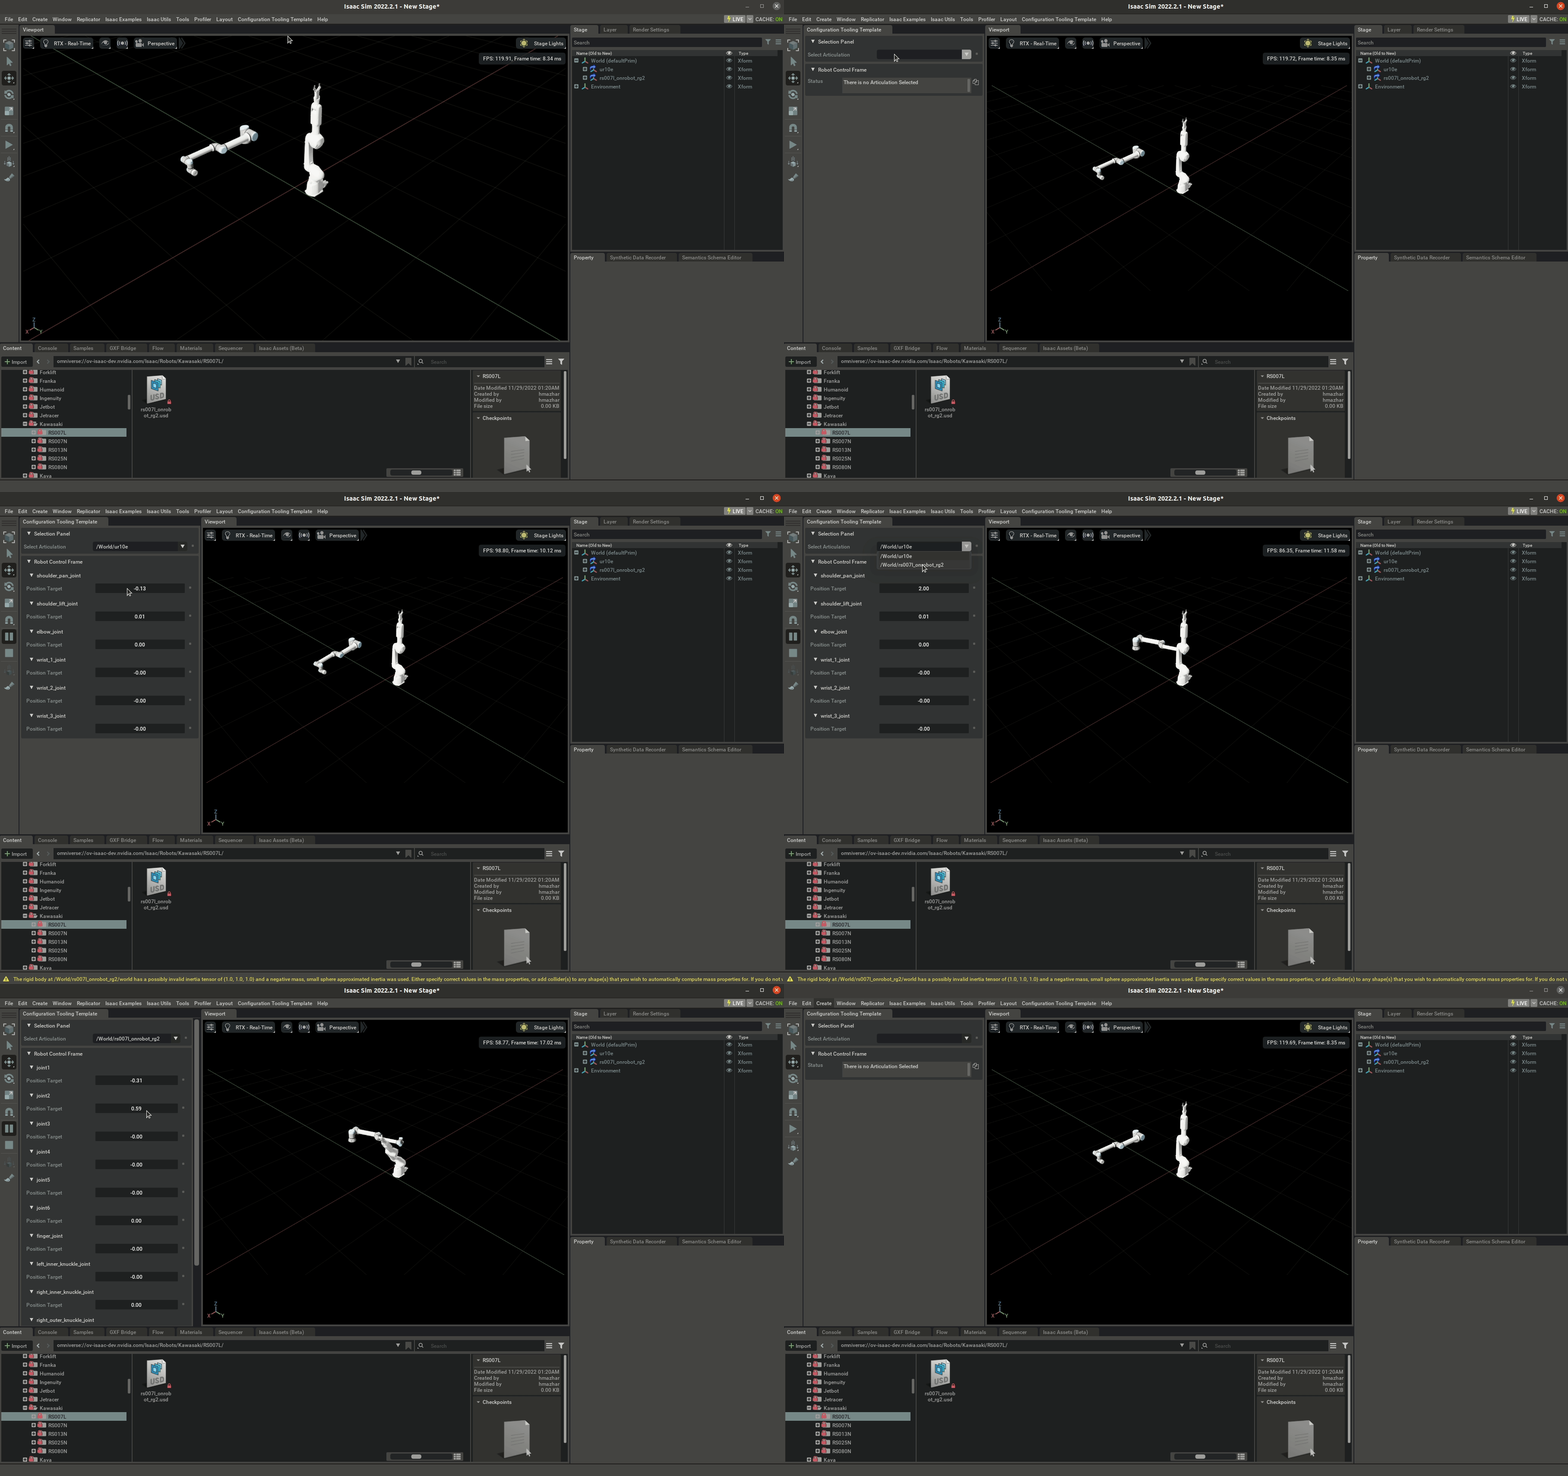
Configuration Tooling Template#
The Configuration Tooling Template provides a simple template that serves as a solid foundation for building tools for asset configuration. The provided implementation creates a drop-down menu that finds any Articulation on the stage and dynamically creates a UI frame through which the user may control each joint in the selected Articulation.
Unlike the Loaded Scenario Template this extension assumes no control over the timeline or the stage. Instead, it allows the user to select whatever is there and start reading and writing its state. Building asset configuration tools is a more advanced use-case, and as such, it requires a better internal model of the Simulation timeline. For example, because an Articulation is only accessible while the timeline is playing, the provided template only allows the user to attempt to modify their selected Articulation while the timeline is playing.
Implementation Details#
The DropDown is populated by a function that searches the USD stage for all objects of the specified type. This is provided as a convenience function directly in the DropDown UI wrapper, but a version of the function it is using is left at the bottom of the template to allow the user further customization.
Whenever a new item is selected from the DropDown, the Robot Control Frame is rebuilt using a builder function. This is a powerful paradigm for creating robust dynamic UI tools. In this template, the frame can either report to the user that no robot could be selected, or it can list every joint in the selected robot if everything went well.

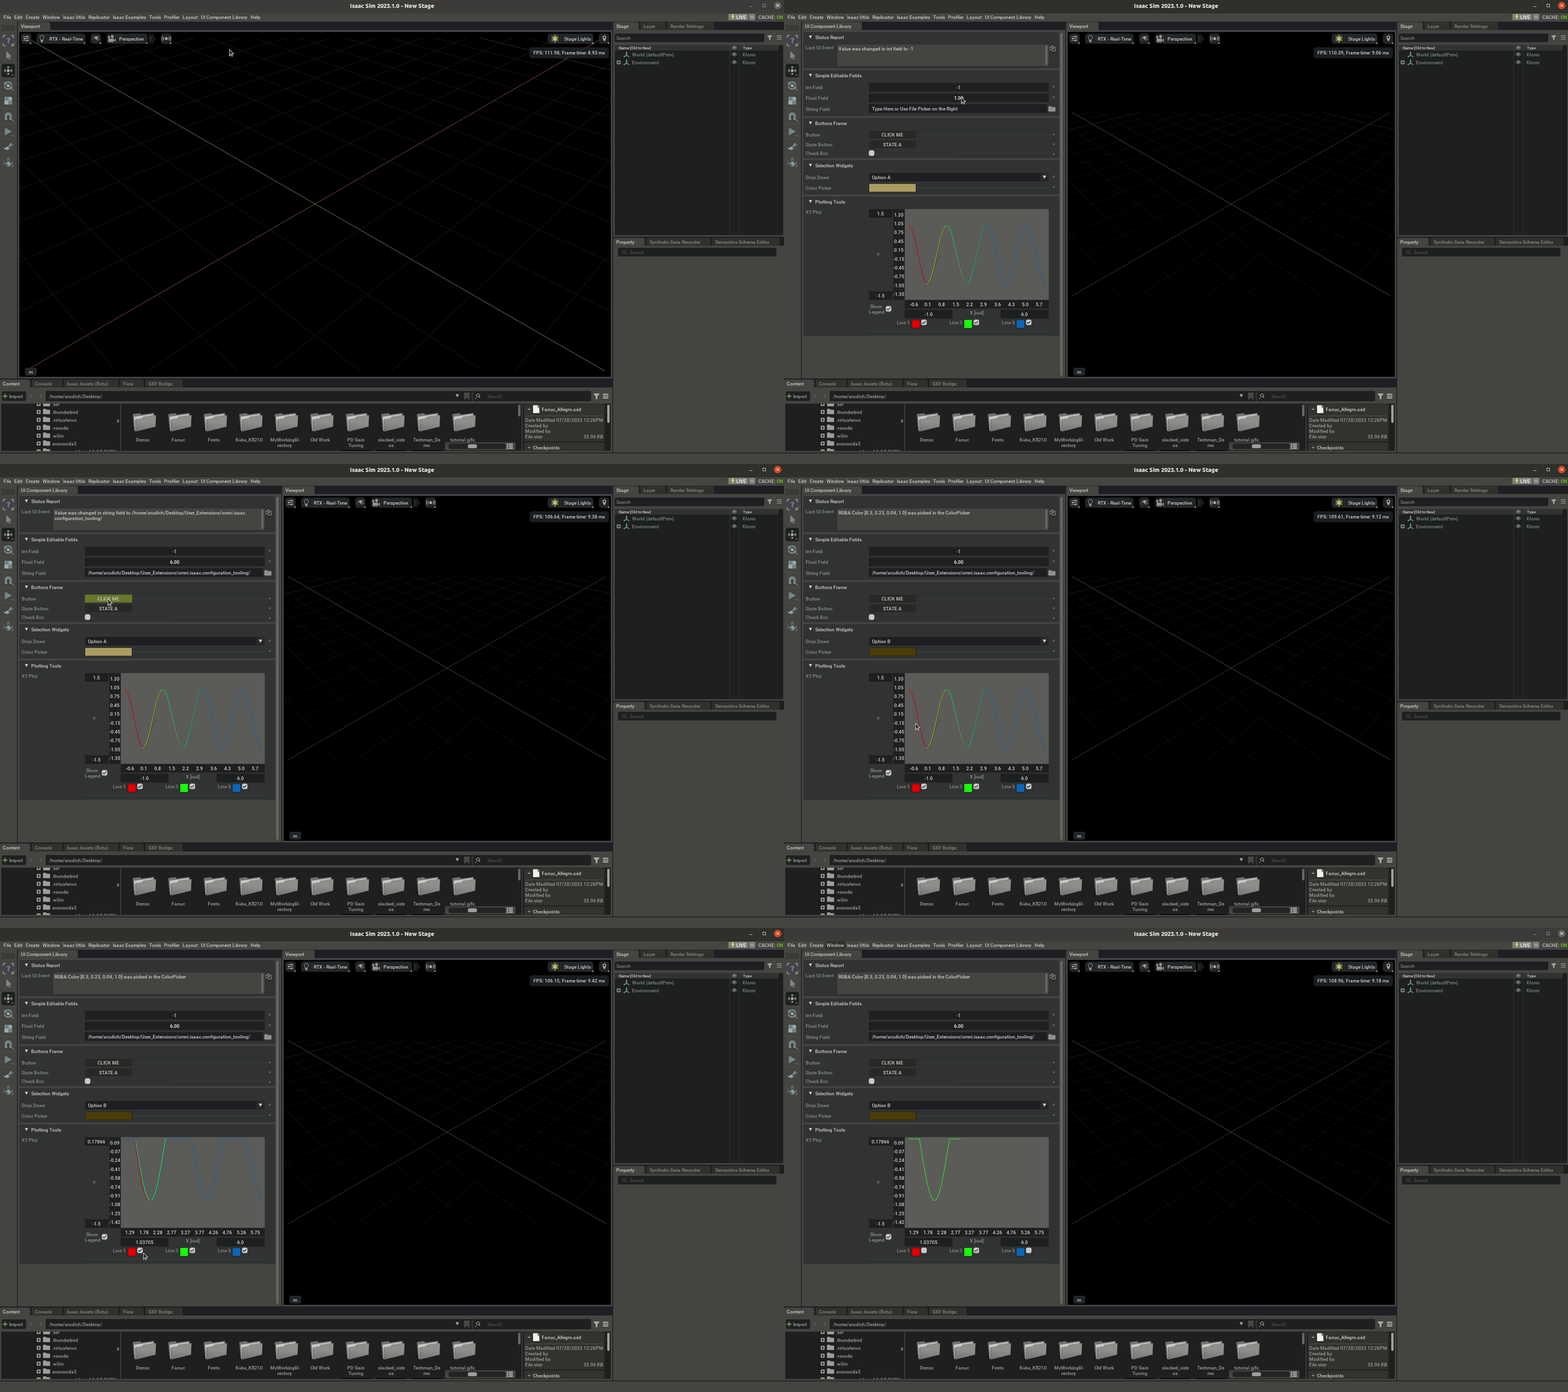
UI Component Library#
The UI Component Library Template demonstrates the usage of each UIElementWrapper that has been created. This should be used as a reference when setting up a custom UI tool. Most importantly, this template shows the specific type of arguments and return values required for each callback function that can be attached to each UIElementWrapper. This template ommits the Load and Reset buttons, as these are special case buttons that are demonstrated in the Loaded Scenario Template. None of the UI components shown in this template directly impact the simulation; they only call user callback functions.
The components in the UI Component Library Template wrap a subset of the elements in omni.ui, and each wrapper is opinionated about how the UI component should be placed and labeled so that it will look good next to other wrapped components. An advanced user may start adding omni.ui components next to wrapped components without issue.

Summary#
This tutorial covered the templates provided in the Omniverse Isaac Sim Extension Template Generator. Each template has a common underlying structure with a thin layer of implementation to show a different use-case. The user will be able to reference one or more of these templates to get started building a highly customized UI-based extension in Omniverse Isaac Sim without having to build a detailed knowledge of the internal simulator mechanics.
Further Learning#
In conjunction with these templates, the user will want to reference the API documentation for the UIElementWrapper objects.