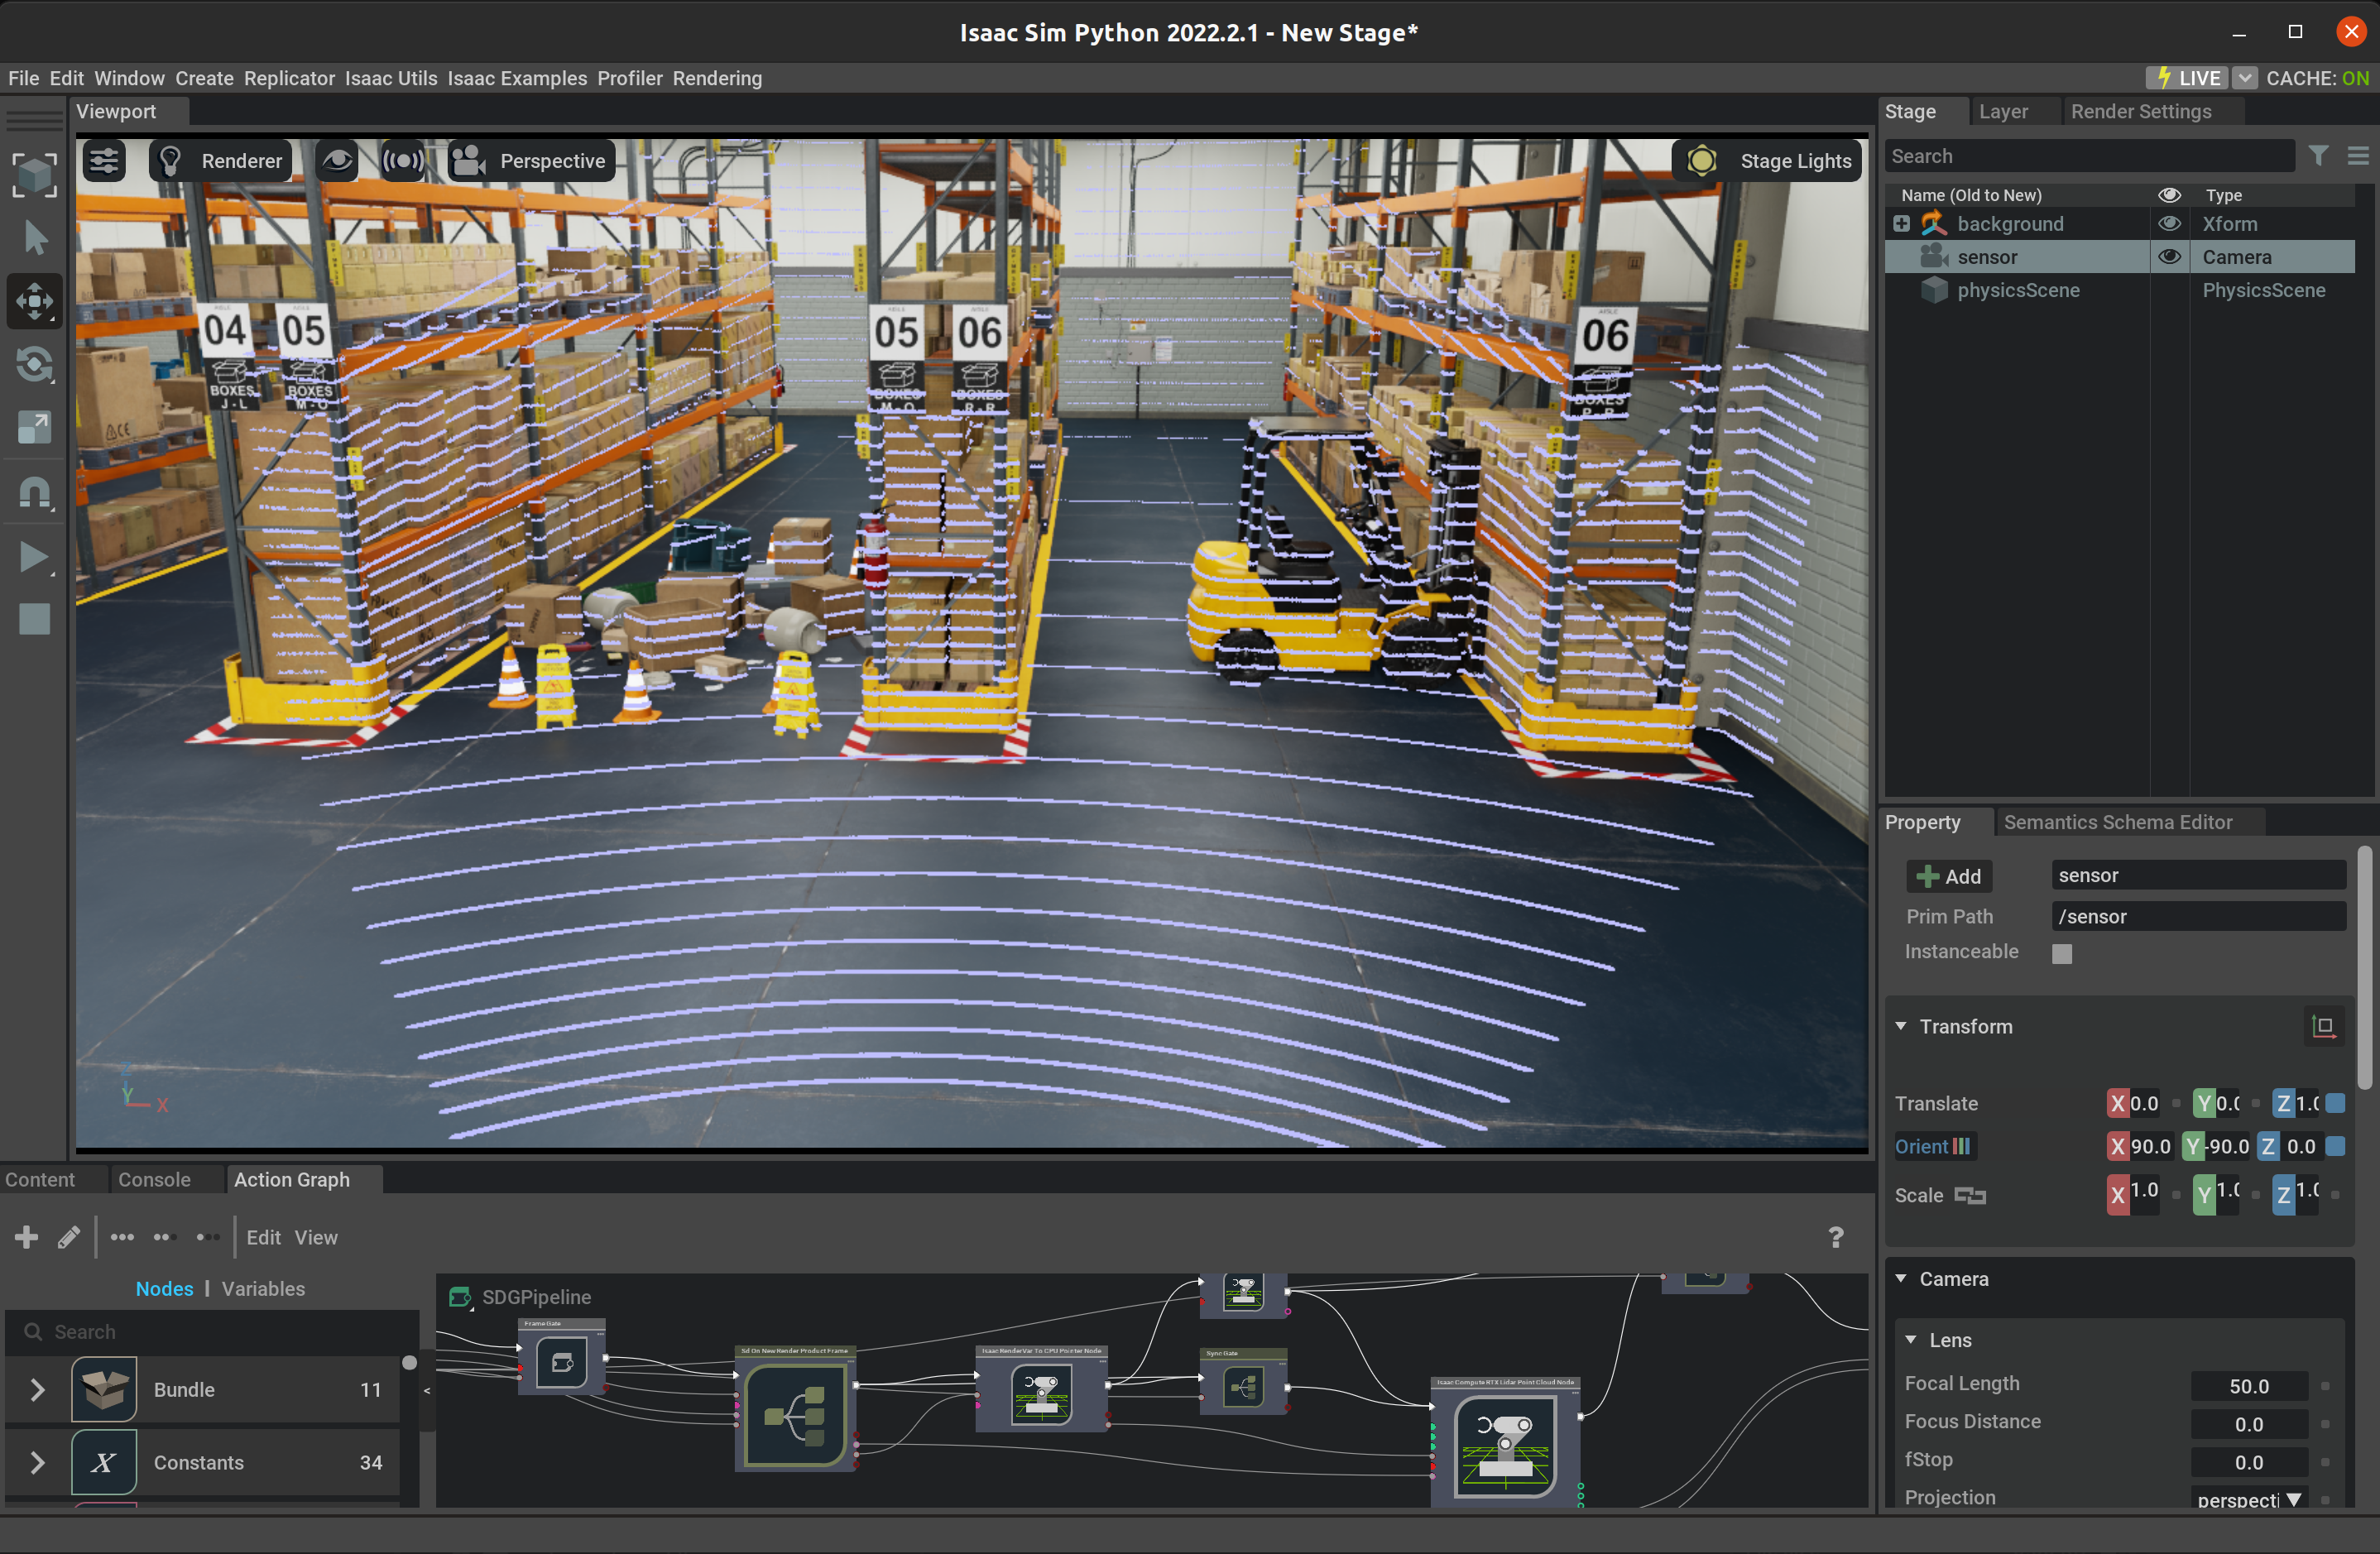
RTX Lidar Sensor#

RTX Lidar sensors are simulated at render time on the GPU with RTX hardware.
Their results are then copied to the RtxSensorCpu rendering buffer for use.
How They work#
Before a RTX Lidar can render, there must be a camera asset with attributes set appropriately.
The render product from that camera will contain the RtxSensorCpu result.
The following code snippet, when run in the Script Editor, will:
create a RTX Lidar sensor in the scene with the
IsaacSensorCreateRtxLidarcommand.render its results into a Hydra texture
create a point cloud from the results using the
RtxLidarDebugDrawPointCloudBufferwritercreate a
RtxSensorCpuIsaacCreateRTXLidarScanBufferannotator that can read the data from the Lidar.
import omni.kit.commands
from pxr import Gf
import omni.replicator.core as rep
lidar_config = "Example_Rotary"

# 1. Create The Camera
_, sensor = omni.kit.commands.execute(
    "IsaacSensorCreateRtxLidar",
    path="/sensor",
    parent=None,
    config=lidar_config,
    translation=(0, 0, 1.0),
    orientation=Gf.Quatd(1,0,0,0),
)
# 2. Create and Attach a render product to the camera
render_product = rep.create.render_product(sensor.GetPath(), [1, 1])

# 3. Create Annotator to read the data from with annotator.get_data()
annotator = rep.AnnotatorRegistry.get_annotator("RtxSensorCpuIsaacCreateRTXLidarScanBuffer")
annotator.attach(render_product)

# 4. Create a Replicator Writer that "writes" points into the scene for debug viewing
writer = rep.writers.get("RtxLidarDebugDrawPointCloudBuffer")
writer.attach(render_product)
The action graph this creates hooks all the nodes up and makes this work when you hit play. You may want to explore an overview of the Action Graph it created, as well as details on the nodes specifically created for RTX Lidar.
The most important parameter to the IsaacSensorCreateRtxLidar command is config.
LiDAR Config Files#
The config parameter is important, because it points to a JSON file, described below, that defines the behavior of the RTX Lidar. All the intrinsic parameters for the Lidar are
stored in the config file. It is loaded when the sensor is created. It’s because of this process that the properties of an RTX Lidar, unlike most other properties in Isaac Sim,
can’t be changed once the RTX Lidar is created.
The app.sensors.nv.lidar.profileBaseFolder setting in the ./exts/omni.isaac.sensor/config/extension.toml file holds the multiple search paths for the configuration file, and the first
JSON file found named config is used. So use unique names for your Lidar config files! There are several config files in ./exts/omni.isaac.sensor/data/lidar_configs/; they
are a good starting place for making your own. The app.sensors.nv.lidar.profileBaseFolder setting defaults to that location.
The RTX Lidar Config Parameters support Rotary and Solid State Lidars.
RTX Lidar Config Library#
A library of several pre-made Lidar config files are shipped with Omniverse Isaac Sim. These are designed with a best guess approximation of the sensors from the publicly available manuals and web pages, unless otherwise noted.
You will find the pre-made config files in the ./exts/omni.isaac.sensor/data/lidar_configs/ folder, in a sub-folder named for the company that makes each Lidar model.
Manufacturer
Model
UI Name
Config Name
HESAI
PandarXT-32
PandarXT-32 10hz
Hesai_XT32_SD10
Ouster
OS0
OS0 128 10hz @ 512 resolution (Rev. 6)
OS0 128 10hz @ 1024 resolution (Rev. 6)
OS0 128 10hz @ 2048 resolution (Rev. 6)
OS0 128 20hz @ 512 resolution (Rev. 6)
OS0 128 20hz @ 1024 resolution (Rev. 6)
OS0 128 10hz @ 512 resolution (Rev. 7)
OS0 128 10hz @ 1024 resolution (Rev. 7)
OS0 128 10hz @ 2048 resolution (Rev. 7)
OS0 128 20hz @ 512 resolution (Rev. 7)
OS0 128 20hz @ 1024 resolution (Rev. 7)
OS0_REV6_128ch10hz512res
OS0_REV6_128ch10hz1024res
OS0_REV6_128ch10hz2048res
OS0_REV6_128ch20hz512res
OS0_REV6_128ch20hz1024res
OS0_REV7_128ch10hz512res
OS0_REV7_128ch10hz1024res
OS0_REV7_128ch10hz2048res
OS0_REV7_128ch20hz512res
OS0_REV7_128ch20hz1024res
Ouster
OS1
OS1 32 10hz @ 512 resolution (Rev. 6)
OS1 32 10hz @ 1024 resolution (Rev. 6)
OS1 32 10hz @ 2048 resolution (Rev. 6)
OS1 32 20hz @ 512 resolution (Rev. 6)
OS1 32 20hz @ 1024 resolution (Rev. 6)
OS1 128 10hz @ 512 resolution (Rev. 6)
OS1 128 10hz @ 1024 resolution (Rev. 6)
OS1 128 10hz @ 2048 resolution (Rev. 6)
OS1 128 20hz @ 512 resolution (Rev. 6)
OS1 128 20hz @ 1024 resolution (Rev. 6)
OS1 128 10hz @ 512 resolution (Rev. 7)
OS1 128 10hz @ 1024 resolution (Rev. 7)
OS1 128 10hz @ 2048 resolution (Rev. 7)
OS1 128 20hz @ 512 resolution (Rev. 7)
OS1 128 20hz @ 1024 resolution (Rev. 7)
OS1_REV6_32ch10hz512res
OS1_REV6_32ch10hz1024res
OS1_REV6_32ch10hz2048res
OS1_REV6_32ch20hz512res
OS1_REV6_32ch20hz1024res
OS1_REV6_128ch10hz512res
OS1_REV6_128ch10hz1024res
OS1_REV6_128ch10hz2048res
OS1_REV6_128ch20hz512res
OS1_REV6_128ch20hz1024res
OS1_REV7_128ch10hz512res
OS1_REV7_128ch10hz1024res
OS1_REV7_128ch10hz2048res
OS1_REV7_128ch20hz512res
OS1_REV7_128ch20hz1024res
Ouster
OS2
OS2 32 10hz @ 512 resolution (Rev. 6)
OS2 32 10hz @ 1024 resolution (Rev. 6)
OS2 32 10hz @ 2048 resolution (Rev. 6)
OS2 32 20hz @ 512 resolution (Rev. 6)
OS2 32 20hz @ 1024 resolution (Rev. 6)
OS2 32 10hz @ 512 resolution (Rev. 7)
OS2 32 10hz @ 1024 resolution (Rev. 7)
OS2 32 10hz @ 2048 resolution (Rev. 7)
OS2 32 20hz @ 512 resolution (Rev. 7)
OS2 32 20hz @ 1024 resolution (Rev. 7)
OS2_REV6_32ch10hz512res
OS2_REV6_32ch10hz1024res
OS2_REV6_32ch10hz2048res
OS2_REV6_32ch20hz512res
OS2_REV6_32ch20hz1024res
OS2_REV7_32ch10hz512res
OS2_REV7_32ch10hz1024res
OS2_REV7_32ch10hz2048res
OS2_REV7_32ch20hz512res
OS2_REV7_32ch20hz1024res
SICK
TiM781
SICK TiM781
SICK_tim781
SLAMTEC
RPLidar S2E
RPLidar S2E
RPLIDAR_S2E
Velodyne
VLS-128
Velodyne VLS-128
Velodyne_VLS128
ZVISION [*]
ML-30s+
ML-Xs
ML-30s+
ML-Xs
ZVISION_ML30S
ZVISION_MLXS
NVIDIA [†]
Generic
Generic
Debug
Rotating
Solid State
Simple Solid State
Example_Rotary
Example_Solid_State
Simple_Example_Solid_State
Note
The Lidar config JSON files are worth looking into, because many of them have comments in them detailing where the parameters came from, so if you need to make your own config file, or change existing ones, you will have an idea of why the values are set as they are.
Sensor Materials#
The material system for RTX Lidar allows content creators to assign sensor material types, to partial material prim names on a USD stage. The materials will make the beams react different when they hit surfaces.
Standalone Examples#
For examples of creating RTX Lidar see the examples:
./python.sh standalone_examples/api/omni.isaac.ros_bridge/rtx_lidar.py
./python.sh standalone_examples/api/omni.isaac.ros2_bridge/rtx_lidar.py
./python.sh standalone_examples/api/omni.isaac.debug_draw/rtx_lidar.py Example_Rotary
./python.sh standalone_examples/api/omni.isaac.debug_draw/rtx_lidar.py Example_Solid_State
Note
See the Isaac Sim Conventions documentation for a complete list of Omniverse Isaac Sim conventions.