Agent Simulation Synthetic Data Generation#
Overview#
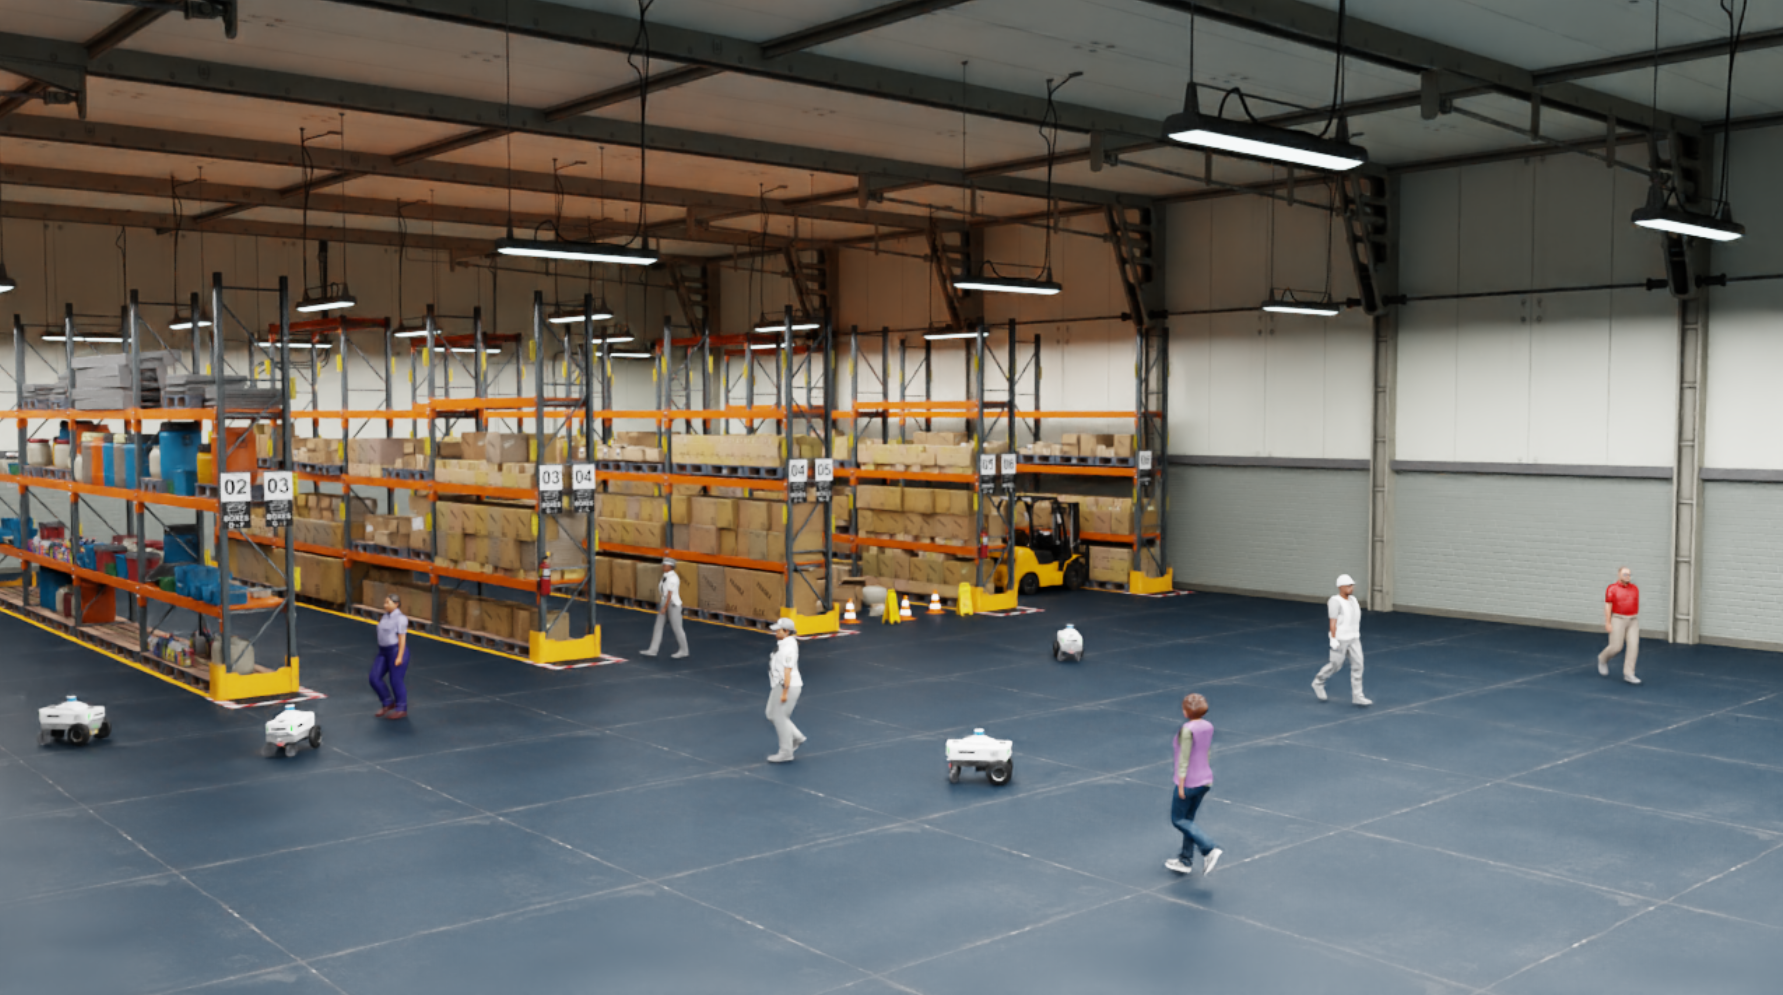
Detection and tracking people in various environments offers a tremendous amount of value in many industries. Retail stores benefit from understanding customer traffic and customer trip patterns. The intelligence is used to influence the design of higher revenue driven floor plans, to run more detailed and frequent promotion events, and to improve customer shopping experience. Manufacturers and warehouse operators can use the generated dat to optimize the interior layout and improve the throughput from the quantitative understanding of worker’s operation routines and potential workflow bottlenecks. As human and robot collaboration in the same space becomes common, ensuring workspace safety and efficiency, at the same time, is challenging. Typically, collecting real world data to train people detection and tracking models for different environments is costly and not scalable.
Synthetic data generation provides the flexibility and scalability to solve these exigent data problems. Also, evaluating model accuracy and robustness under abnormal or long-tail situations is critical, before the models are deployed in the real-world.
For example, when designing an airport, a warehouse, a factory, a shopping mall, a school campus, or residential home, you can simulate people and robots in that design to identify necessary changes before beginning to build it. The simulation can also be used to test normal and rare conditions, to offer unparalleled values in safety, efficiency, and eventually improving earnings.
The Omni.Replicator.Agent (ORA) extension is designed to generate synthetic data on human characters and robots across a variety of 3D environments. It provides controls over the 3D environments, camera parameters, characters, and robot motions through the use of the configuration and command files. The extension includes a comprehensive set of 2D and 3D data annotation methods to support multiple modalities of sensors. For example, RGB camera, LiDAR, and stereo camera sensors. Its primary objective is to provide a GPU-accelerated, computational solution to the synthetic data acquisition problem in computer vision Deep Learning model training and software-in-the-loop testing tasks. In ORA, human characters and robots are classified by the term agent. Prior to ORA, there was no integrated and easy-to-use application or extension in Omniverse to facilitate the synthetic data generation on human characters in various spaces.
ORA provides the following templates for how to customize a simulation with new environments, new characters, and new animations:
Simplified initial setup and low learning curve: the extension is included in Isaac Sim. It provides a graphical user interface and scripting interface to facilitate both interactive development and scalable headless data production.
High data quality and realism: leveraging Omniverse high quality sim-ready assets, flexible human animation backend, precision-built robot physics engine, and optimized Omniverse rendering engine, ORA produces ever-improving realistic imagery and 100% accurate annotations, to formulate high quality data, which is essential to efficiently training AI models.
Integration and compatibility: ORA is a Kit extension in Omniverse. It leverages
omni.anim.graph,omni.anim.navigation,omni.replicator,omni.isaac.core. Its design ensures the compatibility of ORA with the rest of the Omniverse ecosystem.
Prior to enabling this extension, read What Is Isaac Sim? to learn about Isaac Sim and follow Installation to install Isaac Sim.
Note
Omni.Replicator.Agent is in Beta. For more information on pre-release and beta terms, refer to the Omniverse License Agreement.
Enable Omni.Replicator.Agent#
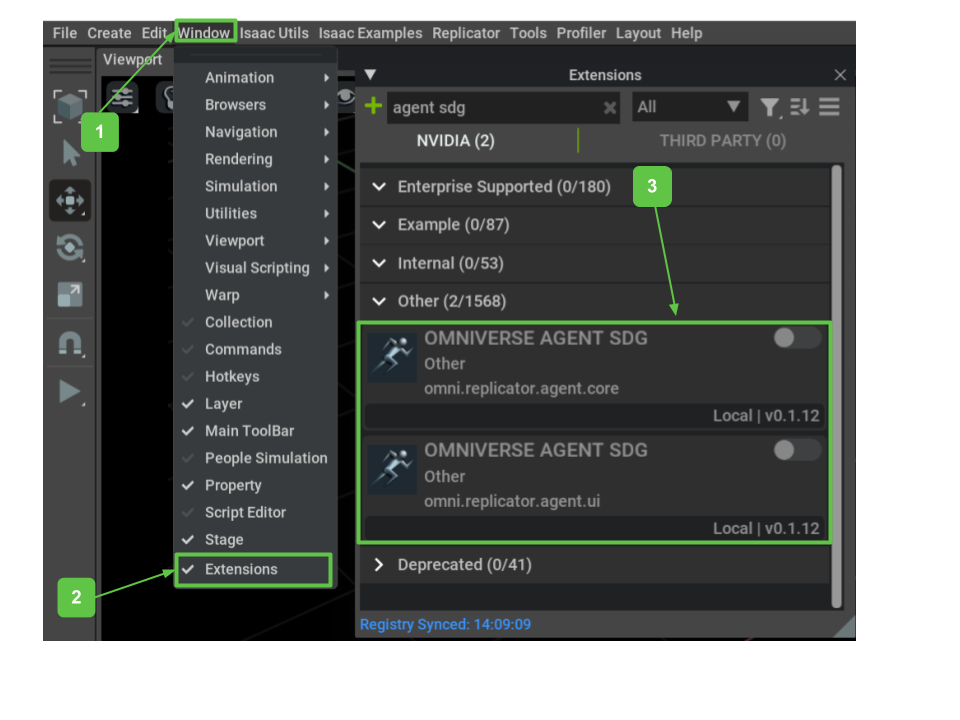
Open the extension manager by Window > Extensions. In the extension manager, search for “agent sdg” and enable the omni.replicator.agent.core and omni.replicator.agent.ui extension.
The extension fetches sample assets from Nucleus during start. Refer to Assets and Nucleus FAQ if you enounter issues for loading assets.
If loading the UI appears to be hanging, try starting Isaac Sim with the flag
--/persistent/isaac/asset_root/timeout=1.0.
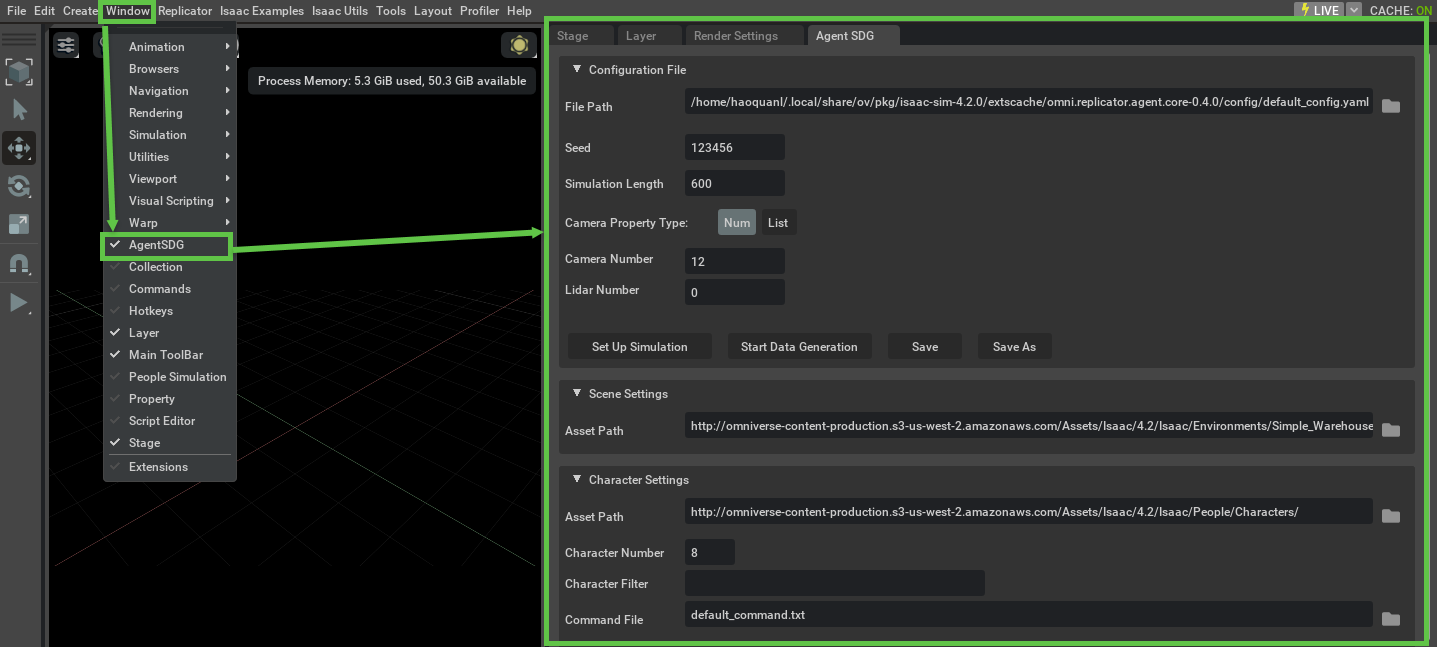
The ORA UI panel is accessible by Window > AgentSDG and it is opens on the right side of the screen.
Note
To have the extension auto-loaded on startup, click the auto-load button in the extension manager.
Because of extension dependencies, a restart of the Isaac Sim app might be required.
Getting Started#
To launch data generation with ORA, load the a YAML configuration file. Or use the default configuration file that comes with the extension, and follow the steps below. For a more detailed walkthrough, see the Basic Usage section.
Enable the ORA extension and open the UI panel.
Load the configuration file or use the default configuration file.
A default config file is provided in
core/config/default_config.yaml, which comes with the core extension and is automatically loaded when the extension starts.
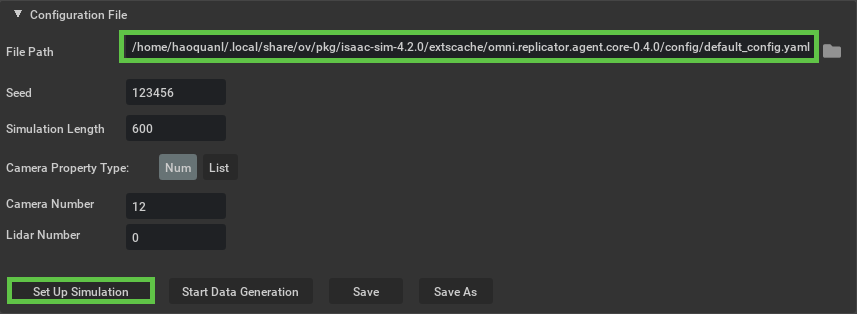
Click the Set Up Simulation button from the Configuration File panel and it starts loading simulation assets, which might take a while.
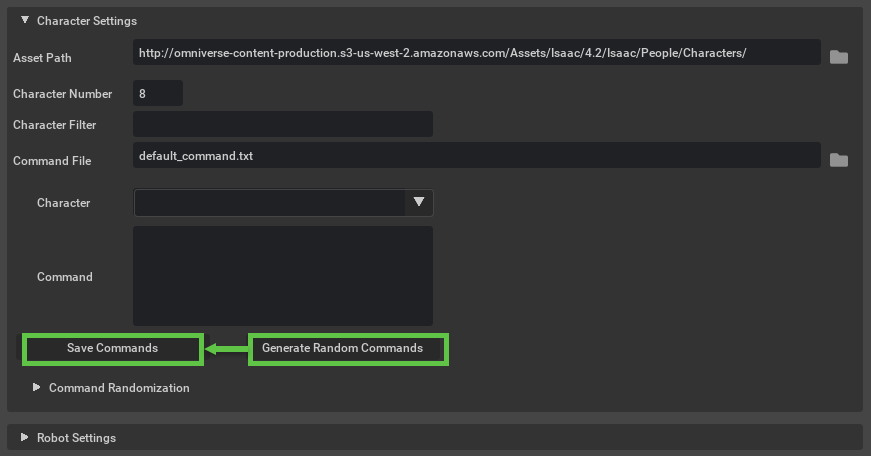
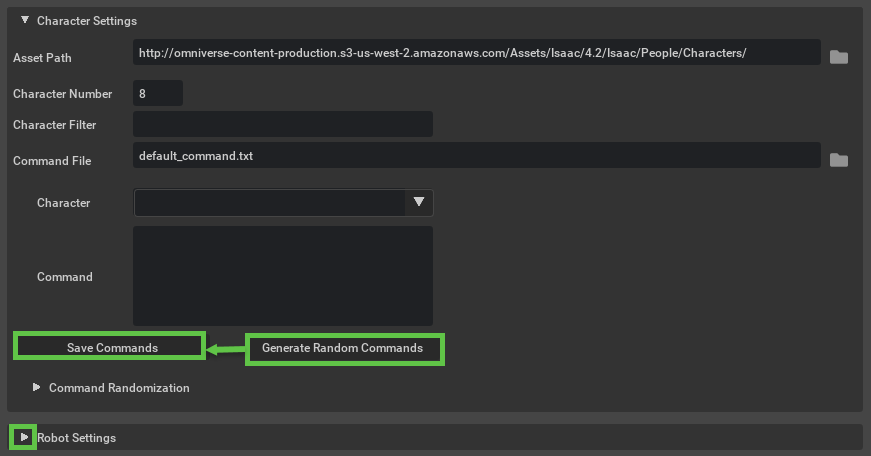
Click the Generate Random Commands button from the Character Settings panel to create commands.
Click the Save Commands button in the Character Settings panel to save commands in the previous step.
[Optional] Click the Save or Save As button from the Configuration File panel, if you want the configuration for this simulation saved.
Click the Start Data Generation button and the simulation starts. It might take a while to finish.
Simulation lasts according to the simulation length field in the Configuration File panel.
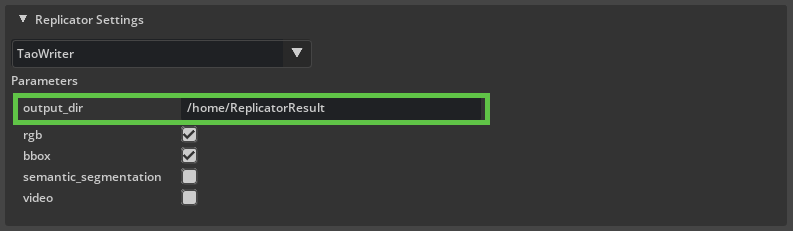
The output data can be found from the output_dir according to the Replicator Settings panel.
Configuration File#
Configuration contains the essential data that defines a simulation. Understanding what each section and row in the configuration file represents helps you understand what ORA can offer. The config file has five sections:
global
scene
replicator
character
robot
The structure of the configuration file is fixed, but the order of each property can vary. For example camera_num can be below the simulation_length. Properties not listed in the format are ignored by our extension.
Note
[Isaac Sim Assets Path] is the path to Isaac Sim Assets. You need to set up Nucleus to use them. It can also be retrieved by printing omni.isaac.core.utils.nucleus.get_assets_root_path() with the Isaac Sim script editor.
The following is an example configuration file:
omni.replicator.agent:
    version: 0.2.1
    global:
        seed: 123456
        camera_num: 5
        lidar_num: 0
        simulation_length: 10
    scene:
        asset_path: [Isaac Sim Assets Path]/Isaac/Environments/Simple_Warehouse/full_warehouse.usd
    character:
        asset_path: [Isaac Sim Assets Path]/Isaac/People/Characters/
        command_file:
        filters:
        num: 5
    robot:
        command_file:
        nova_carter_num: 0
        transporter_num: 0
        write_data: false
    replicator:
        writer: TaoWriter
        parameters:
            output_dir:
            rgb: True
            bbox: True
            semantic_segmentation: False
            video: False
Global Properties#
seed
The random seed that is used in all the randomization features. The same seed guarantees the reproducibility of the same output. If the seed section is left empty, the current system time is used as the seed.
camera_num
/World/Cameras are used for generating data. If camera_num (n) is smaller than the number of cameras in the stage, only the first n cameras in the stage are used for generating data. If camera_num is -1, ORA uses all the existing cameras in the USD under /World/Cameras.camera_num value of cameras for the stage under /World/Cameras with the naming convention Camera, Camera_01, Camera_02, …, is reached or exceeded, no additional cameras are added.Note
The number of cameras for a data generation job is bounded by the VRAM of the system. If you encounter error messages like Cannot create cuda external memory for resource, try reduce camera_num. The complexity of a scene impacts the file descriptor resources. This could limit the number of cameras for a data generation job as well. If you encounter error messages like dup failed for resourceType and Too many open files, try increasing the amount of file descriptors that individual users can consume. For example, HARD_LIMIT=`ulimit -Hn`; ulimit -Sn $HARD_LIMIT increases your open file descriptor limit to the highest value allowed by the OS.
lidar_num
/World/lidars are used for generating data. If lidar_num (n) is smaller than the number of valid Lidar cameras in the stage, only the first n valid Lidar cameras in the stage are used for generating data. If lidar_num is -1, ORA uses all the existing Lidar cameras in the USD under /World/Lidars as long as they have a valid matching camera.lidar_num value of Lidar cameras for the stage under /World/Lidars with the naming convention Lidar, Lidar_01, Lidar_02, …, is reached or exceeded, no additional Lidar cameras are added.camera_list
lidar_list
simulation_length
simulation_length is set to 10 (seconds), 300 frames of data is generated per camera.simulation_length seconds.Scene Properties#
asset_path
The path to the scene environment USD. It must contain the environment of the simulation, but it can also contain some characters and cameras used for data generation. If you like the randomized result for a certain scene, it can be saved as USD and be reused again by providing its path to this field.
Character Properties#
num
num value of characters for the stage is reached or exceeded, no additional characters are added.asset_path
The path to the character asset folder. It must be a directory that stores the USD files for the character assets. Sub-directory and custom assets are allowed.
command_file
The path to the command file that controls the behavior of the characters. It must be a .txt file where each line starts with the name of the character and is followed by the name of the command and the parameters for this command.
filters
,.filter.json and it must be under the root directory of the asset path folder. When using the UI, you can hover the mouse on the filter label, which shows the currently available labels for this asset folder. See [Isaac Sim Assets Path]/Isaac/People/Characters/filter.json for an example filter file.Robot Properties#
nova_carter_num
nova_carter_num value of Nova Carter robots for the stage under /World/Robots with the naming convention Nova_Carter, Nova_Carter_01, Nova_Carter_02, …, is reached or exceeded, no additional Nova Carter robots are added.transporter_num
transporter_num value of Transporter robots for the stage under /World/Robots with the naming convention Transporter, Transporter_01, Transporter_02, …, is reached or exceeded, no additional Transporter robots are added.command_file
The path to the command file that controls the behavior of the robots. It must be a .txt file where each line starts with the stage name of the robot and is followed by the name of the command and the parameters for this command.
write_data
A Boolean value that determines whether to write the camera output data for the robots. If this is set to true, ORA outputs the data for the first two cameras on each robot. If this is set to false, the robots are still controlled according to the command file, but their cameras won’t write any data.
Note
Enabling write_data increases the number of cameras to be written. If the VRAM is running out, reduce the number of the cameras in stage.
Replicator Properties#
writer
parameters
Note
camera_num/lidar_num and camera_list/lidar_list are mutual exclusive. You can toggle the Camera Property Type in the UI to choose between number and list.
Modify the Stage with UI#
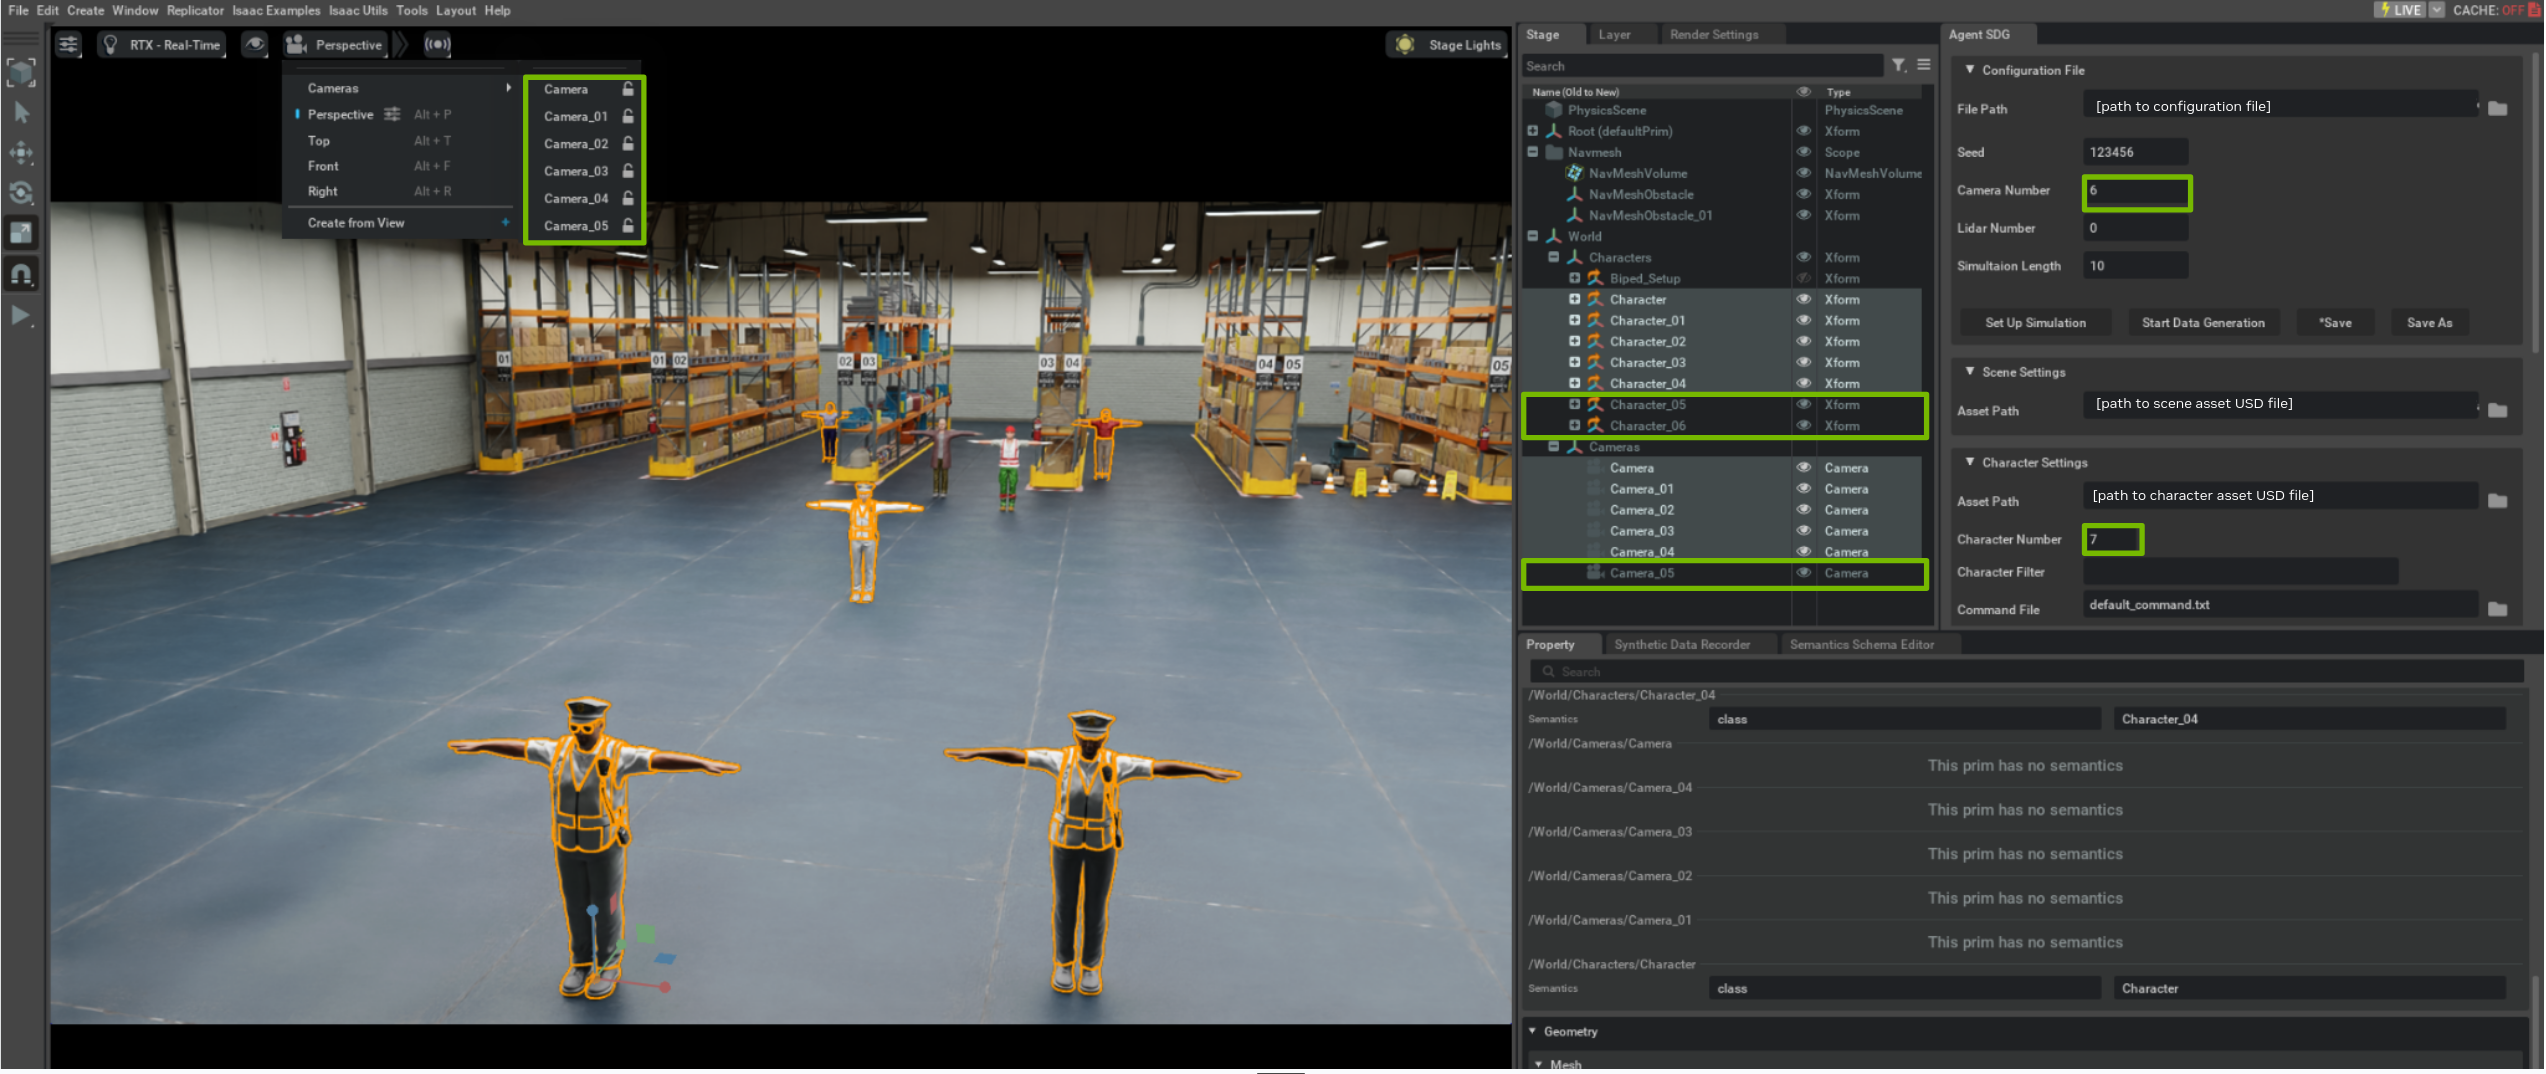
ORA enables you to modify settings using the UI. Here is an example that demonstrates how to adjust the number of characters and cameras in the stage:
Load the default configuration file and click the Set Up Simulation button in the Configuration File panel. This action generates a scene with 5 characters and 5 cameras, as specified by the Character Number and Camera Number values in their respective panels.
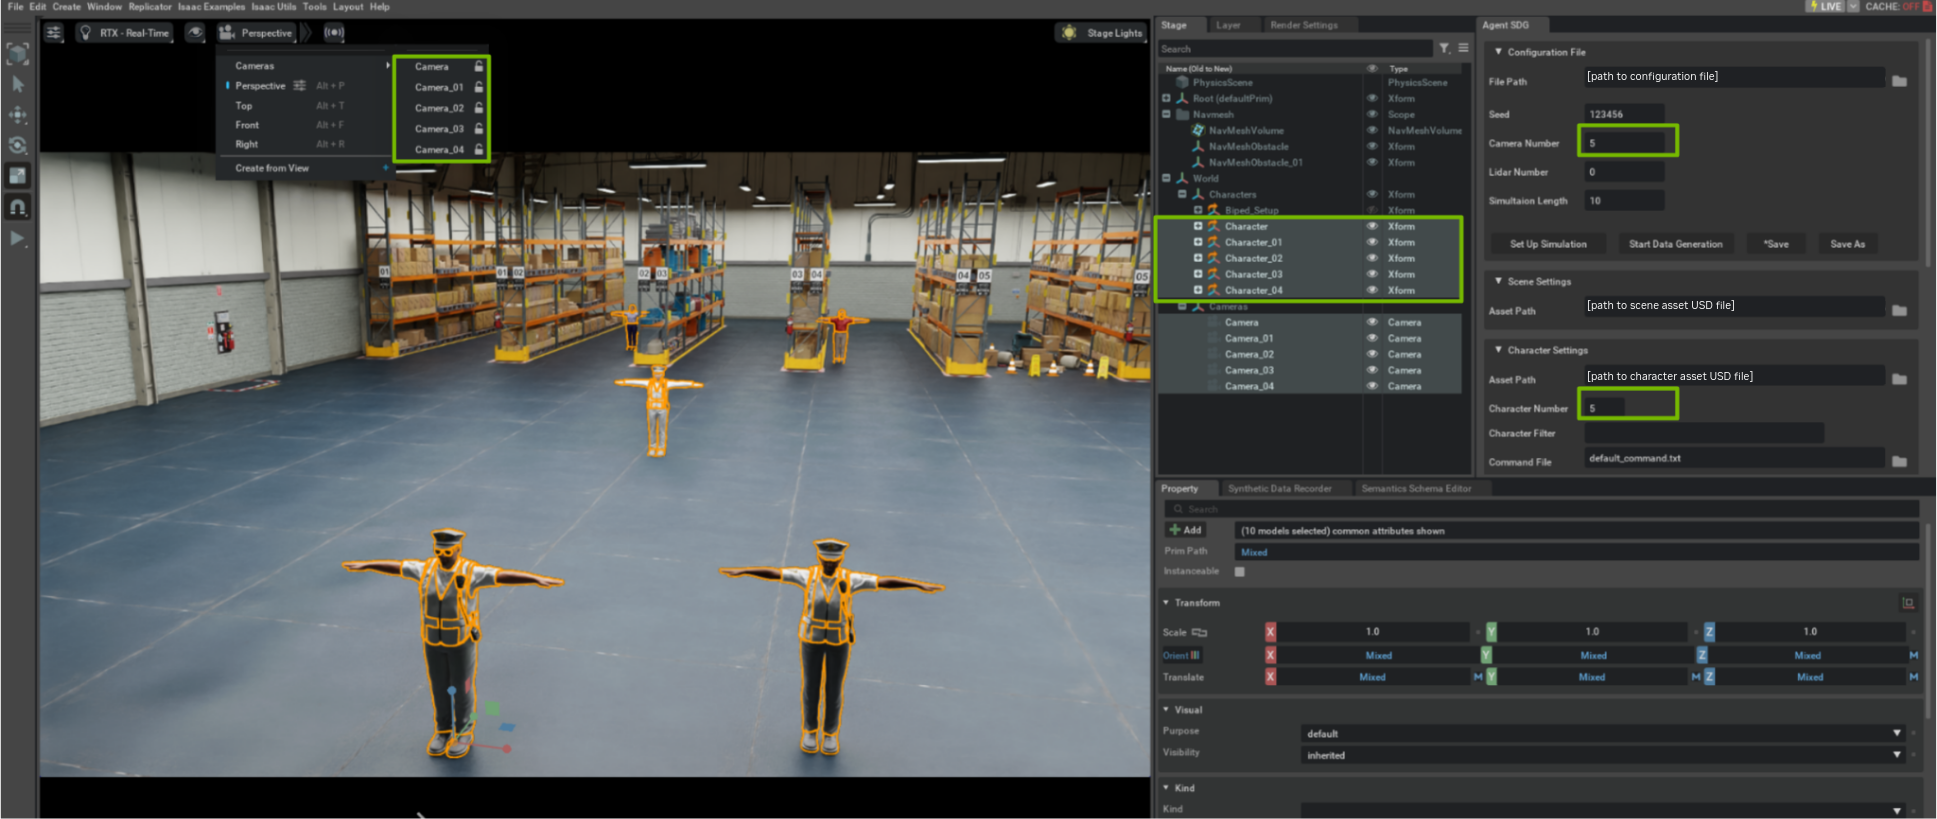
To add two more characters and one more camera:
In the Character Settings panel, increase the Character Number value by 2.In the Configuration File panel, increase the Camera Number value by 1.You can click the Save button in the Configuration File panel to save current settings into the configuration file.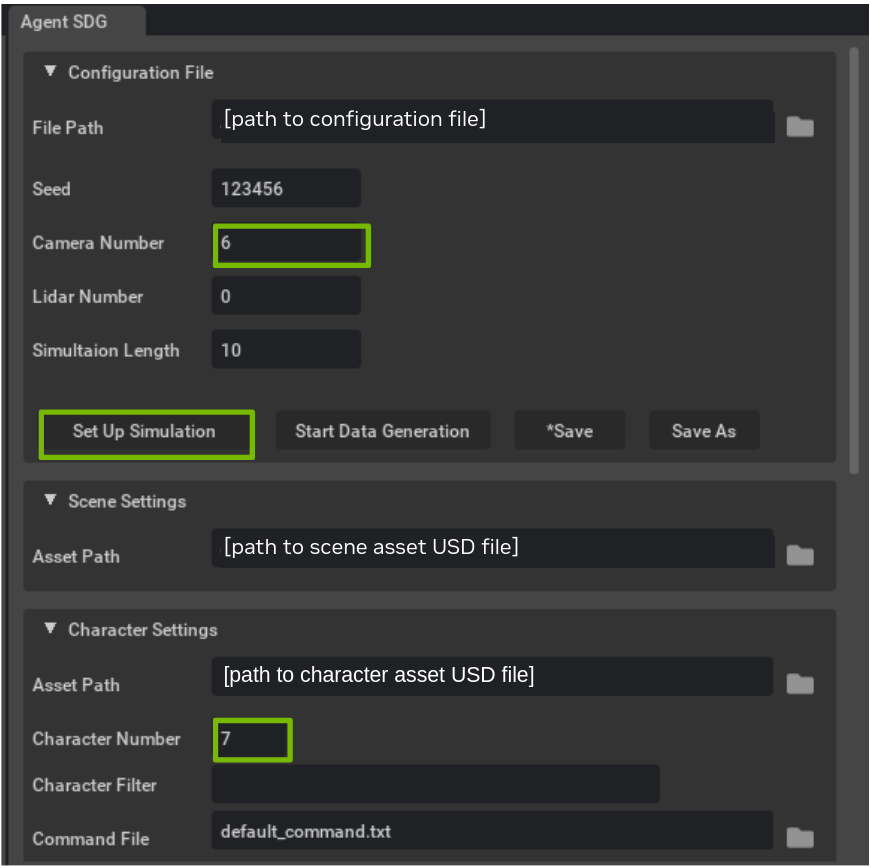
Click the Set Up Simulation button in the Configuration File panel again. After resetting the scene, you will see 2 additional characters and 1 new camera added to the stage.
Minimum Configuration File#
The minimum data required for the configuration file is the header of the extension omni.replicator.agent and the version of the extension. Other fields have default values, if they are not specified explicitly, the default values are generated automatically.
The version in the config file must match the major version of the current extension. For example, 0.1.12 works with 0.1.11 but 0.0.12 won’t work with 0.1.12. See Semantic Versioning for the version convention.
A default config file is provided in core/config/default_config.yaml, which comes with the core extension and is automatically loaded when the extension starts. When no command file is specified in the config file, the default_command.txt and ‘default_robot_command.txt` are created at the system default location and its path is added to the config file.
The following is an example of the minimum config file:
omni.replicator.agent:
version: 0.2.1
Data Generation from UI#
The ORA UI provides control for all the attributes of the simulation configuration. The attributes provide you with fine grain control over the simulation result. The following steps launch the data generation with simulation configurations:
Follow Enable Omni.Replicator.Agent to install the app and necessary extensions.
Enable the UI extension (
omni.replicator.agent.ui) to open the Agent SDG window.After the extension is enabled, a default config file is loaded into the UI and the default values are reflected in the UI accordingly.
To load a different configuration file, click the folder icon next to the File Path text field in the Configuration File panel or directly enter the path to the config file in the File Path text field.
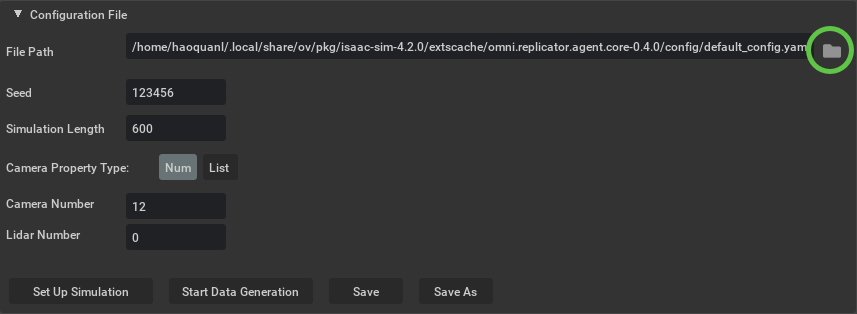
Modify other simulation properties in the UI.
All the fields in the configuration file can be directly edited through the UI. Each UI panel represents a section in the config file. See the Configuration File to review what each field means.
When changes in the UI are made, the “*” symbol appears on the Save File button. Changes are not written to the config file until the Save File button is clicked. However, if you click Set Up Simulation or Start Data Generation buttons, it uses the configuration set from the UI, even if the changes are not saved to the configuration file.
When modifying commands, the “*” symbol appears on the Save Commands button instead. This is because modifications in the command file do not reflect the config file itself. When clicking Save File on the Configuration File panel, it also triggers the saving of command files.
A Generate Random Commands button is provided to generate random commands for agents in the scene. When you click Save Commands, it overwrites the existing commands in the command file.
Assets (scene, characters, cameras) are not loaded until the Set Up Simulation button is clicked.
Extension spawns characters, if there are not enough characters in the scene.
Extension spawns cameras to make sure there are enough cameras in the scene.
If there are many characters or cameras in the scene already, the extension does not remove any assets and it uses the first N cameras for the data output.
When there are unsaved changes, Set Up Simulation and Start Data Generation buttons run according to the information displayed in the UI rather than from the configuration file on disk.
Click the Set Up Simulation button to load the simulation assets and wait the loading to finish. Loading can take a while, depending on the complexity of the assets.
Note
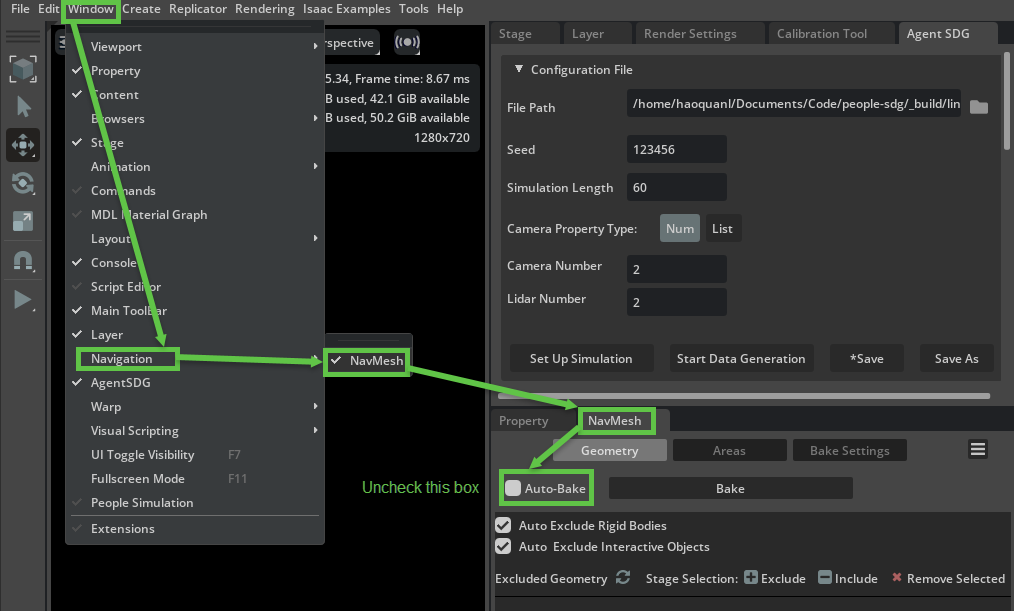
Before setting up the simulation, ORA requires a navmesh in the stage to spawn agents and control them correctly. Learn how to create your navmesh from Navigation Mesh.
You can also go to Window > Navigation > NavMesh and turn off Auto Rebake in the NavMesh settings. Turning it off can increase the performance.
Modify agent (character, robot) commands as you wish.
When commands are modified, “*” symbol appears in Save Commands button instead. This is because modifications are made for the command file instead of the config file.
ORA provide a command editor for each agent. You can select the agent name on the tab and use the text editor to edit the command for it.
Set up and run data generation.
[Optional] Click the Save or Save As button from the Configuration File panel, if you want the configuration for this simulation to be saved.
Saving the configuration file also triggers saving of the command files.
After the assets have been loaded and modified, and the command files have been generated and saved, press the Start Data Generation button in the Configuration File panel to start recording data.
Agents start executing commands and Replicator starts recording data.
The simulation automatically stops when enough data has been generated to cover the simulation time set in the config file.
To end the data generation early, click Stop in the editor menu on the left.
The output data can be found in the output_dir according to the Replicator Settings panel.
Data Generation from Script#
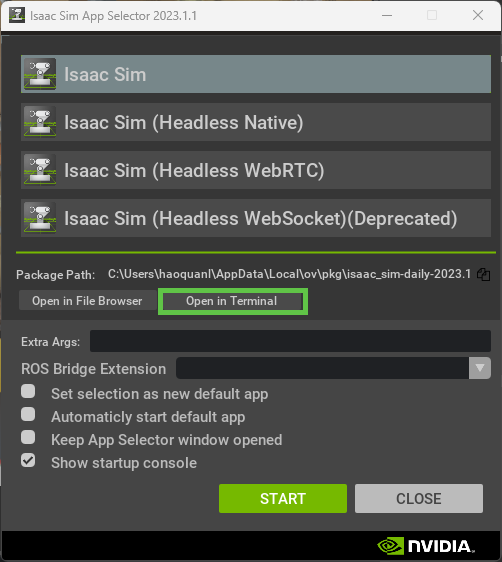
For large-scale data generation, it can be more efficient to launch it from script. ORA provides an automatic script (sdg_schedueler.py) to run offline data generation. To run from script, choose open in terminal in the App Selector.
- For Linux, in the pop-up command line window, run the following command:
./python.sh tools/isaac_people/sdg_scheduler.py -c [config file path]
- For Windows, run the following command:
.\python.bat tools/isaac_people/sdg_scheduler.py -c [config file path]
An example config file is also provided in the isaac_people folder. For a sample run, execute:
./python.sh tools/isaac_people/sdg_scheduler.py -c tools/isaac_people/config.yamlThe parameters for the command are:
config file path: Config file location.
Note
The [asyncio] Exception in callback Task.task_wakeup(<Future finis...3333333333333>) error is harmless and can be ignored.
Simulation Control#
To further understand simulation control, see:
Terminology#
Omni.Replicator.Agent.Core
The core extension that manages the simulation state. It contains the essential API and modules for setting up the scene, running the simulation, and capturing the data. Its modules can be called independently.
Omni.Replicator.Agent.UI
The UI extension for ORA. When this extension loads, the core extension is loaded automatically. This extension contains the UI components for easy interaction with the extension.
Configuration File
A .yaml file that contains configuration data that defines the key components of a simulation, including the randomization seed, duration of the simulation, number of the agents, output format. To use our extension, you must load load a configuration file or use the UI to generate a YAML file first.
Command File
A .txt file that contains commands for the agents. The agents (characters, robots) perform actions based on the given commands. The extension controls the agents through the omni.anim.people extension. Different agents have different command files.
Agent
Agents are controlled by the respective command files and perform actions in the simulation. The extension supports characters (human) and robots (Isaac Nova Carter) as agents.
Seed
Randomization seed. Given the same seed, the extension can generate the same randomized result for camera and agent location and agent behaviors. With the same seed and the same sequence of operations, the same data is guaranteed to be generated.
Replicator (Omni.Replicator)
The data capturing extension that our extension is based on. More information about the Replicator extension can be found in Replicator Official Documentation.
Omni.Anim.People
The underlying extension for controlling the agents. It is a command-based system that drives the behavior of the agents. More information can be found in the Official Omni.Anim.People documentation.