Back End Setup#

Back End Setup#
Open a new terminal window and perform all the subsequent steps within that session.
Update python (if needed)#
Poetry, the tool for dependency management and packaging, requires Python version 3.12 or higher.
Determine the currently installed Python version:
python3 --version
Note
If the displayed Python version is earlier than 3.12, proceed with upgrading your Python installation.
These steps will upgrade the entire Linux environment and may take some time to complete, depending on the current state of your system packages:
sudo apt update -y && sudo apt upgrade -y

sudo apt install software-properties-common -y

sudo add-apt-repository -y ppa:deadsnakes/ppa

sudo apt update -y

sudo apt install -y python3.12

sudo update-alternatives --install /usr/bin/python3 python /usr/bin/python3.12 2
Verify Python Version#
Check the output of the python3 --version command. In this guide, Python version 3.12.8 is used:
python3 --version
Install Pip3#
Ensure that the appropriate version of Pip3 is installed. There are two main approaches available depending on your Linux distribution:
Install Pip3 using a script
curl -sS https://bootstrap.pypa.io/get-pip.py | python3.12
If the command runs successfully, the output should resemble the following example:

Install Pip3 using apt
sudo apt install python3-pip
Verify Pip3#
Run the pip3 --V command to verify the installation. In this guide, version 24.3.1 of Pip is installed:
Note
Once Pip3 is installed, you may need to log out and log back into your terminal session. This refreshes the PATH environment variable, ensuring that the verification command executes correctly.
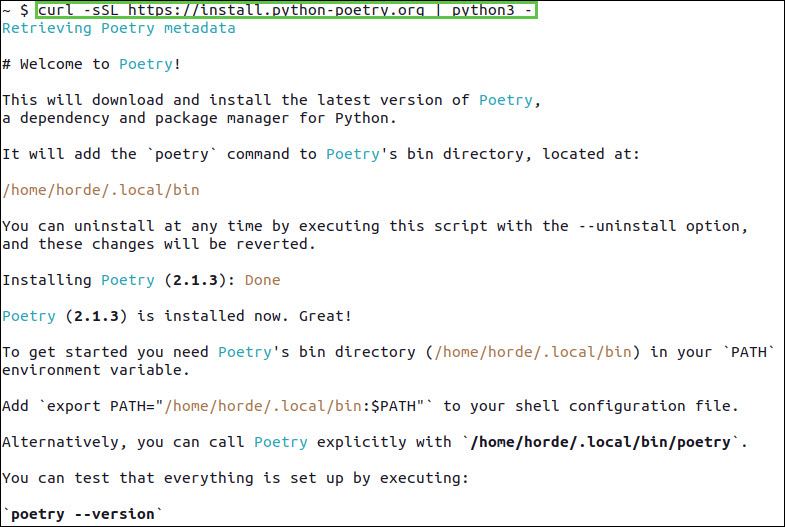
Install Python Poetry#
Poetry is a Python tool designed for managing dependencies and packaging projects. To install it, run the following command:
curl -sSL https://install.python-poetry.org | python3 -
If the command executes successfully, you should see the following output:
To ensure the Poetry command is recognized and works properly, add its directory path to your system’s PATH environment variable:
export PATH="/home/<user>/.local/bin:$PATH"
Verify Python Poetry#
Confirm the installed version of Poetry by running the appropriate command. In this guide, version 1.8.5 is used:
poetry --version
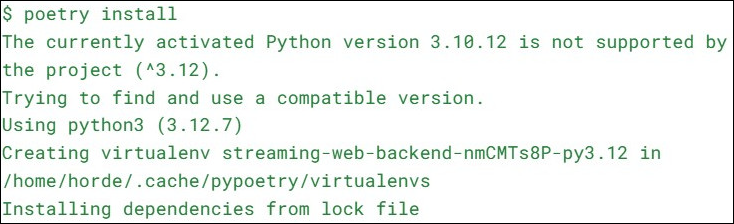
Install Dependencies using Poetry#
The content of this folder is located in the Portal Sample GitHub repository.
To install the backend dependencies for the Portal Sample, navigate to the backend/ directory in the cloned OVonDGXC Portal Sample. This repository was cloned in an earlier section.
All commands should be executed from within the backend directory. Once you’ve navigated to the sample directory, proceed with the following steps:
cd backend/
poetry install
If the command completes successfully, you should expect a similar output:
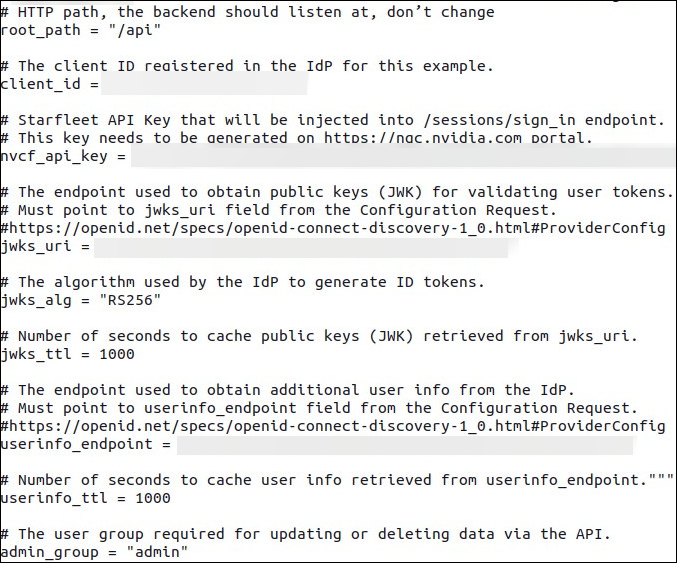
Configure the Back End Sample#
Begin by creating the configuration file:
touch ./settings.toml
Use the script below to apply the configurations, ensuring that all placeholders enclosed in angle brackets (<>) are replaced with the appropriate user-defined values:
cat << 'EOF' | sudo tee ./settings.toml
# The HTTP path the backend should listen at. Do not change.
root_path = "/api"

# The client ID registered in the IdP for this example.
client_id = "<client id>"

# Starfleet API Key that will be injected into /sessions/sign_in endpoint.
# This key needs to be generated on https://ngc.nvidia.com portal.
nvcf_api_key = "<NVCF_TOKEN>"

# https://openid.net/specs/openid-connect-discovery-1_0.html#ProviderConfig
metadata_uri = "https://<customer domain>/.well-known/openid-configuration"

# The algorithm used by the IdP to generate ID tokens.
jwks_alg = "<ALGO>"

# Number of seconds to cache public keys (JWK) retrieved from jwks_uri.
jwks_ttl = <number, usually something like 1000 is fine>

# Number of seconds to cache user info retrieved from userinfo_endpoint.
userinfo_ttl = <number, usually something like 1000 is fine>

# The user group required for updating or deleting data via the API.
admin_group = "<admin group identifier>"

# The maximum number of instances the same app a user can open at any given time
max_app_instances_count = 2

EOF
FIELD |
EXAMPLE ENTRY |
EXPLANATION |
|---|---|---|
clientID |
portal-sample-auth |
A public identifier for applications that use the OIDC protocol for authentication and authorization of OVC application. |
nvcf_api_key |
nvapi-XXXX |
The API token obtained from NVCF. |
jwks_uri |
https://auth.keycloak.com/realms/ovc2-auth/protocol/openid-connect/certs |
The endpoint used to obtain public keys (JWK) for validating user tokens. Must point to jwks_uri field from the Configuration Request. https://openid.net/specs/openid-connect-discovery-1_0.html#ProviderConfig |
jwks_alg |
RS256 |
The algorithm used by the IdP to generate ID tokens. |
jwks_ttl |
1000 |
Number of seconds to cache public keys (JWK) retrieved from jwks_uri. |
userinfo_endpoint |
https://auth.keycloak.com:8443/realms/ovc2-auth/protocol/openid-connect/userinfo |
The endpoint used to obtain additional user info from the IdP. Must point to userinfo_endpoint field from the Configuration Request. https://openid.net/specs/openid-connect-discovery-1_0.html#ProviderConfig |
userinfo_ttl |
1000 |
The number of seconds to cache user info retrieved from userinfo_endpoint. |
admin_group |
admin |
The user group required for updating or deleting data via the API. |
Verify Back End Sample Configuration#
Verify that the configuration settings have been applied successfully:
cat settings.toml
Below is an example of a completed configuration:
Run the Back End Sample#
Execute the following command to launch the back-end service:
poetry run api
After running poetry run api, keep the terminal window open as the Python environment remains active within that session. Once the command executes, the output will appear as follows:
