Project#
Within a Kit-based application are several settings that improve visual quality and performance for configurators. The settings described in this section pertain to any configurator project regardless of the type of environment you plan to use.
Preferences#
As a starting point, there are two options to enable in the Preferences panel. Fabric Scene Delegate (to help speed up the scene) and Material Distilling (to improve render performance).
Note
If you are using the USD Composer Template, you can skip steps 1-4 below. These options are already enabled in the template.
Access the Preferences panel by selecting Edit menu > Preferences. The Preferences options will appear under a Preferences tab at the bottom of the screen.
Navigate to the Rendering option on the left side of the panel.
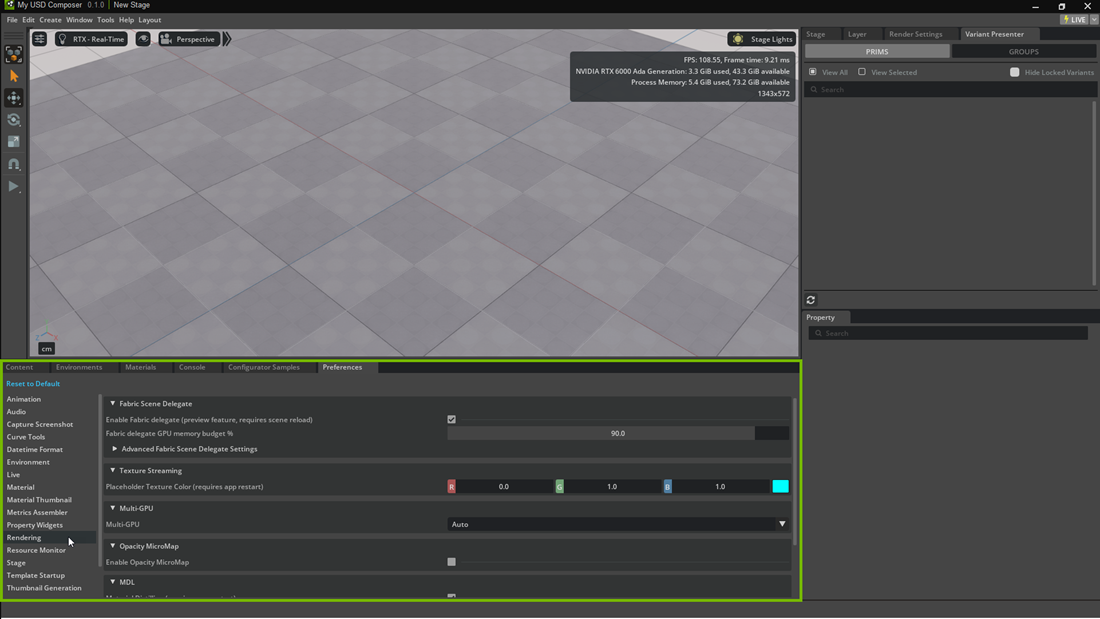
In the Fabric Scene Delegate section, ensure that the Enable Fabric Delegate option is enabled.
This option helps speed up the scene, optimizing asset handling by delegating tasks through Omniverse’s Fabric methodology. To learn about how Fabric Scene Delegate works under the hood, see Introduction to the Fabric Scene Delegate.
In the MDL section, confirm the Material Distilling option is enabled.
Material distilling refers to the process of simplifying and converting full-fidelity Material Definition Language (MDL) materials for improved portability and rendering performance. Distillation is a process of compiling and converting MDL materials for render performance. To gain an understanding of how this feature works at a technical level, see MDL Distill and Bake.
Render Settings#
Next, we’ll set the render settings to be most conducive to configurator requirements. Adjust these settings manually, or load a file to set the settings.
Adjust Render Settings With a File#
To set the recommended settings, load Template.settings.usd into the Stage:
Download Template.settings.usd to an accessible location.
In the application, at the upper right of the screen, click the Render Settings tab.
Click the hamburger menu and choose Load Settings.

Navigate to
Template.settings.usdand select it.
Your render settings are now loaded.
Adjust Render Settings Manually#
To adjust the settings manually, navigate to the Render Settings tab at the upper right of the screen and follow the chart below. More detailed explanations of each setting can be found in the In-Depth Render Settings section of this guide.
Common Tab Settings
Section |
Setting |
Value |
|---|---|---|
Lighting
|
Invisible Light Refractions Roughness Threshold
|
0.01 |
Invisible Light Reflections Roughness Threshold
|
0.01 |
Ray Tracing Tab Settings
Section |
Setting |
Value |
|---|---|---|
NVIDIA DLSS
|
Ray Reconstruction
|
(enable) |
Direct Lighting
|
Sampled Direct Lighting Mode
|
(enable) |
Samples per Pixel
|
8 |
|
Reflections: Light Samples per Pixel
|
8 |
|
Reflections
|
Max Reflection Bounces
|
At least 2 |
Translucency
|
Reflection Seen Through Refraction
|
(enable) |
Secondary Bounce Reflection Throughput Threshold
|
0 |
|
Fractional Cutout Opacity
|
(enable) |
|
Depth Correction for DoF
|
(enable) |
|
Roughness Sampling
|
(enable) |
Optional Settings#
These settings aren’t required for optimizing render time, but can help improve the look of the scene.
Post Processing Tab Settings
Section
|
Setting
|
Value |
|---|---|---|
Tone Mapping
|
Tone Mapping Operator
|
Iray |
Crush Blacks
|
(choose value based on visual preference) |
|
Burn Highlights
|
||
Saturation
|
||
F Stop
|
||
Color Grading
|
Color Grading
|
(enable) |
Contrast
|
(choose value based on visual preference) |
|
FFT Bloom
|
FFT Bloom
|
(enable) |
Scale
|
0.005 |
|
TV Noise and
Film Grain
|
TV Noise and Film Grain
|
(enable) |
Enable Vignetting
|
(enable) |
|
Vignetting Strength
|
0.065 |
➤ Next: Create the Environment