Containerizing and Local Validation
Overview
Any Kit Application to be deployed to an Omniverse Cloud PaaS instance must be built for Linux and subsequently containerized into a docker image along with any required dependencies. Typically, this is accomplished using the repo tools, a sample Dockerfile, and an Omniverse Kit Application Streaming base-image provided by NVIDIA.
To containerize and locally test a Kit application before deploying it to Omniverse Cloud PaaS, follow these steps:
Create a container from the fat application package.
Build the container.
Validate the containerized application functionality.
Containerize your Application
Note
Before proceeding, it is assumed you already have a developed and containerized application. If you have access to your application source code but have not yet performed a clean release build and subsequent application packaging, follow the steps found here.
To containerize your Kit Application, you will need the following:
Previously packaged application in the form of a zip file. This zip file is obtained by exporting the application as a fat package.
The
my_custom_app.my_usd_explorer.ovc.kitfile used for the application build.
Preparing Working Directory for Container Build
In these steps, all work will be done in the /opt/dockerfile directory.
Create that directory if it does not already exist:
sudo mkdir /opt/dockerfile
By default, content in /opt will be owned by root:root. Change the ownership of that directory to be your current user:
sudo chown <user>:<group> /opt/dockerfile
Use this command to add the current user ownership:
sudo chown $USER:$USER /opt/dockerfile
Within this folder, copy the myapp.zip fat package:
cp ~/kit-app-template-github/_build/packages/kit-app-template-fat@<user_specific_hash>.local.linux-x86_64.release.zip /opt/dockerfile
In this folder, we will be creating two new files in the following steps:
Dockerfile
startup.sh
Create the Dockerfile
A Dockerfile is used as instructions to create the container using the custom Omniverse application.
Change to the working directory where we will do our build:
cd /opt/dockerfile
Create the Dockerfile using your preferred file editor (i.e., nano, vi), then copy in the following code:
# Use the kit 105.1.2 streaming base image available publicly via NVIDIA NGC
FROM nvcr.io/nvidia/omniverse/kit:105.1.2

###
### This section of code defines variable inputs to `docker build`
###
ARG FAT_PACK
ARG OVC_KIT

RUN if [  -z $FAT_PACK ];then \
>&2 echo  "\n****************Warning!!!!*************\n"; \
>&2 echo "Define docker build --build-arg FAT_PACK=<path_to_your_fat_package>.zip, it cannot be empty!" ; false;\
fi

RUN if [  -z $OVC_KIT ];then \
>&2 echo  "\n****************Warning!!!!*************\n"; \
>&2 echo "Define docker build --build-arg OVC_KIT=<some.file.ovc.kit>, it cannot be empty!" ; false;\
fi

ENV OVC_KIT=$OVC_KIT
ENV OVC_APP_PATH="/opt/nvidia/omniverse"

### Cleanup embedded kit-sdk-launcher package as your custom application is already a full package with kit-sdk.
RUN rm -rf /opt/nvidia/omniverse/kit-sdk-launcher

### Copy the application package from the _build/packages directory into the containers OV app directory.
COPY --chown=ubuntu:ubuntu $FAT_PACK $OVC_APP_PATH

### Unzip the application package into the container's /app directory and then delete the application package.
WORKDIR $OVC_APP_PATH
RUN echo $OVC_APP_PATH
RUN FAT_PACK_BASE=$(basename $FAT_PACK) && unzip $FAT_PACK_BASE -d . && rm $FAT_PACK_BASE

# Pull in any additional required dependencies.
RUN ./pull_kit_sdk.sh

# Copy the startup.sh script from the repos source/scripts directory.
# This is what will be called when the container image is started.
COPY --chown=ubuntu:ubuntu startup.sh /startup.sh
RUN chmod +x /startup.sh

# This specifies the container's default entrypoint that will be called by "> docker run".
ENTRYPOINT [ "/startup.sh" ]

# Create local user configuration folder
RUN mkdir -p ~/.nvidia-omniverse/config
Create the Startup Script
In the /opt/dockerfile folder, create another file called startup.sh using your preferred editor (ie. nano, vi), then copy in the following code:
#!/usr/bin/env bash
set -e
set -u

# Check for libGLX_nvidia.so.0 (needed for vulkan)
ldconfig -p | grep libGLX_nvidia.so.0 || NOTFOUND=1
if [[ -v NOTFOUND ]]; then
    cat << EOF > /dev/stderr

Fatal Error: Can't find libGLX_nvidia.so.0...

Ensure running with NVIDIA runtime. (--gpus all) or (--runtime nvidia)

EOF
    exit 1
fi

# Detect NVIDIA Vulkan API version, and create ICD:
export VK_ICD_FILENAMES=/tmp/nvidia_icd.json

# Only required if needed to load a specific sample file during application launch by default.
# USD_PATH="${USD_PATH:-/app/samples/stage01.usd}"

USER_ID="${USER_ID:-""}"
if [ -z "${USER_ID}" ]; then
echo "User id is not set"
fi

WORKSTREAM="${OV_WORKSTREAM:-"omni-saas-int"}"

export HSSC_SC_MEMCACHED_SERVICE_NAME="memcached-service-r3"
export HSSC_SC_MEMCACHED_REDISCOVER="1"
export HSSC_SC_CLIENT_LOGFILE_ROOT=/tmp/renders/hssc
mkdir -p /tmp/renders

__GL_F32B90a0=$(find /opt/nvidia/omniverse/hssc_shader_cache_client_lib -path \*release/lib\* -name libhssc_shader_cache_client.so)
echo "Found hssc client so in: $__GL_F32B90a0"
export __GL_F32B90a0
export __GL_a011d7=1   # OGL_VULKAN_GFN_SHADER_CACHE_CONTROL=ON
export __GL_43787d32=0 #  OGL_VULKAN_SHADER_CACHE_TYPE=NONE
export __GL_3489FB=1   # OGL_VULKAN_IGNORE_PIPELINE_CACHE=ON

export OPENBLAS_NUM_THREADS=10

CMD="${OVC_APP_PATH}/kit/kit"
ARGS=(
    "${OVC_APP_PATH}/apps/${OVC_KIT}"
    "--no-window"
    "--/privacy/userId=${USER_ID}"
    "--/crashreporter/data/workstream=${WORKSTREAM}"
    "--/exts/omni.kit.window.content_browser/show_only_collections/2="
    "--/exts/omni.kit.window.filepicker/show_only_collections/2="
    "--ext-folder /home/ubuntu/.local/share/ov/data/exts/v2"
    "--/crashreporter/gatherUserStory=0"
    "--/crashreporter/includePythonTraceback=0"
    #"--${OVC_APP_PATH}/auto_load_usd=${USD_PATH}" # Comment out if you don't need to auto load a specific USD file


)

# Since we won't have access for
echo "==== Print out kit config OVC_KIT=${OVC_KIT} for debugging ===="
cat ${OVC_APP_PATH}/apps/${OVC_KIT}
echo "==== End of kit config ${OVC_KIT} ===="

echo "Starting usd viewer with $CMD ${ARGS[@]} $@"

exec "$CMD" "${ARGS[@]}" "$@"
Note
The base image must match the Kit version of your application, any included or required extensions, and should include functionality for scalability and efficiency. (i.e., support for cluster-wide shader-caching).
Build the Container
Building the container leverages the Dockerfile previously created. All work will be done in the working directory of /opt/dockerfile.
Run the build process and pass in the two variables defined in the Dockerfile. The Docker process only sees the working directory content during the Docker build. Put the zip package in the local directory of /opt/dockerfile.
docker build . -t my_usd_explorer:0.1 --build-arg FAT_PACK=./kit-app-template-fat@2023.2.1+105.1.0.bf5935c7.local.linux-x86_64.release.zip \
--build-arg OVC_KIT=my_custom_app.my_usd_explorer.ovc.kit
When the build process is complete, the following should be displayed:
[+] Building 1.1s (17/17) FINISHED                                                              docker:default
…
=> exporting to image                                                                           0.0s
=> => exporting layers                                                                          0.0s
=> => writing image sha256:5ebf9d5fa4092f1f447881ddc723304f141b881a2fa1b118e8edc2b9a61dc9d8     0.0s
=> => naming to docker.io/library/my_usd_explorer:0.1                                           0.0s
Verify the image is build by listing all images using the following command:
docker image ls
The following should be displayed:
REPOSITORY                                TAG            IMAGE ID           CREATED          SIZE
my_usd_explorer                           0.1            5ebf9d5fa409   10 minutes ago   15.1GB
The above output shows that the container was successfully built and now resides locally on your local environment.
Local Validation of the Container
Now that we have created the custom application container, we want to ensure it runs locally before deployment on Omniverse Cloud PaaS.
To do this, run the container, automatically launching the application and starting the streaming process. After that, connect the running container to a Sample Web Client application to ensure functionality. You can find an example of a web client application that you can use to validate the streaming functionality here.
Run the container locally and ensure no errors. To run this container, the local server will need a GPU. The following command will launch the container, run it as a daemon in the background (-d), use the NVIDIA docker toolkit runtime, and allocate all available GPUs to the container.
docker run -d --runtime=nvidia --gpus all --net=host my_usd_explorer:0.1
This starts the my_usd_explorer container and can be verified with the following command:
docker ps
The following should be displayed:
CONTAINER ID   IMAGE                 COMMAND            CREATED                 STATUS
a9074bf47c42   my_usd_explorer:0.1   "/startup.sh"      48 minutes ago          Up 48 minutes
Note
When testing the container locally, it can take several minutes (i.e., 10 minutes) to fully load. This is due to the application compiling the shader cache and waiting for RTX renderer to become available.
Connect to the running container via a sample Streaming Web Client
Note
A Chromium-based browser (e.g., Google Chrome or Microsoft Edge) is required. Browsers such as Mozilla Firefox or Apple Safari are not compatible.
This is an example web client that can stream and communicate with Kit applications. In its default state, the web client is designed to be used with a dedicated USD Viewer Sample application, so some small modifications to turn it into a simpler validation web client for the custom Omniverse Cloud PaaS container will be necessary.
Create a very simple Web App Interface to embed your video and replace the default one (which is following the default USD Viewer Sample logic). For this, replace the usage of the existing Window.tsx by a simpler version.
Navigate to
src/.Create a
SimpleWindow.tsxfile.Copy the following code into the
SimpleWindow.tsxfile.
import { useState, useEffect } from 'react'

import './App.css'
import { AppStreamer } from '@nvidia/omniverse-webrtc-streaming-library';
import StreamConfig from '../stream.config.json';

function App() {
const [_, setStream] = useState(null);
const onStreamUpdate = (message: any) => {
    console.debug(message);
};
const onStreamStart = (message: any) => {
    console.debug(message);
};
const onStreamCustomEvent = (message: any) => {
    console.debug(message);
};

useEffect(() => {
    const server = StreamConfig["local"].server ?? "127.0.0.1"
    const width = 1920;
    const height = 1080;
    const fps = 60;
    const url = `server=${server}&resolution=${width}:${height}&fps=${fps}&mic=0&cursor=free&autolaunch=true`;
    const streamConfig = {
    source: 'local',
    videoElementId: 'remote-video',
    audioElementId: 'remote-audio',
    messageElementId: 'message-display',
    urlLocation: { search: url }
    };

    try {
    const stream = AppStreamer.setup({
        streamConfig: streamConfig,
        onStart: onStreamStart,
        onUpdate: onStreamUpdate,
        onCustomEvent: onStreamCustomEvent,
    })
        .then((result: any) => {
        console.info(result);
        })
        .catch((error: any) => {
        console.error(error);
        });
        setStream(stream);
    }
    catch (error) {
    console.error(error);
    }

}, []);

return (
    <div id={'video-group'}>
    <video
        id={'remote-video'}
        width={"100%"}
        height={"100%"}
        tabIndex={-1}
        playsInline
        muted
        autoPlay />
    <audio id="remote-audio" muted></audio>
    <h3 style={{ visibility: 'hidden' }} id="message-display">...</h3>
    </div>
)
}

export default App
Edit
src/App.tsxand modify the code to call theSimpleWindowinstead.
import "./App.css";
import Window from './Window';
import SimpleWindow from './SimpleWindow';

function App() {
    /** return <Window /> */
    return <SimpleWindow />
}

export default App;
To start the Sample Web Client, follow these steps:
Change into the directory where you extracted the Sample Web Client:
cd /home/horde/src/web-viewer-sample
Now run these commands:
npm install

npm run dev
The following should be displayed:
VITE v5.0.10  ready in 456 ms

➜  Local:   http://localhost:5173/
➜  Network: use --host to expose
➜  press h + enter to show help
Follow the on-screen directions:
press ‘h’ and enter to see the keyboard commands.
press ‘o’ and enter to open the default browser automatically with the correct address.
Alternatively, open a web browser and access the URL displayed by the application. (An example is shown in the screenshot below.) The container will probably take a minute or two to load. If you do not see the application stream load, hit the refresh button on the browser.
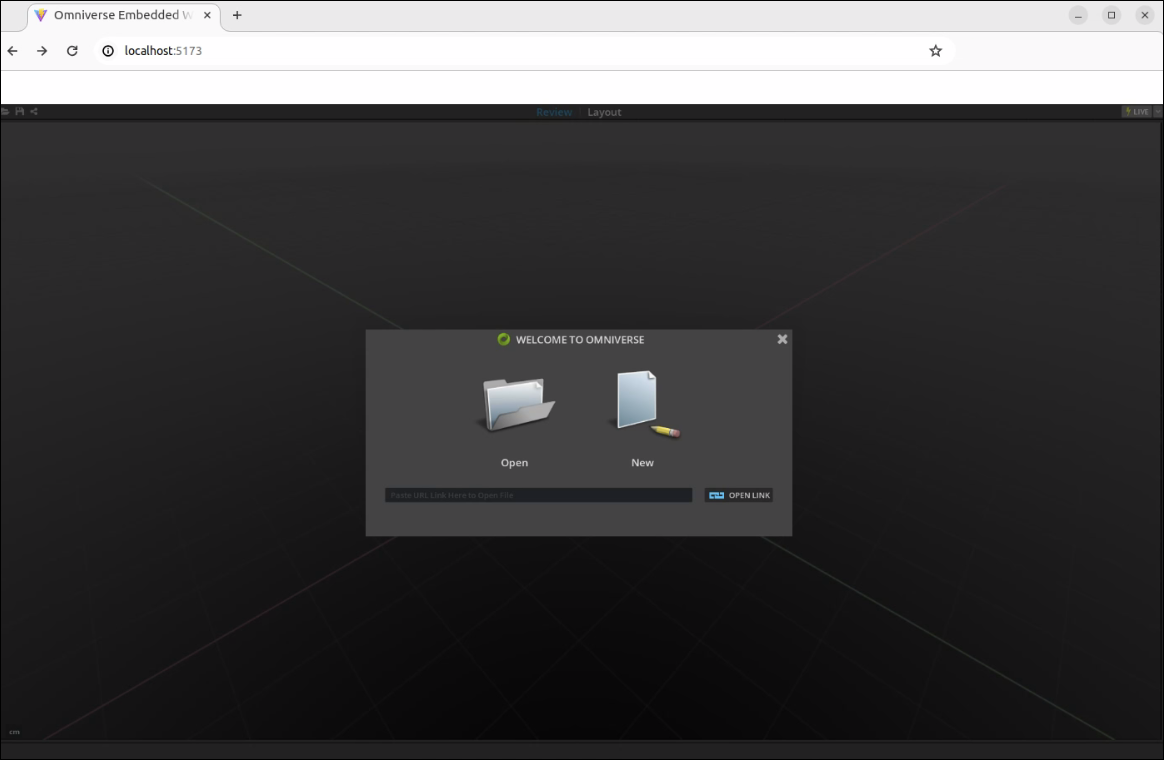
You should have the web application running locally on your workstation.
Note
If this is the first time running the container, it may take a few moments to fully load the application while it’s completing shader compilation. See the troubleshooting documentation for more details.
Stopping everything
To properly shut everything down, follow these steps:
Close the browser tab with the streaming window.
In the shell where you launched the web sample application, type
qthen<ENTER>.Stop the my_usd_explorer container using the following steps:
List all of the running containers
docker ps
Find and kill the
my_usd_explorer:0.1containerdocker kill <container name>
You now have a streaming Kit application ready for deployment to Omniverse Cloud PaaS.