Installing and configuring the NVIDIA vGPU Manager VIB#
This section covers installing and configuring the NVIDIA vGPU Manager:
Preparing the VIB file for Install
Uploading VIB using WinSCP
Installing vGPU Manager with the VIB
Updating the VIB
Verifying the Installation of the VIB
Uninstalling the VIB
Changing the Default Graphics Type in VMWare vSphere 6.5 and Later
Changing the vGPU Scheduling Policy
Disabling and Enabling ECC memory
Preparing the VIB file for Install#
Before you begin, download the archive containing the VIB file from the NVIDIA Enterprise Application Hub login page and extract the archived contents to a folder. The file ends with .VIB is the file you must upload to the host datastore for installation.
Note
For demonstration purposes, these steps use WinSCP to upload the .VIB file to the ESXi host.WinSCP can be downloaded here.
Upload the .VIB file using WinSCP#
WinSCP is a Secure Copy (SCP) protocol based on SSH (Secure Shell) that enables file transfers between hosts on a network—uploading the. VIB file using WinSCP is the quickest way to transfer the file from the Source location to the destination location, the ESXi datastore. Refer to the WinSCP documentation page for detailed information.
To upload the .VIB file to the ESXi datastore using WinSCP. Start WinSCP.

WinSCP opens to the Login window. In the Login window:
Select SCP as the file transfer protocol from the File Protocol dropdown menu.
Enter your ESXi hosts’ name in the Hostname field.
Enter the hosts’ username in the User name field.
Enter the hosts’ password in the Password field.
Note
You may want to save your session details to a site, so you do not need to type them in each time you want to connect—Press the Save button and type the site name.
Select the Login button to connect to the ESXi host using the credentials you provided.
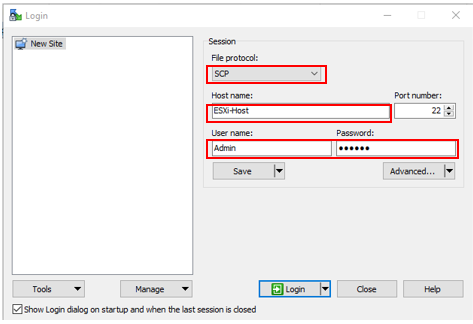
Select Yes to the Host Certificate warning.
Once you are connected to the ESXi host, you will see the contents of the default remote directory (typically, this is the ESXi hosts user’s home directory) on the remote file panel.
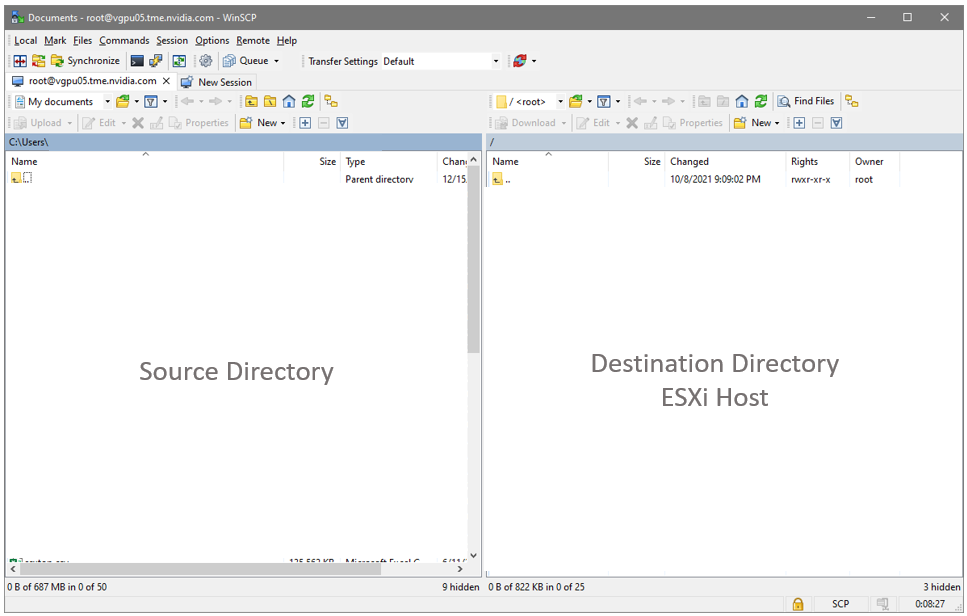
Upload the .VIB file from the Source location to the Destination location (the DataStore on the ESXi host).
In the left panel (Source Directory), navigate to the location of the .VIB file. Select the .VIB file.
Navigate to the destination location within the DataStore on the ESXi host in the right panel.
Select the Upload button over the left panel to start the .VIB file download.
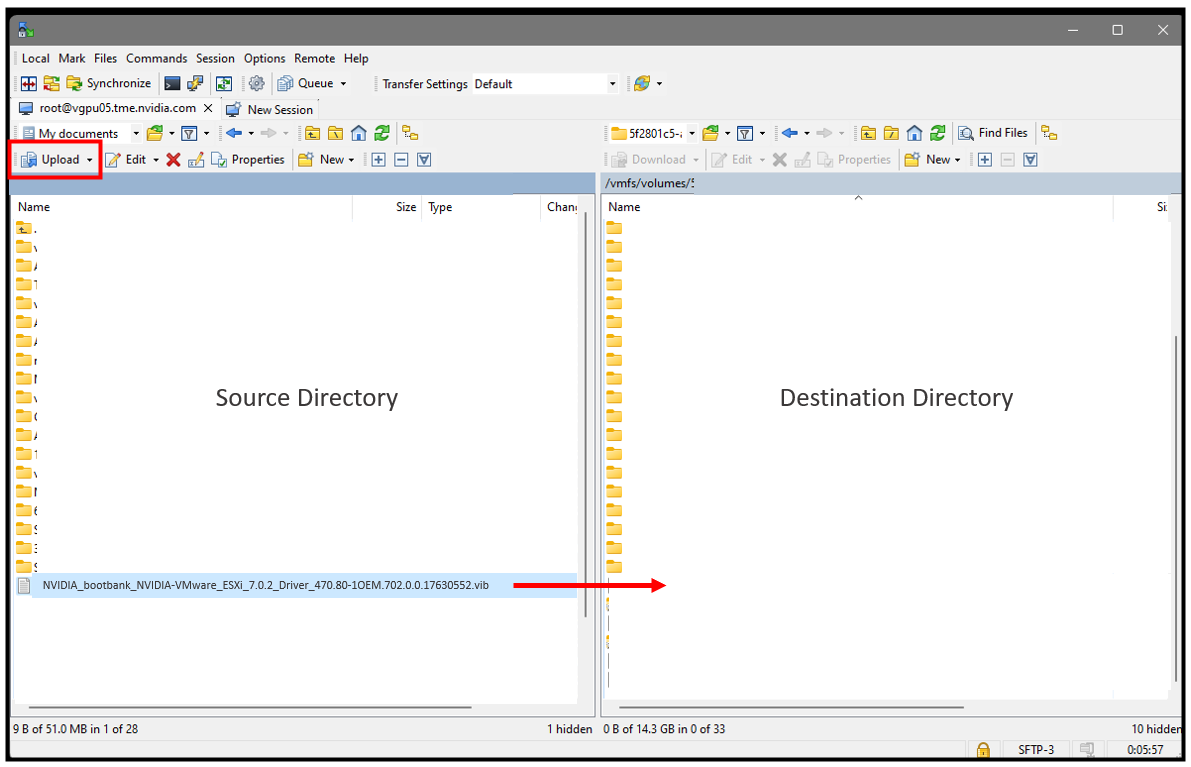
The .VIB file is uploaded to the datastore on the ESXi host.
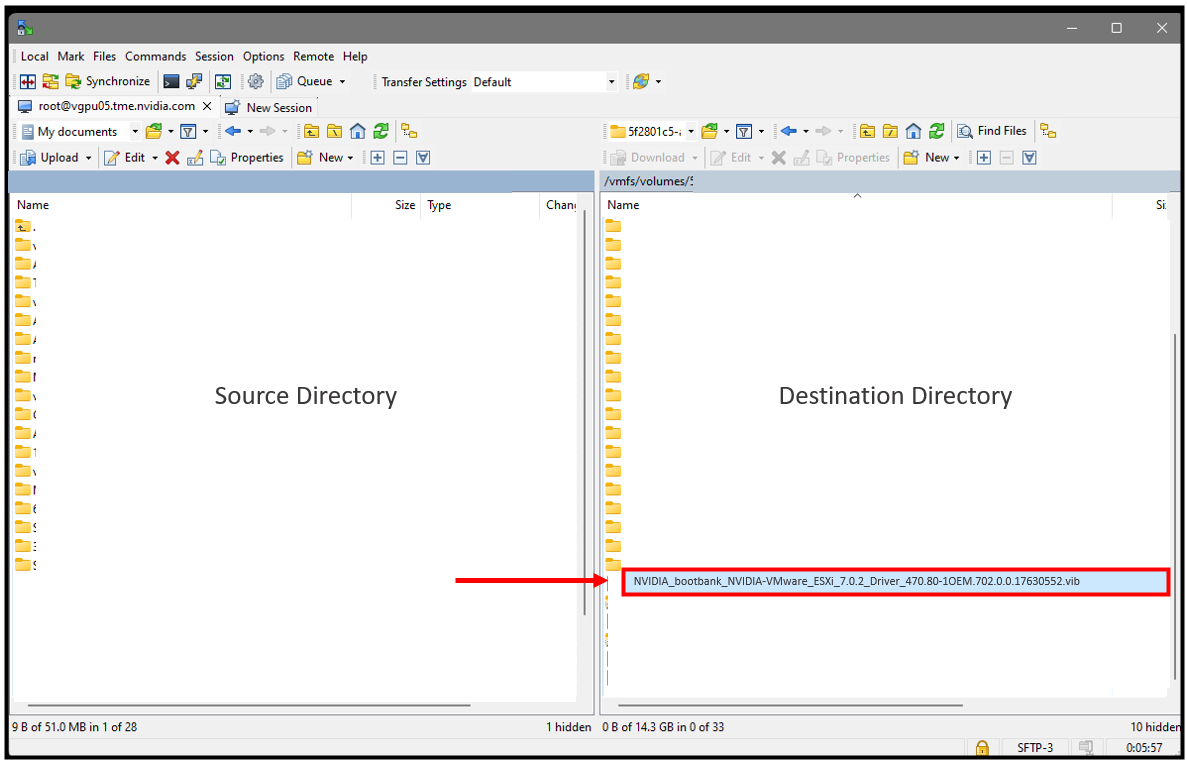
Installing vGPU Manager with the VIB#
The NVIDIA Virtual GPU Manager runs on the ESXi host. It is provided in the following formats:
As a VIB file, which must be copied to the ESXi host and then installed
As an offline bundle that you can import manually as explained in Import Patches Manually in the VMware vSphere documentation.
Important
Before vGPU release 11, NVIDIA Virtual GPU Manager and Guest VM drivers must be matched from the same main driver branch. If you update vGPU Manager to a release from another driver branch, guest VMs will boot with vGPU disabled until their guest vGPU driver is updated to match the vGPU Manager version. Consult Virtual GPU Software for VMware vSphere Release Notes for further details.
To install the vGPU Manager .VIB, you need to access the ESXi host via the ESXi Shell or SSH. Refer to VMware’s documentation on how to enable ESXi Shell or SSH for an ESXi host.
Note
Before proceeding with the vGPU Manager installation, make sure that all VMs are powered off, and the ESXi host is in Maintenance Mode. Refer to VMware’s documentation on how to place an ESXi host in maintenance mode.
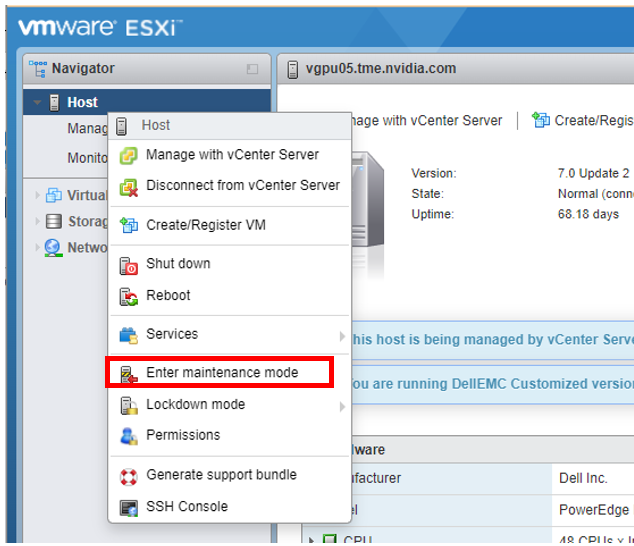
Place the host into Maintenance mode by right-clicking it and then selecting Maintenance Mode - Enter Maintenance Mode.
Note
Alternatively, you can place the host into Maintenance mode using the command prompt by entering:
$ esxcli system maintenanceMode set --enable=true
This command will not return a response. Making this change using the command prompt will not refresh the vSphere Web Client UI. Click the Refresh icon in the upper right corner of the vSphere Web Client window.
Important
Placing the host in Maintenance Mode disables any vCenter appliance running on this host until you exit Maintenance Mode, then restart that vCenter appliance.
Click OK to confirm your selection. This place’s the ESXi host in Maintenance Mode.
Enter the
esxclicommand to install the vGPU Manager package:[root@esxi:~] esxcli software vib install -v directory/NVIDIA_bootbank_NVIDIA-VMware_ESXi_7.0.2_Driver_470.80-1OEM.702.0.0.17630552.vib Installation Result Message: Operation finished successfully. Reboot Required: false VIBs Installed: NVIDIA_bootbank_NVIDIA-VMware_ESXi_7.0.2_Driver_470.80-1OEM.702.0.0.17630552 VIBs Removed: VIBs Skipped:
Note
The directory is the absolute path to the directory that contains the VIB file. You must specify the absolute path even if the VIB file is in the current working directory.
Reboot the ESXi host and remove it from Maintenance Mode.
Note
Although the display states “Reboot Required: false,” a reboot is necessary for the vib to load and Xorg to start.
From the vSphere Web Client, exit Maintenance Mode by right-clicking the host and selecting Exit Maintenance Mode.
Note
Alternatively, you may exit from Maintenance mode via the command prompt by entering:
$ esxcli system maintenanceMode set --enable=false
This command will not return a response. Making this change via the command prompt will not refresh the vSphere Web Client UI. Click the Refresh icon in the upper right corner of the vSphere Web Client window.
Reboot the host from the vSphere Web Client by right-clicking the host and selecting Reboot.
Note
You can reboot the host by entering the following at the command prompt:
$ rebootThis command will not return a response—the Reboot Host window displays.
When rebooting from the vSphere Web Client, enter a descriptive reason for the reboot in the Log a reason for this reboot operation field, and click OK to proceed.
Updating the VIB#
Update the vGPU Manager VIB package if you want to install a new version of NVIDIA Virtual GPU Manager on a system where an existing version is already installed.
To update the vGPU Manager VIB you need to access the ESXi host via the ESXi Shell or SSH. Refer to VMware’s documentation on enabling ESXi Shell or SSH for an ESXi host
The driver version seen within this document is for demonstration purposes. There will be similarities, albeit minor differences, within your local environment.
Note
Before proceeding with the vGPU Manager update, make sure that all VMs are powered off, and the ESXi host is placed in maintenance mode. Refer to VMware’s documentation on putting an ESXi host in maintenance mode.
Use the
esxclicommand to update the vGPU Manager package:1[root@esxi:~] esxcli software vib update -v directory/NVIDIA_bootbank_NVIDIA-VMware_ESXi_7.0.2_Driver_470.80-1OEM.702.0.0.17630552.vib 2 3Installation Result 4Message: Operation finished successfully. 5 Reboot Required: false 6 VIBs Installed: NVIDIA_bootbank_NVIDIA-VMware_ESXi_7.0.2_Driver_470.80-1OEM.702.0.0.17630552 7 VIBs Removed: NVIDIA_bootbank_NVIDIA-VMware_ESXi_7.0_Host_Driver_460.73.021OEM.700.0.0.15525992 8 VIBs Skipped:
Note
directory is the path to the directory that contains the VIB file.
Reboot the ESXi host and remove it from maintenance mode.
Verifying the Installation of the VIB#
After the ESXi host has rebooted, verify the installation of the NVIDIA vGPU software package.
Verify that the NVIDIA vGPU software package is installed and loaded correctly by checking for the NVIDIA kernel driver in the list of kernels-loaded modules.
[root@esxi:~] vmkload_mod -l | grep nvidia
nvidia                   5    8420
If the NVIDIA driver is not listed in the output, check dmesg for any load-time errors reported by the driver.
Verify that the NVIDIA kernel driver can successfully communicate with the NVIDIA physical GPUs in your system by running the nvidia-smi command.
The
nvidia-smicommand is described in more detail in NVIDIA System Management Interface nvidia-smi.
Running the
nvidia-smicommand should produce a listing of the GPUs in your platform.1[root@esxi:~] nvidia-smi 2Tue Jan 4 20:48:42 2022 3+-----------------------------------------------------------------------------+ 4| NVIDIA-SMI 470.80 Driver Version: 470.80 CUDA Version: N/A | 5|-------------------------------+----------------------+----------------------+ 6| GPU Name Persistence-M| Bus-Id Disp.A | Volatile Uncorr. ECC | 7| Fan Temp Perf Pwr:Usage/Cap| Memory-Usage | GPU-Util Compute M. | 8| | | MIG M. | 9|===============================+======================+======================| 10| 0 NVIDIA A16 On | 00000000:3F:00.0 Off | 0 | 11| 0% 33C P8 15W / 62W | 896MiB / 15105MiB | 0% Default | 12| | | N/A | 13+-------------------------------+----------------------+----------------------+ 14| 0 NVIDIA A16 On | 00000000:41:00.0 Off | 0 | 15| 0% 34C P8 15W / 62W | 3648MiB / 15105MiB | 0% Default | 16| | | N/A | 17+-------------------------------+----------------------+----------------------+ 18| 0 NVIDIA A16 On | 00000000:43:00.0 Off | 0 | 19| 0% 29C P8 15W / 62W | 0MiB / 15105MiB | 0% Default | 20| | | N/A | 21+-------------------------------+----------------------+----------------------+ 22| 0 NVIDIA A16 On | 00000000:45:00.0 Off | 0 | 23| 0% 26C P8 15W / 62W | 0MiB / 15105MiB | 0% Default | 24| | | N/A | 25+-------------------------------+----------------------+----------------------+ 26| 0 NVIDIA A40 On | 00000000:D8:00.0 Off | 0 | 27| 0% 30C P8 30W / 300W | 0MiB / 45634MiB | 0% Default | 28| | | N/A | 29+-------------------------------+----------------------+----------------------+ 30 31+-----------------------------------------------------------------------------+ 32| Processes: GPU Memory | 33| GPU GI CI PID Type Process name Usage | 34|=============================================================================| 35| No running processes found | 36+-----------------------------------------------------------------------------+
If nvidia-smi fails to report the expected output for all the NVIDIA GPUs in your system, see NVIDIA AI Enterprise User Guide for troubleshooting steps.
The NVIDIA System Management Interface nvidia-smi also allows GPU monitoring using the following command:
$ nvidia-smi -l
This command switch adds a loop, automatically refreshing the display. The default refresh interval is 1 second.
Uninstalling the VIB#
Run
esxclito determine the name of the vGPU driver bundle.$ esxcli software vib list | grep -i nvidia NVIDIA-VMware_ESXi_7.0.2_Driver 470.80-1OEM.702.0.0.17630552
Run the following command to uninstall the drive package.
$ esxcli software vib remove -n NVIDIA-VMware_ESXi_7.0_Host_Driver --maintenance-mode
the following message displays if the uninstall process is successful.
1Removal Result
2Message: Operation finished successfully.
3Reboot Required: false
4VIBs Installed:
5VIBs Removed: NVIDIA-VMware_ESXi_7.0_Host_Driver-460.73.02-1OEM.700.0.0.15525992
6VIBs Skipped:
Reboot the host to complete the uninstall of the vGPU Manager.
Changing the Default Graphics Type in VMware vSphere 6.5 and Later#
The vGPU Manager VIBs for VMware vSphere 6.5 later provides vSGA and vGPU functionality in a single VIB. After the VIB is installed, the default graphics type is Shared, which provides vSGA functionality. To enable vGPU support for VMs in VMware vSphere 6.5, you must change the default graphics type to Shared Direct. If you do not modify the default graphics type, VMs to which a vGPU is assigned fail to start, and the following error message is displayed:
Note
If you are using a supported version of VMware vSphere earlier than 6.5, or are configuring a VM to use vSGA, omit this task.
Change the default graphics type before configuring vGPU. Output from the VM console in the VMware vSphere Web Client is unavailable for VMs running vGPU. Before changing the default graphics type, ensure that the ESXi host is running and that all VMs on the host is powered off.
Log in to vCenter Server by using the vSphere Web Client.
In the navigation tree, select your ESXi host and click the Configure tab.
From the menu, choose Graphics and then click the Host Graphics tab.
On the Host Graphics tab, click Edit.
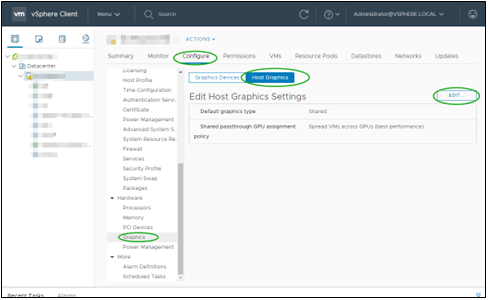
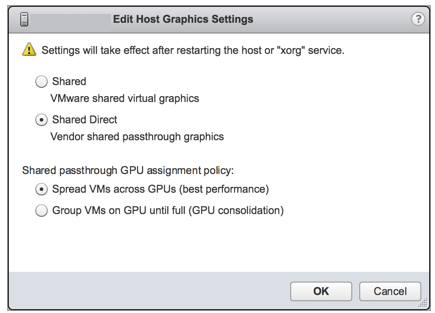
In the Edit Host Graphics Settings window box that opens, select Shared Direct and click OK.
Note
This dialog box also lets you change the allocation scheme for vGPU-enabled VMs. For more information, see Modifying GPU Allocation Policy on VMware vSphere.
After you click OK, the default graphics type changes to Shared Direct.
Restart the ESXi host or stop and restart the Xorg service and nv-hostengine on the ESXi hos
To stop and restart the Xorg service and nv-hostengine, perform these steps:
Stop the Xorg service.
[root@esxi:~] /etc/init.d/xorg stop
Stop nv-hostengine.
[root@esxi:~] nv-hostengine -t
Wait for 1 second to allow nv-hostengine to stop.
Start nv-hostengine.
[root@esxi:~] nv-hostengine -d
Start the Xorg service
[root@esxi:~] /etc/init.d/xorg star
After changing the default graphics type, configure vGPU as needed in Configuring a vSphere VM with Virtual GPU.
See also the following topics in VMware vSphere documentation:
Changing the vGPU Scheduling Policy#
GPUs starting with the NVIDIA Maxwell™ graphic architecture implement a best-effort vGPU scheduler that aims to balance performance across vGPUs. The best effort scheduler allows a vGPU to use GPU processing cycles that are not being used by other vGPUs. Under some circumstances, a VM running a graphics-intensive application may adversely affect graphics-light applic performance in other VMs.
GPUs, starting with the NVIDIA Pascal™ architecture, also support equal share and fixed share vGPU schedulers. These schedulers limit GPU processing cycles used by a vGPU which prevents graphics-intensive applications running in one VM from affecting the performance of graphics-light applications running in other VMs. The best effort scheduler is the default scheduler for all supported GPU architectures.
vGPU Scheduling Policies#
In this section, the three NVIDIA vGPU scheduling policies are defined. The vGPU scheduling policy is designed to fully use the GPU by balancing processes during GPU availability and unavailability. The overall intent of the three vGPU scheduling policies is to keep the GPU efficient, fast, and fair.
Best effort scheduling provides consistent performance at a larger scale and reduces the TCO per user. The best effort scheduler leverages a round-robin scheduling algorithm, which shares GPU resources based on actual demand, optimally utilizing resources. This results in consistent performance with optimized user density. The best effort scheduling policy best uses the GPU during idle and not fully utilized times, allowing for optimized density and a good QoS.
Fixed share scheduling always guarantees the same dedicated quality of service. The fixed share scheduling policies guarantee equal GPU performance across all vGPUs sharing the same physical GPU. Dedicated quality of service simplifies a POC. It also common benchmarks to measure physical workstation performance, such as SPECviewperf, to compare the performance with current physical or virtual workstations.
Equal share scheduling provides equal GPU resources to each running VM. As vGPUs are added or removed, the share of GPU processing cycles allocated changes, accordingly, resulting in performance to increase when utilization is low and decrease when utilization is high.
Organizations typically leverage the best effort GPU scheduler policy for their deployment to achieve better utilization of the GPU, which usually results in supporting more users per server with a lower quality of service (QoS) and better TCO per user. Additional information regarding GPU scheduling can be found here.
RmPVMRL Registry key#
The RmPVMRL registry key sets the scheduling policy for NVIDIA vGPUs.
Note
You can change the vGPU scheduling policy only on GPUs based on the Pascal, Volta, Turing, and Ampere architectures.
Value |
Meaning |
|---|---|
|
Best effort scheduler |
|
Equal share scheduler with the default time slice length |
|
Equal share scheduler with a user-defined time slice length |
|
Fixed share scheduler with the default time slice length |
|
Fixed share scheduler with a user-defined time slice length |
Examples The default time slice length depends on the maximum number of vGPUs per physical GPU allowed for the vGPU type.
Maximum Number of vGPU |
Default Time Slice Length |
|---|---|
Less than or Equal to 8 |
2 ms |
Greater than 8 |
1 ms |
TT
Two hexadecimal digits in the range 01 to 1E that set the length of the time slice in milliseconds (ms) for the equal share and fixed share schedulers. The minimum length is 1 ms, and the maximum length is 30 ms.
If
TTis 00, the length is set to the default length for the vGPU type.If
TTis greater than 1E, the length is set to 30 ms.
Examples
This example sets the vGPU scheduler to equal share scheduler with the default time slice length.
RmPVMRL=0x01
This example sets the vGPU scheduler to equal share scheduler with a time slice that is 3 ms long.
RmPVMRL=0x00030001
This example sets the vGPU scheduler to a fixed share scheduler with the default time slice length.
RmPVMRL=0x11
This example sets the vGPU scheduler to a fixed share scheduler with a time slice that is 24 (0x18) ms long.
RmPVMRL=0x00180011
Changing the vGPU Scheduling Policy for All GPUs#
Perform this task in your hypervisor command shell.
Open a command shell as the root user on your hypervisor host machine. You can use a secure shell (SSH) on all supported hypervisors for this purpose.
Set the
RmPVMRLregistry key to the value that sets the GPU scheduling policy that you want.Use the
esxclicommand:esxcli system module parameters set -m nvidia -p "NVreg_RegistryDwords=RmPVMRL=value"
Where <value> is the value that sets the vGPU scheduling policy you want, for example:
0x00- (default) - Best Effort Scheduler
0x01- Equal Share Scheduler with the default time slice length
0x00030001- Equal Share Scheduler with a time slice of 3 ms
0x11- Fixed Share Scheduler with the default time slice length
0x00180011- Fixed Share Scheduler with a time slice of 24 ms (0x18)
To review: the default time slice length depends on the maximum number of vGPUs per physical GPU allowed for the vGPU type:
Maximum Number of vGPU |
Default Time Slice Length |
|---|---|
Less than or Equal to 8 |
2 ms |
Greater than 8 |
1 ms |
Note
Confirm that the scheduling behavior was changed as explained in Getting the Current Time-Sliced vGPU Scheduling Behavior for All GPUs.
Changing the vGPU Scheduling Policy for Select GPUs#
Perform this task in your hypervisor command shell:
Open a command shell as the root user on your hypervisor host machine. On all supported hypervisors, you can use the secure shell (SSH) for this purpose.
Use the
lspcicommand to obtain the PCI domain and bus/device/function (BDF) of each GPU for which you want to change the scheduling behavior.Pipe the output of
lspcito thegrepcommand to display information only for NVIDIA GPUs.# lspci | grep NVIDIAThe NVIDIA GPU listed in this example has the PCI domain
0000and BDF3f:00.0.On VMware vSphere, use the
esxcliset command.# esxcli system module parameters set -m nvidia \ -p "NVreg_RegistryDwordsPerDevice=pci=pci-domain:pci-bdf;RmPVMRL=value\ [;pci=pci-domain:pci-bdf;RmPVMRL=value...]"For each GPU, provide the following information:
pci-domain - The PCI domain of the GPU.
pci-bdf - The PCI device BDF of the GPU.
value - The value that sets the GPU scheduling policy and the length of the tie slice you want. For example:
0x00- (default) - Best Effort Scheduler0x01- Equal Share Scheduler with the default time slice length0x00030001- Equal Share Scheduler with a time slice of 3 ms0x11- Fixed Share Scheduler with the default time slice length0x00180011- Fixed Share Scheduler with a time slice of 24 ms (0x18)For all supported values, see RmPVMRL Registry Key.
This example adds an entry to the
/etc/modprobe.d/nvidia.conffile to change the scheduling behavior of two GPUs as follows:For the GPU at PCI domain
0000and BDF85:00.0, the vGPU scheduling policy is set to Equal Share Scheduler.For the GPU at PCI domain
0000and BDF86:00.0, the vGPU scheduling policy is set to Fixed Share Scheduler.
options nvidia NVreg_RegistryDwordsPerDevice= "pci=0000:85:00.0;RmPVMRL=0x01;pci=0000:86:00.0;RmPVMRL=0x11"
Reboot your hypervisor host machine.
Note
Confirm that the scheduling behavior was changed as explained in Getting the Current Time-Sliced vGPU Scheduling Behavior for All GPUs.
Restoring Default vGPU Scheduling Policies#
Perform this task in your hypervisor command shell.
Open a command shell as the root user on your hypervisor host machine. You can use a secure shell (SSH) on all supported hypervisors for this purpose.
Unset the
RmPVMRLregistry key.Set the module parameter to an empty string.
# esxcli system module parameters set -m nvidia -p "module-parameter="module-parameter
The module parameter to set, which depends on whether the scheduling behavior was changed for all GPUs or select GPUs:
For all GPUs, set the
NVreg_RegistryDwordsmodule parameter.For all GPUs, set the
NVreg_RegistryDwordsmodule parameter.
For example, to restore default vGPU scheduler settings after they were changed for all GPUs, enter this command:
# esxcli system module parameters set -m nvidia -p "NVreg_RegistryDwords="Reboot your hypervisor host machine.
Disabling and Enabling ECC Memory#
Some NVIDIA GPUs support error-correcting code (ECC) memory with NVIDIA vGPU software. ECC memory improves data integrity by detecting and handling double-bit errors. However, not all GPUs, vGPU types, and hypervisor software versions support ECC memory with NVIDIA vGPU. Refer to the NVIDIA Virtual GPU Software Documentation for detailed information about ECC Memory.
Note
Enabling ECC memory has a 1/15 overhead cost because it uses the GPU VRAM to store the ECC bits —resulting in a less usable frame buffer for the vGPU.
On GPUs that support ECC memory with NVIDIA vGPU, ECC memory is supported with C-series and Q-series vGPUs, but not with A-series and B-series vGPUs. Although A-series and B-series vGPUs start on physical GPUs on which ECC memory is enabled, enabling ECC with vGPUs that do not support it might incur some costs.
On physical GPUs that do not have HBM2 memory, the amount of frame buffer usable by vGPUs is reduced. All types of vGPU are affected, not just vGPUs that support ECC memory.
The effects of enabling ECC memory on a physical GPU are as follows:
ECC memory is exposed as a feature on all supported vGPUs on the physical GPU.
In VMs that support ECC memory, ECC memory is enabled, with the option to disable ECC in the VM.
ECC memory can be enabled or disabled for individual VMs. Enabling or disabling ECC memory in a VM does not affect the amount of frame buffer usable by the vGPUs
GPUs based on the Pascal GPU architecture and later GPU architectures support ECC memory with NVIDIA vGPU. These GPUs are supplied with ECC memory enabled.
Some hypervisor software versions do not support ECC memory with NVIDIA vGPU.
If you use a hypervisor software version or GPU that does not support ECC memory with NVIDIA vGPU and ECC memory is enabled, NVIDIA vGPU fails to start. In this situation, you must ensure that ECC memory is disabled on all GPUs using NVIDIA vGPU.
Disabling ECC Memory#
If ECC memory is unsuitable for your workloads but is enabled on your GPUs, disable it. You must also ensure that ECC memory is disabled on all GPUs if you use NVIDIA vGPU with a hypervisor software version or a GPU that does not support ECC memory with NVIDIA vGPU. If your hypervisor software version or GPU does not support ECC memory and ECC memory is enabled, NVIDIA vGPU fails to start.
Where to perform this task depends on whether you are changing ECC memory settings for a physical GPU or a vGPU.
For a physical GPU, perform this task from the hypervisor host.
For a vGPU, perform this task from the VM to which the vGPU is assigned.
Note
ECC memory must be enabled on the physical GPU where the vGPUs reside.
Before you begin, ensure that NVIDIA Virtual GPU Manager is installed on your hypervisor. If you are changing ECC memory settings for a vGPU, ensure that the NVIDIA vGPU software graphics driver is installed in the VM to which the vGPU is assigned.
Use
nvidia-smito list the status of all physical GPUs or vGPUs, and check for ECC noted as enabled.# nvidia-smi -q ==============NVSMI LOG============== Timestamp : Fri Dec 3 20:33:42 2021 Driver Version : 470.80 Attached GPUs : 5 GPU 00000000:3F:00.0 [...] Ecc Mode Current : Enabled Pending : Enabled [...]
Change the ECC status to off for each GPU for which ECC is enabled.
If you want to change the ECC status to off for all GPUs on your host machine or vGPUs assigned to the VM, run this command:
# nvidia-smi -e 0If you want to change the ECC status to off for a specific GPU or vGPU, run this command:
# nvidia-smi -i id -e 0
idis the index of the GPU or vGPU as reported by nvidia-smi.This example disables ECC for the GPU with index 0000:02:00.0.
# nvidia-smi -i 0000:02:00.0 -e 0Reboot the host or restart the VM.
Confirm that ECC is now disabled for the GPU or vGPU.
        # nvidia-smi -q

==============NVSMI LOG==============

Timestamp                                 : Fri Dec  3 20:38:42 2021
Driver Version                            : 470.80

Attached GPUs                             : 5
GPU 00000000:3F:00.0

[...]

   Ecc Mode
        Current                           : Disabled
        Pending                           : Disabled

[...]
Enabling ECC Memory#
If ECC memory is suitable for your workloads and is supported by your hypervisor software and GPUs, but is disabled on your GPUs or vGPUs, enable it.
Where this task is performed depends on whether you are changing ECC memory settings for a physical GPU or a vGPU.
For a physical GPU, perform this task from the hypervisor host.
For a vGPU, perform this task from the VM to which the vGPU is assigned.
Note
ECC memory must be enabled on the physical GPU where the vGPUs reside.
Before you begin, ensure that NVIDIA Virtual GPU Manager is installed on your hypervisor. If you are changing ECC memory settings for a vGPU, ensure that the NVIDIA vGPU software graphics driver is installed in the VM to which the vGPU is assigned.
Use
nvidia-smito list the status of all physical GPUs or vGPUs, and check for ECC noted as disabled.# nvidia-smi -q ==============NVSMI LOG============== Timestamp : Fri Dec 3 20:45:42 2021 Driver Version : 470.80 Attached GPUs : 5 GPU 00000000:3F:00.0 [...] Ecc Mode Current : Disabled Pending : Disabled [...]
Change the ECC status to off for each GPU for which ECC is enabled.
If you want to change the ECC status to off for all GPUs on your host machine or vGPUs assigned to the VM, run this command:
# nvidia-smi -e 0If you want to change the ECC status to off for a specific GPU or vGPU, run this command:
# nvidia-smi -i id -e 0
idis the index of the GPU or vGPU as reported by nvidia-smi.This example disables ECC for the GPU with index 0000:02:00.0.
# nvidia-smi -i 0000:02:00.0 -e 0Reboot the host or restart the VM.
Confirm that ECC is now Enabled for the GPU or vGPU.
        # nvidia-smi -q

==============NVSMI LOG==============

Timestamp                                 : Fri Dec  3 20:50:42 2021
Driver Version                            : 470.80

Attached GPUs                             : 5
GPU 00000000:3F:00.0

[...]

   Ecc Mode
        Current                           : Enabled
        Pending                           : Enabled

[...]
