Enterprise Nucleus Cache#
Overview#
An Enterprise Nucleus Cache is a service that helps speed up your users by keeping their data closer to them and avoiding the need to download files over potentially slow connections. This feature additionally helps remove the overhead on the primary Nucleus server, thus allowing even more users to work much faster.
Nucleus Cache can be installed on an Enterprise Nucleus Server or installed stand-alone as it does not require any functionality from Nucleus itself.
Designing your Cache Infrastructure#
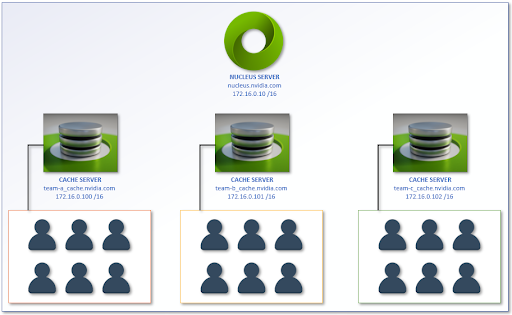
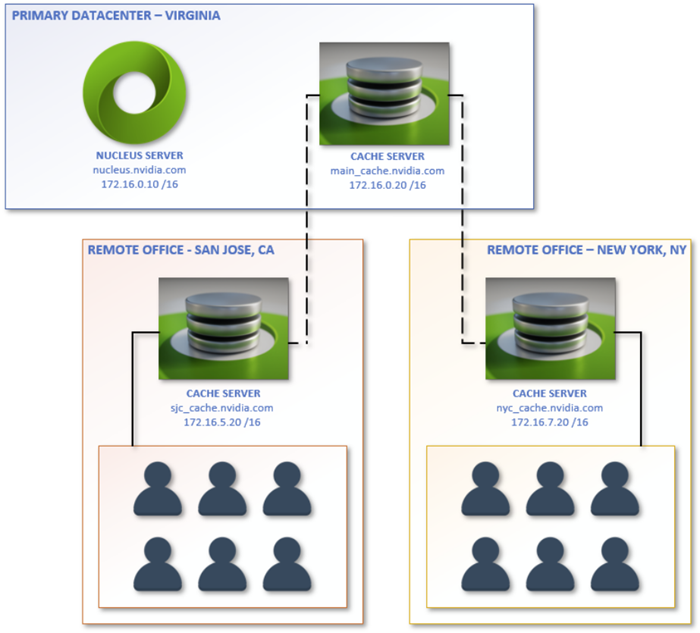
When designing your Cache Infrastructure, it is important to remember that well placed Caches will optimize traffic and provide the best performance and experience for your Omniverse users. Below are examples of different Cache Infrastructures and the methodology behind them:
This example shows three different teams connecting to the same Nucleus Server, however each has its own dedicated Cache. As users work with files from the Nucleus server, they are cached locally within their dedicated Cache, which accelerates access to those files for all users configured to use that Cache.

This example shows two different teams connecting to the same Nucleus Server, however not only does each team have its own dedicated Cache, there is an additional shared/chained Cache between both teams. As individual users work with files from the Nucleus server, they are cached locally within their dedicated Cache and on the shared/chained Cache which accelerates access to those files across both teams. Chaining Caches together provides quicker access to the files and improves performance for both teams.
Note
There are no limitations on how many Caches can be chained together.

Prerequisites#
To install and configure the Nucleus Cache properly, the following requirements must be met:
For the updated list of compatible host operating systems and Docker versions for running an Enterprise Nucleus Cache, click here.
Disable the local firewall on the host to allow full connectivity. (Many Linux distributions enable the local firewall (ufw, firewalld) by default.)
Disable SELinux (if enabled).
The Enterprise Nucleus Cache Docker artifacts have been downloaded from the NVIDIA Licensing Portal (NLP).
If SSL/TLS encryption is required, obtain the proper certificates and private key.
Installing Docker#
Refer to the Docker Installation guide for comprehensive installation instructions.
Warning
Running an Enterprise Nucleus Cache under a Windows environment, using either Nano Server or WSL (Windows Subsystem for Linux), is not supported.
Unpacking Nucleus Cache#
Once all the prerequisites have been met, the following unpacking steps can be completed:
Upload/Copy the Nucleus Cache package to the target server
Create a new folder for the Nucleus Cache:
$ sudo mkdir /opt/ove
$ sudo mkdir /opt/ove/cache
Extract the Nucleus Cache package to this new folder:
$ sudo tar xzvf nucleus-cache-2022.1.0.tar.gz -C /opt/ove/cache --strip-components=1
Caution
The filename(s) and versions are current at the time of publication. Adjust all commands to reflect the version of the Enterprise Nucleus Cache you are installing.
Configuring Nucleus Cache#
All configuration options are contained within the nucleus-cache.env file. This is the only file that needs to be edited for a proper working environment. For these examples, nano will be used as the text editor.
Open the nucleus-cache.env file within nano:
$ cd /opt/ove/cache
$ sudo nano -w nucleus-cache.env
Uncomment the End-User License Agreement (EULA):
# Uncomment to indicate your acceptance of EULA
ACCEPT_EULA=1
The Data Directory is where the Nucleus Cache files will be stored. The default location is set to:
DATA_ROOT=/var/lib/omni/nucleus-cache-data
This can be set to any available path on your Nucleus Cache server. Ensure that the set location has adequate available space.
The communication between the Clients and Applications and the Nucleus Cache can be encrypted using SSL/TLS. (This is optional, however recommended.) If you do not wish to enable this, this section can be skipped. If you do want to enable SSL/TLS, follow these steps:
Enable SSL:
SSL_ENABLED=1
Specify the certificates to be used: (Certificates below are for example only.)
SSL_CERT=/etc/ssl/cache/cache.cert
SSL_KEY=/etc/ssl/private/cache.key
If your SSL/TLS certificate key file is protected with a password, specify it below. If it is not protected, leave this field blank.
Note
If you are enabling SSL/TLS for Nucleus Cache and are chaining the Caches together, all Caches must have SSL/TLS enabled and configured properly. You may need to provide the full certificate chain, depending on your issuing CA. Nucleus Cache requires all of your certificates to be contained within a single file, and best practices suggest that they are in the following order: Domain Cert > Interim Cert > CA Cert.
Cache compression is enabled by default and should be used for slower networks.
ALLOW_COMPRESSION=1
If compression is not required, it can be disabled:
ALLOW_COMPRESSION=0
If the required configuration requires Cache’s to be chained together for efficiency, specify the upstream cache’s hostname, Fully Qualified Domain Name (FQDN), or IP Address. (See Appendix A for more information on Upstream/Chained Caches.)
UPSTREAM_CACHE=
If the configuration has compression enabled, keep the upstream cache compression options enabled as well. (If compression was disabled, these options must be disabled as well.)
UPSTREAM_CACHE_COMPRESSION=1
UPSTREAM_REMOTES_COMPRESSION=1
Nucleus Cache is configured to automatically clean up/rotate once a disk size threshold is reached. There are two parameters within the nucleus-cache.env file that control this behavior:
MAX_CACHE_SIZE_GIGS_PER_UPSTREAM=500
Once the cache meets this threshold, the cleanup process will start. As the process is asynchronous, the actual total possible max footprint of this Cache may be slightly larger than the amount configured.
MIN_CACHE_SIZE_GIGS_PER_UPSTREAM=250
This is the amount of space left occupied by the cache after cleanup.
Note
The sizes configured above are per upstream Nucleus Server. For example, if this Cache will be used by users accessing two Nucleus instances, the total usage can be double the configured value.
Nucleus Cache supports pre-warming, which proactively pre-caches content that an administrator knows will be in high demand, providing faster file access to Omniverse users. (See Appendix B for more information on Cache Pre-Warming.)
Pre-warming configuration is disabled by default.
To configure Cache pre-warming, first create an account within the Nucleus server that this Cache serves, then uncomment and edit the options below:
#PREHEAT_CONFIG = "
#- name: server-one          # Unique Name for your Nucleus server
#  url: sampledomain.com     # IP or hostname of the Nucleus server
#  user: username            # Login for server above
#  password: password        # Password for server above
#  paths:                    # List of paths to keep warm
#    - /some/path/1
#    - /some/path/2
#  interval: 3600            # How often (in seconds) to refresh
#"
When this Docker package starts on the server, it builds an internal network for its containers. By default, the 192.168.2.64/26 subnet is used. If this conflicts with the host network or other Nucleus service(s), specify an separate and unaffected range:
CONTAINER_SUBNET=192.168.2.64/26
By default, the Cache Services Port is TCP 8891 and the Prometheus Metrics port is set to TCP 9500. If using different ports is required, change them as needed:
CACHE_PORT=8891
METRICS_PORT=9500
Note
The remainder of the configuration options within the nucleus-cache.env file should not be changed.
Running Nucleus Cache#
Before running the service, pull the necessary containers to ensure all required software is locally available:
sudo docker-compose --env-file /opt/ove/cache/nucleus-cache.env -f /opt/ove/cache/nucleus-cache.yml pull
Once the software is pulled, it can be started:
sudo docker-compose --env-file /opt/ove/cache/nucleus-cache.env -f /opt/ove/cache/nucleus-cache.yml up
This will start the Nucleus Cache, however it will be running in non-daemon mode and will display output to the screen. Watch the output for 60 seconds to ensure that there are no errors or configuration warnings displayed.
Note
When specifying the Remote Cache Server, the hostname or Fully Qualified Domain Name (FQDN) and the port number MUST be specified. If you enabled SSL/TLS, the prefix of https:// must also be specified.
If the Nucleus Cache service fails to start or cannot be contacted, review the configuration and network connectivity between the Clients and the Cache Server.
If startup was successful, the Nucleus Cache can be configured to run in daemon mode.
Stop the Cache service by pressing CTRL+C which will cancel the running process. Restart the service in daemon mode using:
sudo docker-compose --env-file /opt/ove/cache/nucleus-cache.env -f /opt/ove/cache/nucleus-cache.yml up -d
Confirming Cache Functionality#
Once the Cache service has been started, review the logs in the DATA_ROOT/logs/ov_cache_server.log for any errors or failures. This log will also provide context information on Cache chaining. If the Cache cannot access an upstream chained Cache, an exception error will appear and resemble the following:
http.client_exceptions.ClientConnectorError: Cannot connect to host cache01555.nonexistant.omniverse.nvidia.com:8891
Note
For an error to be logged, a Client must be configured to use an upstream chained Cache. Upon the client accessing the Cache, the Caches will communicate and any/all connection issues will be reported.
To verify the pre-heat functionality is working correctly, view the DATA_ROOT/logs/access.log file. (The default folder location is: /var/lib/omni/nucleus-cache-data/logs.)
Based on the pre-heat interval configured, logs will be present and appear as follows:

Here, the cache is accessing (and warming) the sample-ping-image-10mb.png file from Nucleus host 172.31.95.10 every 600 seconds/10 minutes.
Additionally, once pre-warming is configured and services are started and functioning properly, a database and the cache files will be added to the Cache filesystem in the following location DATA_ROOT/data and will resemble the following:

Note
The example above shows a single Cache warming a single Nucleus server. If additional Nucleus servers are warmed by a single Cache, multiple folders will be created.
Troubleshooting#
If connections to the main Cache or any upstream Caches are failing, telnet to the port that you are trying to connect to from the computer that you are connecting from. (By default, telnet is not enabled within Windows and is sometimes not installed on Linux distributions.)
If a connection refused or similar message is displayed, check the following:
Ensure that the service is running and that you have not customized the port that the service is using.
Ensure that the service is bound to the correct IP Address within the configuration.
Ensure that there’s not a local firewall running on the server and/or a firewall blocking connections between the server and the workstation.
Appendix A: Upstream/Chained Caches#
As noted earlier in this document, Caches can be chained together using the following configuration:
UPSTREAM_CACHE=
To use this functionality, specify the upstream cache’s hostname, Fully Qualified Domain Name (FQDN), or IP Address.
When designing Cache chaining infrastructure, remember there are no limits on the number of upstream Caches that can be chained. A Cache can only be chained to a single upstream Cache, but an upstream Cache can support multiple downstream Caches.
Appendix B: Cache Pre-Warming#
To ensure that Omniverse users have access to the files they need quickly, Cache Pre-Warming can be configured where a remote Cache will log into your Nucleus Server and download and cache the files locally, bringing the files closer to the users.
Prior to editing config files on the Cache server, identify the following:
Nucleus file paths that you want to pre-warm
A Nucleus user that has appropriate permissions; you can create a user within the Navigator UI or use the Nucleus “Superuser” that is configured within the nucleus-stack.env file
Identifying the file paths
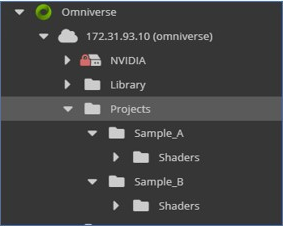
Log into Navigator and focus on the example file paths as shown below:

Cache pre-warming configuration#
For this example, its intended to warm both Shader folders under Sample_A and Sample_B. Within the nucleus-cache.env file, the required configuration is as follows:
PREHEAT_CONFIG = "
- name: server_01_nucleus           # Unique Name for your Nucleus server
  url: my_nucleus_svr.com           # IP/Hostname of the Nucleus server
  user: nuc_username                # Login for server above
  password: nuc_password            # Password for server above
  paths:                            # List of paths to keep warm
    - /Projects/Sample_A/Shaders
    - /Projects/Sample_B/Shaders
  interval: 3600                    # How often (in seconds) to refresh
"
It is possible to pre-warm folders residing on different Nucleus Servers utilizing a single Cache server. A sample configuration is shown below:
PREHEAT_CONFIG = "
- name: server_01_nucleus           # Unique Name for your Nucleus server
  url: my_nucleus_svr.com           # IP/Hostname of the Nucleus server
  user: nuc_username                # Login for server above
  password: nuc_password            # Password for server above
  paths:                            # List of paths to keep warm
    - /Projects/Sample_A/Shaders
  interval: 3600                    # How often (in seconds) to refresh


- name: server_02_nucleus           # Unique Name for your Nucleus server
  url: my_nucleus_svr2.com          # IP/Hostname of the Nucleus server
  user: nuc_username                # Login for server above
  password: nuc_password            # Password for server above
  paths:                            # List of paths to keep warm
    - /Projects/Sample_B/Shaders
  interval: 3600                    # How often (in seconds) to refresh
"
Note
For paths declarations as specified above, these are Nucleus file paths, not local file system paths within your Enterprise Nucleus Server. Note that paths are also case-sensitive.